Seting up remote access to Frigate NVR with Nginx Proxy Manager LXC on Proxmox

This took me a little while to piece together, so I thought I’d write it up here in case it’s of use to anyone else, or if I ever need to go through it again….

Background

I use Frigate to to access and manage my home CCTV cameras. It is awesome, and I would like to be able to access it securely from outside my local network/LAN.

I also use HomeAssistant (“HA”) to process the feeds and notifications from Frigate, but would like to directly access the Frigate web UI. I’ll keep HA mostly out of this post.

Setup

A quick overview on my current setup:

Nginx Proxy Manager running on a Proxmox host as an LXC

Homeassistant also on Proxmox but as a VM (HAOS)

– Frigate and MQTT run as Docker containers on Ubuntu, on an old HP Prodesk. I may eventually migrate these over to Proxmox too, but they are working happily on this device and there may be issue migrating them to a VM or LXC due to harware; I use a USB Coral TPU for processing, and while I know you can pass that through to an LXC or VM, I haven’t gotten around to it.

Installing Nginx Proxy Manager on Proxmox

Thanks to Proxmox and the amazing community scripts, this was very quick and easy. I used this script to deploy it as an LXC:

https://community-scripts.github.io/ProxmoxVE/scripts?id=nginxproxymanager

When that was completed I opened up a firewall rule on my router to allow traffic via HTTPS/443 to the new Nginx LXC’s address.

Configure Nginx Proxy Manager and Frigate

The next step – and the crux of this post – was to setup Nginx Proxy Manager to allow access through to Frigate and handle authentication:

  • create a new Proxy Host

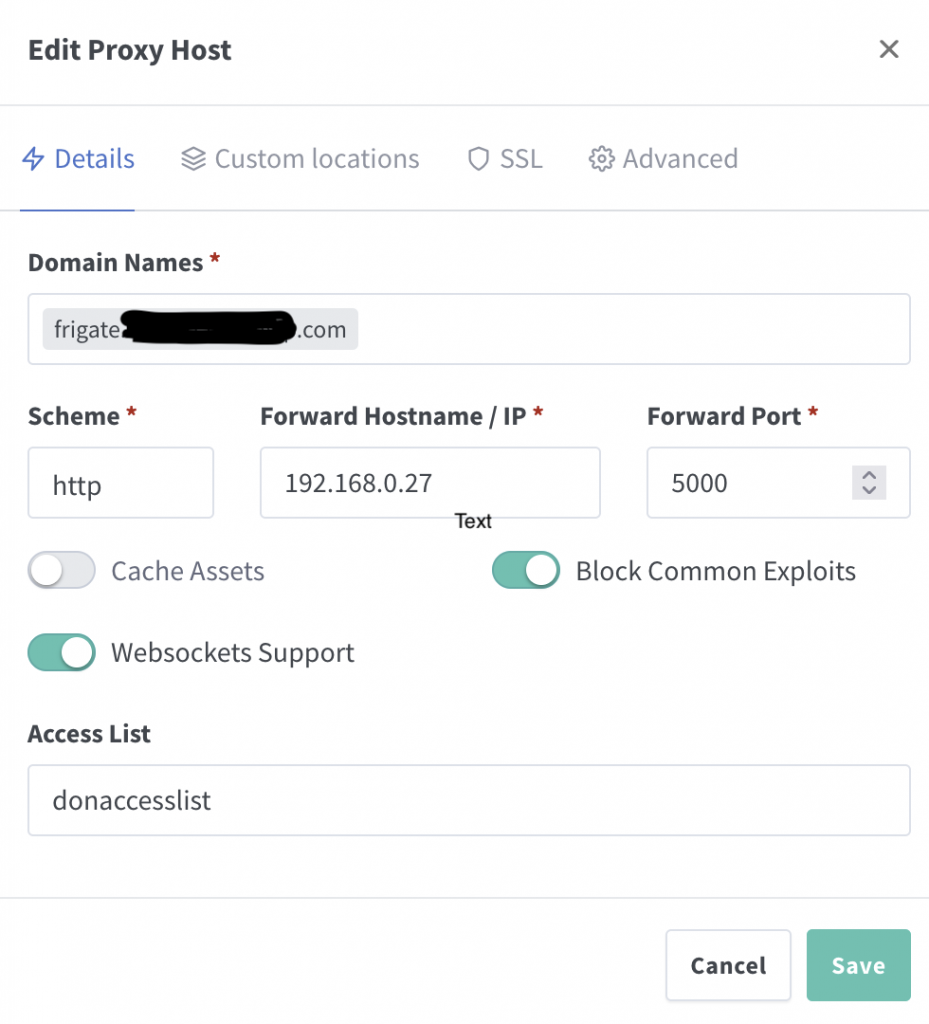
This is reasonably simple; specify a domain name that resolves to your host/router, then set the local IP your Frigate runs on and the port. I gather Websocket Suport is required, and you only need HTTPS here if your Frigate endpoint is using it. Nginx will serve this connection as HTTPS once setup to do so.

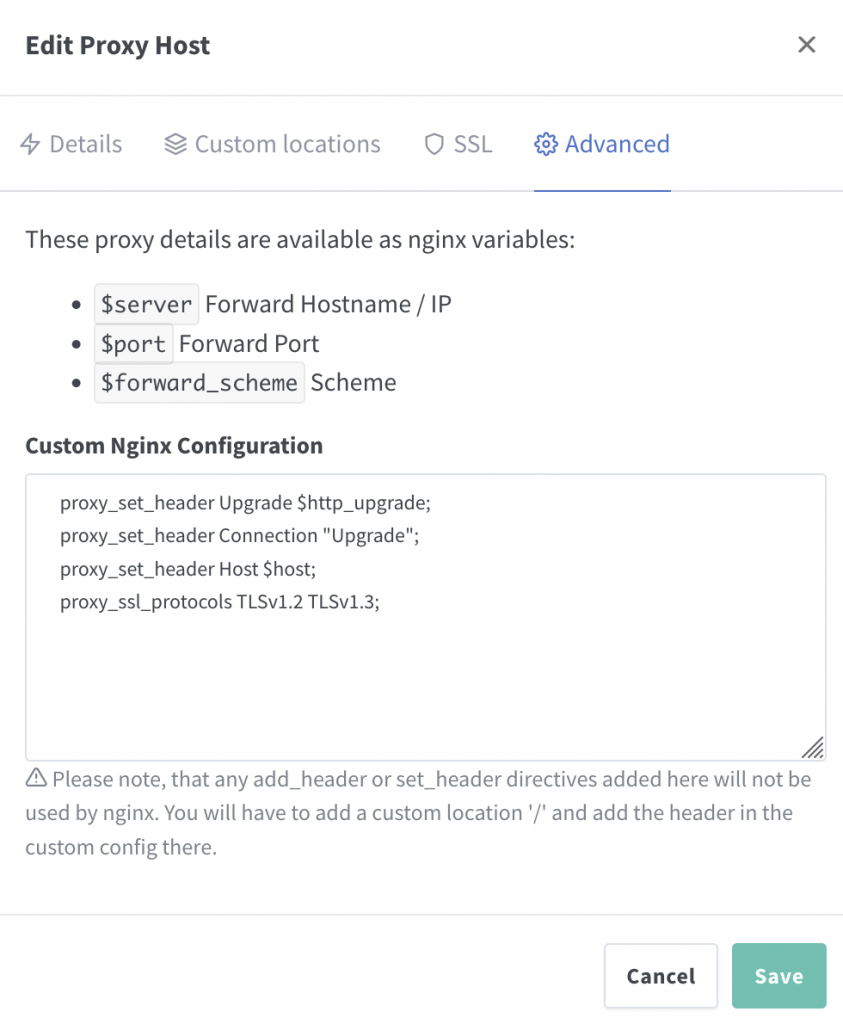
After some googling I found the following Nginx config was also recommended:

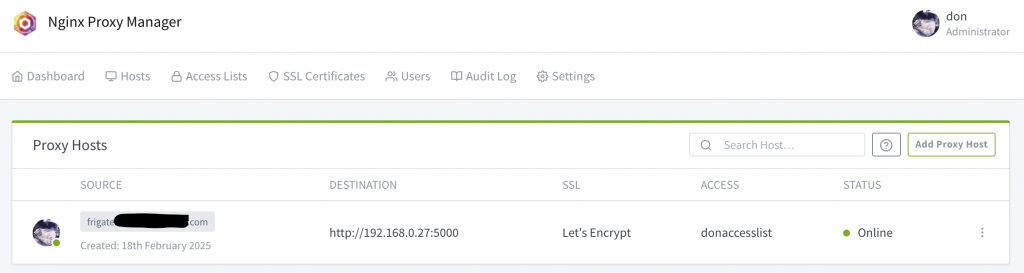
Once done, you should have an “Online” Proxy Host combining your domain name, your Frigate (destination) IP & listening port, with SSL option (I use Let’s Encrypt):

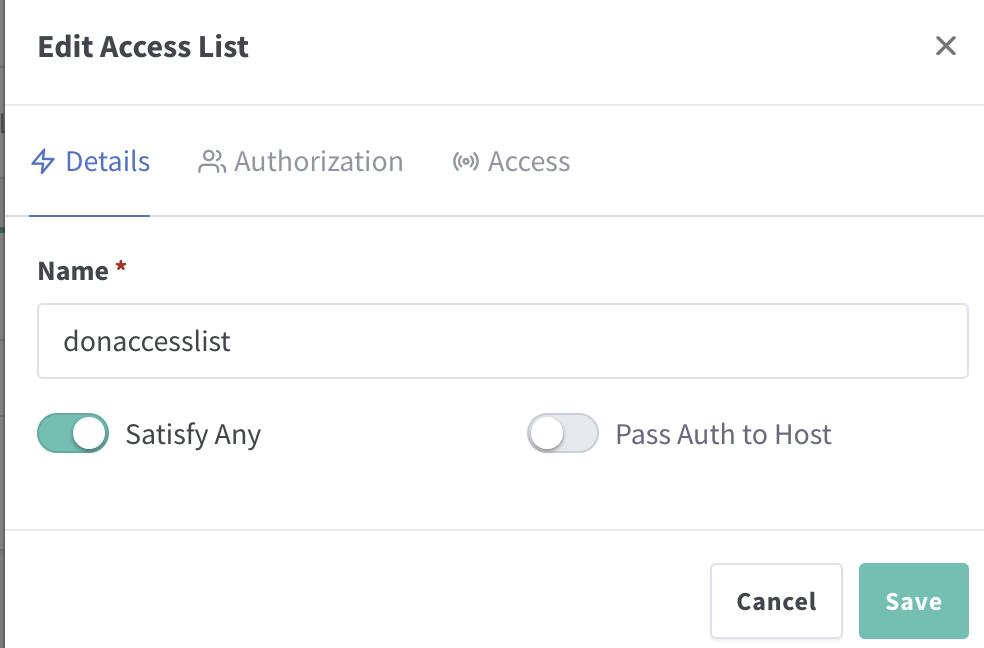
  • A simple Access List was defined prior to the above, just containing a user & password set under ‘Athorisation’. You will need to use these credentials to log in.
  • Frigate updates for TLS?
  • The trusted_proxies below were also recommended, but I didn’t need them in my case:


When I eventually got things working using port 8971 (instead of 5000) I was prompted for a login by Frigate, but I hadn’t set up auth in Frigate, just Nginx.

Nginx has the option to pass auth through to the destination, which may be nice, but for now I just disabled the feature in Frigate and after a restart things worked as expected, with the basic Nginx auth only:

auth:
  enabled: False
tls:
  enabled: false

It may be better/safer/nicer to have the auth passed through, enabled and managed in Frigate, along with TLS, but I haven’t done so yet.

  • port issues – 5000 or 8971?

When I was testing this I started off using port 8971 which is recommended here:
https://docs.frigate.video/configuration/authentication

This didn’t work for me; I then discovered I couldn’t connect to that port at all (even locally) so I went with 5000 initially as I knew that did work locally at least.

Eventually I realised that I’d never needed or opened up that port to my Frigate container! I updated my config to map port 8971 to 8971:

-p 8971:8971 

after that little oversight was corrected, it worked correctly!

When testing via a Browser (behind a VPN to emulate external access) I was prompted once for a login and then everything just worked; perfect!

I then went to check via my mobile phone, and that kept asking me to log in, with the message “Authorization required”


This was fixed by updating the Nginx Access List and setting “Satisfy Any” to be On/checked. That small change seems to have sorted the issue and everything now works perfectly on my phone too.

No Man’s Sky Save Editor on Mac

Quick notes on using the No Man’s Sky Save Editor on Mac

Make a local directory to install and keep the required files in

mkdir NMSEditor; cd NMSEditor 

download the jar file from the GitHub repo:

https://github.com/goatfungus/NMSSaveEditor/blob/master/NMSSaveEditor.jar

or if you’re happier using the command line:

curl -L -O https://github.com/goatfungus/NMSSaveEditor/raw/master/NMSSaveEditor.jar

Next, you need java installed to run the jar file with, the easist way for this (and for adding lots of other useful tools to your Mac) is to use HomeBrew, install instructions for that are here:

https://brew.sh/

When you’ve got brew setup, you can then install java with this command:

brew install java

As recommended by brew, then run the following (or similar, depending on your shell) to update your shell & path;

echo 'export PATH="/opt/homebrew/opt/openjdk/bin:$PATH"' >> ~/.zshrc

Remember to open a new shell/terminal session to pick up this change

NMS Save file location

The Steam save file location on Mac is the equivalent of this, you need to update for your user name and whatever your “st_xxx” numbers are…

/Users/<YOURUSERNAME>/Library/Application Support/HelloGames/NMS/st_<my_numbers>

to run the save editor, you can now just do:

java -jar NMSSaveEditor.jar 

when it opens, select the path to your save file based on the above, choose a save slot, modify as desired… and remember to take frequent backups

Storm Isha cleanup

Storm Isha left an obstacle that needed cleared up in a hurry, here are some pics!

In the early hours of the morning, blocking our way out past our neighbours farm at the end of our track:

This was the start of my “lunch break”:

Things went quickly, this was about half way through:


All packed up (nearly – I went back for those big bits later!) and off back to work with about 10 mins to spare….

Firefox on Mac issue – finally fixed!

This one caused me some grief for the last few weeks, thought I’d share in case it helps anyone else…

Firefox is my prefered browser on Mac, it’s setup with all my passwords, bookmarks, extensions etc and I use Chrome for work, so when it stopped loading and started crashing for no good reason it was VERY annoying. Couldn’t find any cure for it, little mention of issues and nothing more helpful than the usual: update it, restart, disable extensions, clear your profile, reinstall etc etc.

The issue being that Firefox would hang on startup – nothing would load, not even the basic home page, and I had to force-restart the browser on a regular basis until it would eventually decide to work like nomal again…. ARGH!

The solution to my issue was to disable support for HTTP3. That’s very easily done and has completely fixed things on my Mac (in this case it’s an iMac Retina 5k, 27-inch with macOS Monterey).

Here’s how – it takes 5 seconds + a restart.

enter “about:config” in the address bar and then hit the “Accept the Risk and Continue” button…

filter the settings for “http3” via the search bar, click on the bottom right icon seen in this pic to change the value from true to false:

so that it loks like this:

then just restart the browser and if you had the same issue as me, it should now be sorted! Happy surfing.

Update: There is a some more detailed info here:
https://bugzilla.mozilla.org/show_bug.cgi?id=1749908
incluing reports that disabling all of the data collection features may solve this (without the HTTP3 disabling update). Looks like this has been around for a while but only started affecting me a couple of weeks ago, and was hard to debug as there’s no obvious/searchable error message.

Installing APKs on Amazon Fire HD with ADB

My notes on “sideloading” APK files to an Amazon Fire TV HD using ADB.

I don’t do this often and had forgotten how, so this may help me out next time.

Getting and using Android Debug Bridge (adb)

Useful info here:

https://developer.android.com/studio/command-line/adb

download the stable binaries for Mac, linux or Windows from here:

https://developer.android.com/studio/releases/platform-tools

you can either add the location of the binaries to your PATH, or cd to them and run them directly like I did, e.g.

./adb help

Download the APK files you want to install

For example

https://smartyoutubetv.github.io/en/

or Kodi

https://mirrors.kodi.tv/releases/android/arm/

I put the downloaded APK files in the same dir as the adb tools to keep things very simple.

Connect to your Amazon Fire TV

Find the IP address of your Amazon Fire device from Network Settings (From Settings, go to Device (or My Fire TV) > About > Network), for example mine was 192.168.0.176.

Enable ADB debugging in your Amazon Fire device via Settings.

connect from client laptop/pc to Fire TV, for example:

./adb connect 192.168.0.176:5555

you can also list local devices:

donaldsimpson@Donalds-iMac adb-tools % ./adb devices
List of devices attached
192.168.0.176:5555 unauthorized
192.168.0.59:5555 unauthorized

Install APK to connected device

Once connected, installing a new app should be as simple as

./adb install yourapp.apk

Note that if you have multiple devices you may get this message:

➜ adb-tools ./adb install smartyoutubetv_latest.apk
Performing Push Install
adb: error: failed to get feature set: more than one device/emulator

check the list of attached devices:

➜ adb-tools ./adb devices
List of devices attached
G070VM1904950F5U device
192.168.0.18:5555 device

then specify the device you are aiming for with “-s <address:port>” like this:

➜ adb-tools ./adb -s 192.168.0.18:5555 install smartyoutubetv_latest.apk
Performing Streamed InstallSuccess

I also had this response at one point:

./adb install smartyoutubetv_latest.apk
Performing Push Install
adb: error: failed to get feature set: device unauthorized.
This adb server's $ADB_VENDOR_KEYS is not set
Try 'adb kill-server' if that seems wrong.
Otherwise check for a confirmation dialog on your device.

… the last line promoted me to look at the Fire TV screen and notice it was asking me to approve the connection request from my laptop.
Doh.
Once approved the app installed no problem:

./adb install smartyoutubetv_latest.apk
Performing Push Install
smartyoutubetv_latest.apk: 1 file pushed, 0 skipped. 3.3 MB/s (7901934 bytes in 2.261s)
pkg: /data/local/tmp/smartyoutubetv_latest.apk
Success

Also, when doing this:

./adb -s 192.168.0.88:5555 install FlixVision_v2.9.2r.apk
adb: device '192.168.0.88:5555' not found

despite adb appearing to connect, the device was listed as offline:

error: device offline

this again turned out to be the FireTV having prompted me for approval on-screen, which I didn’t see when connecting from my laptop.

Note to self – check for a dialog on-screen when having issues!

Updating an existing app

I’ve had an outdated Kodi install for ages and wanted to update that while I was here. The process is simple, just add an -r for “replace existing application”:

./adb install -r kodi-18.8-Leia-armeabi-v7a.apk
Performing Push Install
kodi-18.8-Leia-armeabi-v7a.apk: 1 file pushed, 0 skipped. 3.5 MB/s (63508040 bytes in 17.391s)
pkg: /data/local/tmp/kodi-18.8-Leia-armeabi-v7a.apk
Success

This went very smoothly, all my settings, connections and shares etc were still there after the upgrade, and it looks a lot nicer for it too.

That’s it – there’s a ton of useful info on other commands and options from

./adb help

I found some more useful info on connecting from ADB to Fire TV here:

https://developer.amazon.com/docs/fire-app-builder/connecting-adb-to-fire-tv.html

Starting up Kodi on Amazon FireTV remotely

After getting the above sorted out, I wanted to find a way to start Kodi on my FireTV without having to switch my projector on & off to do so.

I use Kodi as an AirPlay target for music during the day, and it switches itself off overnight. I could probably change that.

Using ADB tools, I connect to the device remotely, as before, with:

./adb connect 192.168.0.176:5555

though normally that comes back with “already connected to…

then start up Kodi using the “Android activity manager”, “am“:

./adb shell am start -n org.xbmc.kodi/.Splash

this takes a little while to start, but after about 30 seconds I can connect to the Kodi web interface on port 8080 of my FireTV, and the AirPlay target becomes available.

It looks like there are many other interesting things you can do with “am”.

Uninstalling packages with adb

List installed packages

./adb shell pm list packages

and filter for whatever you’re looking for (e.g. “guard“)

./adb shell pm list packages | grep -i guard

then unsinstall that package name:

./adb uninstall com.adguard.vpn

Update on smartyoutube to fix ads

Quick update specifically on Smart Youtube TV on Android. This was brought on by my initial install of Smart Youtube TV starting to show adverts (a lot).

I had installed Smart Youtube TV, version 6.17.739 (at time of writing this is still the latest stable release available) on my Android Fire – details above. This worked very well for months, but has started to not filter out youtube advertisements.

Having not found an update and while looking for another solution, I found “SmartTubeNext Beta”, which looks to be pretty stable and widely used, for a beta version:

https://www.apklinker.com/apk/liskovsoft/

From that site, it looks like around 4 months since SmartYouTube was updated, but SmartTubeNext is actively being developed, so could be worth a try – here’s how:

Get the latest smarttube beta APK (via wget, or download via browser from here: https://smartyoutubetv.github.io/)

wget https://github.com/yuliskov/SmartTubeNext/releases/download/latest/smarttube_beta.apk

connect to your Android device (update the IP to match yours):

./adb connect 192.168.0.176:5555

install the APK:

./adb -s 192.168.0.18:5555 install -r smarttube_beta.apk

All done.

I wasn’t sure if this would replace the existing SmartYouTube (which is why I added the -r switch that wasn’t necessary), but it’s ok: it’s installed as a different app so the stable version is kept and available should there be any issues with the beta version.

This version of SmartYoutube looks a lot better than the previoous/stable one.

List of improvements from their site:

  • 4K support
  • runs without Google Services
  • designed for TV screens
  • stock controller support
  • external keyboard support

Personally I really like the better controller support, and the overall look is much more suitable for a large screen. It’s also a lot more customisable. And, most importantly, it removes all the adverts.

Chicken

We had this awesome chicken for about 6 or 7 years, she was an amazing character, always stood out from the flock and did her own thing. She insisted on getting involved whenever I was doing anything outside, and used to run about 100m to greet me at the gate whenever I came home.

RIP funny bird.

HTTPS Certs for WordPress Multisite with Let’s Encrypt

Intro

This post looks at creating and maintaining HTTPS/SSL/TLS Certificates for multiple WordPress sites running on the same host.

Some background…

This website is one of several different domains/sites/blogs hosted on my single Google Cloud server, with one public IP address shared for all websites. I’m using WordPress Multisite to do this, based on a very well put together Appliance provided by Bitnami.

WordPress Multisite allows me to cheaply, easily and efficiently serve multiple sites from the one host and IP address, sharing the same host resources (CPU, Mem, Disk) which is great but makes seting up HTTPS/SSL Certificates a little different to the norm – the same cert has to validate multiple sites in multiple domains.

I’d banged my head against this for a while and looked at many different tools and tech (some of which are mentioned below) to try and sort this out previously, but finally settled on the following process which works very well for my situation.

There is some good info on why you may want SSL/TLS certificate for your website(s), background info and some popular providers reviewed: https://makeawebsitehub.com/free-ssl-tls-certificate/

“WordPress is the world’s most popular blogging and content management platform. With WordPress Multisite, conserve resources by managing multiple blogs and websites from the same server and interface.”

CERT PROVIDER

Let’s Encrypt is a free, automated, and open Certificate Authority created by the Linux Foundation in collaboration with the Internet Security Research Group. There are many other certificate providers available, but I’m using this one.

LEGO – the Let’s Encrypt Go Client

Here’s the high level plan:

  • Install the Lego client – see Step 1 here
  • Generate a Let’s Encrypt certificate for your domain
  • Configure the Web server to use the Let’s Encrypt certificate – see Apache or Nginx options on Bitnami site
  • Add a cron job to run every <90 days

I used this excellent Bitnami article to work through the process, it explains the steps in greater detail:

https://docs.bitnami.com/aws/how-to/generate-install-lets-encrypt-ssl/

Stop services

sudo /opt/bitnami/ctlscript.sh stop

Get/renew certificates

Once lego is set up, you can request multiple certs like this – just make sure to change the --domains="whatever" entries and add as many as you need. Remember all of your sub domains (www. etc) too.

sudo lego --tls --email="my@email.com"--domains="donaldsimpson.co.uk" --domains="www.donaldsimpson.co.uk" --domains="www.someothersite.com" --domains="someothersite.com" --path="/etc/lego" run

Noe you’ve got the certs, move them in to place and chmod them etc:

sudo mv /opt/bitnami/apache2/conf/server.crt /opt/bitnami/apache2/conf/server.crt.old
sudo mv /opt/bitnami/apache2/conf/server.key /opt/bitnami/apache2/conf/server.key.old
sudo mv /opt/bitnami/apache2/conf/server.csr /opt/bitnami/apache2/conf/server.csr.old
sudo ln -sf /opt/bitnami/letsencrypt/certificates/DOMAIN.key /opt/bitnami/apache2/conf/server.key
sudo ln -sf /opt/bitnami/letsencrypt/certificates/DOMAIN.crt /opt/bitnami/apache2/conf/server.crt
sudo chown root:root /opt/bitnami/apache2/conf/server*
sudo chmod 600 /opt/bitnami/apache2/conf/server*

Restart services

sudo /opt/bitnami/ctlscript.sh start

PLUGIN – JSM’s Force SSL / HTTPS

By this point I was happy that the nice new HTTPS certs were finally working reliably for all of my sites, but was aware that Google and external links would still try to get in through HTTP URLs.

After trying a few WordPress plugins that sounded like they should correct this neatly for me, I settled on JSM’s Force SSL/HTTPS plugin. As the name suggested, it quickly and easily redirects all incoming HTTP requests to HTTPS. It was simple to install and setup and works very well with WordPress Multisite too – thanks very much JSM!

CRONJOB

Now that the process works, the certificates need updated every 90 days which would be a bit of a pain to remember and do, so adding a simple script to a cron job saves some hassle.

OTHER OPTIONS and things I found interesting…

Many other clients are available, there’s a large list here:
https://letsencrypt.org/docs/client-options/

One of the more popular is Certbot: https://certbot.eff.org/

Tech links

SNI – Server Name Indication:
https://www.digicert.com/ssl-support/apache-multiple-ssl-certificates-using-sni.htm

SAN – Subject Alternative Name:
https://www.digicert.com/subject-alternative-name.htm

Kubernetes – with Minikube and Helm – part 2

This is the second half of the Kubernetes with Minikube and Helm presentation, the first half explains all of the steps we went through to get to this point, and is available here:

In this section we cover the following:

  • Helm and Tiller – what they are, when & why you’d maybe use them
  • Helm and Tiller – prep, install and Helm Charts
  • Deploying Jenkins via Helm Charts
  • and WordPress w/MariaDB too
  • Wrap up

The below are mostly my technical notes from this session, with some added blurb/explanation.

Helm and Tiller – what they are, when & why you’d maybe use them

From the Helm site:

“Helm helps you manage Kubernetes applications — Helm Charts help you define, install, and upgrade even the most complex Kubernetes application. Charts are easy to create, version, share, and publish — so start using Helm and stop the copy-and-paste.”

https://helm.sh/

Helm is basically a package manager for Kubernetes applications. You can choose from a large list of Stable (or not so!) ready made packages and use the Helm Charts to quickly and easily deploy them to your own Kubernetes Cluster.

This makes light work of some very complex deployment tasks, and it’s also possible to extend these ready-made charts to suit your needs, and to write your own Charts from scratch, or pass your own values to override default ones, or… many other interesting options!

For this session we are looking at installing Helm, reviewing some example Helm Charts and deploying a few “vanilla” ones to the cluster we created in the first half of the session. We also touch upon the life-cycle of Helm Charts – it’s similar to dockers – and point out some of the ways this could be extended and customised to suit your needs – more on this at a later date hopefully.

Helm and Tiller – prep, install and Helm Charts

First, installing Helm – it’s as easy as this, run on your laptop/host that’s running the Minikube k8s we setup earlier:

Get & chmod the get_helm script, then run it:

curl https://raw.githubusercontent.com/kubernetes/helm/master/scripts/get > get_helm.sh

chmod 700 get_helm.sh

./get_helm.sh

Tiller is the client part of Helm and is deployed inside your k8s cluster. It’s set to be removed with the release of Helm 3, but the basic functionality wont really change. More details here https://helm.sh/blog/helm-3-preview-pt1/

Next we do the Tiller prep & install – add RBAC for tiller, deploy via helm and take a look at the running pods:

kubectl create serviceaccount -n kube-system tiller

kubectl create clusterrolebinding tiller-cluster-rule --clusterrole=cluster-admin --serviceaccount=kube-system:tiller

helm init --service-account tiller

kubectl --namespace kube-system get pods

Helm Charts – look at the list of available stable Charts, then deploy a couple. The github repo is here

https://github.com/helm/charts

Update the local helm repo info:

helm repo update

then, for example, install Redis from its Helm Chart to the k8s cluster as easily as this:

helm install stable/redis

or helm install stable/mysql and check the console output that explains how to access the newly deployed app.

keep an eye on the pods to see what’s going on: watch kubectl get pods -o wide

Deploying Jenkins via Helm Charts

helm ls

helm delete <things you don't want any more to free up resources>

helm install --set serviceType=NodePort --name jenki stable/jenkins

again, watch kubectl get pods -o wide

now get the URL for the Jenkins service from Minikube:

minikube service --url=true jenki-jenkins

Hit that URL in your browser, and grab the password in UI from Pods > Jenki and log in to Jenkins with the user “admin”:

That’s a Jenkins instance deployed via Helm and Tiller and a Helm Chart to our Kubernetes Cluster running inside Minikube via a VirtualBox VM… all done in a few minutes. And it’s all customisable, repeatable, highly scaleable and awesome.

and WordPress w/MariaDB too

This was the “bonus demo” if my laptop wasn’t on fire – and thanks to some rapid cleaning up it managed fine – showing how quickly we could deploy a functional WordPress with MariaDB backend to our k8s cluster using the Helm Chart.

To prepare for this I did a helm ls to see all the things I had running. then helm delete --purge jenki, gave it a while to recover then had to do

kubectl delete pods <jenkinpod>

before starting the WordPress Chart deployment with

helm install --set serviceType=NodePort --name wp-k8s stable/wordpress

watch kubectl get pods -o wide for a while – note the chart is configured with the mariadb pod as a pre requisite of the wordpress instance:

Once it’s started we requested the service URL from Minikube again, making ingress nice and easy:

minikube service --url=true wp-k8s-wordpress

Hit that in the browser, using https and accepting the cert warning…

then logged in as `user` and qureied for the password in the k8s secret…

echo Password: $(kubectl get secret wp-k8s-wordpress -o
jsonpath="{.data.wordpress-password}" | base64 --decode)

and logged in to WordPress:

Wrap up

That’s it – we covered a lot in this session, and plan to use this as a platform to explore Helm in more detail later, writing our own Helm Charts and providing our own customisations to them.

minikube delete; rm -rf ~/.minikube

Cleans up everything we’d done:

Leaving just the local tools to remove if you want to – see the first half for a reminder.

Cheers,

Don

Update: this follow-on post runs through setting up Jenkins with Helm then creating Jenkins Pipelines that dynamically provision dockerised Jenkins Agents:

Milling Chilling and Flattening

Intro

Here are some pics and updates on my recent attempts at milling my own wood. This had been on my wood-related TODO list for a long time. The aim was to free up some room in my woodpile by creating planks that I can then try and make things out of – and to have some fun doing so.

All of the wood is local beech, I’m using up old trunks first but plan to do some green milling later, including milling another fallen tree with a nice straight trunk “in situ” then bringing the planks home to dry.

Tools & Setup

Chainsaw: you need a powerful chainsaw for milling, especially if you want to run a long enough bar to mill wider trunks, which I hope to do later. I really really wanted a large Husqvarna or Stihl but the cost for something of the right spec for this job was waaaay over my budget.

Searching for >60cc chainsaws I found this one by Parker:

https://www.amazon.co.uk/62CC-20-PETROL-CHAINSAW-CHAINS/dp/B00M9BBTT4

£80-odd quid for a 62cc Chinese chainsaw with 2 year guarantee and some extras bits ‘n pieces!?! Sounds far too good to be true, but further reading led me to reviews of similar cheap gear being used, mostly with good results, and folk referring to it as Chinese Milling, or “Chilling” 🙂

Bar & Chain: the 20″ bar that came with the Parker was ok but too small and the chains were cross-cut. I ordered a 28″ bar and Archer ripping chain from these guys – very happy with the parts and the service:

https://www.ebay.co.uk/str/chainsawbarsltd

Mill: there are some very cheap Chinese mill, bar & chain sets on eBay, but I went for this Eco Mill one which gets lots of good reviews:

https://www.frjonesandson.co.uk/products/eco-mill-36-chainsaw-mill/

Pics of the end result – cheapo Chinese saw, 28″ bar, ripping chain and EcoMill together:

First attempt

The first cut is not only the deepest, but the most important and most difficult too – I tried the old approach of screwing a straight plank to the top of the log, then running the saw/mill over this to give me a flat initial cut.

It went ok, but I think the log rolled a little towards the end – it was only small so easy done. This means that all subsequent cuts follow the same slight curve – the planks are still ok, but a lesson learned. These planks are narrow enough to run through my planer/thicknesser later anyway.

The waste/kerf from the ripping chain is noticeably smaller (narrower) and much finer than with a cross-cut chain. The saw runs surprisingly well and starts really easily. It makes a fair bit of noise but for the money it’s superb. I didn’t try to rush or force the cut, pretty much let the chain pull itself through, and I am very happy with the results.

Pics of the first small-scale test – the chicken was grudgingly impressed.

Second attempt

This time I tried using a bigger plank sitting on a crate at either end for the first cut, with the log sitting unattached underneath but secured with a load of wedges to stop it rolling/moving. This took longer to set up but worked much better.

Flattening Sled/Jig

Here are pics of a similar-ish setup I use to flatten large slabs. It’s a “jig” made from a couple of clamped planks (from my daughters old bed), with a “sled” made from a couple of 30mm angle iron sections joined together with Gorilla Tape & wooden blocks to keep it the right width and stop it coming off the rails. All of this keeps the router level while I run it from side to side, moving the sled up and down the jig to flatten the wood.

The router bit is a “1/2-Inch Shank 2-Inch Cutting Diameter Double Flute Carbide Tipped Cleaning Bottom Router Bit Cutter“… so there you go. It’s now done quite a lot of work and still cuts quickly and easily.

This setup is very versatile – I used it to create these too:

Random pics

Other stuff….

TODO: make something useful from those planks….

Three times tables

Pics of three tables I’ve made recently – all are from the same beech tree that fell over in the wind about 4 years ago.

Small

– this one is being used as a plant stand. It was narrow enough to fit through the 12″ thicknesser then was finished with a hand planer. The legs are beech branches.

Medium

– this one has some nice spalting lines around the edges. Flattening this was the first test of my home-made “router sled jig slab flattening contraption” (not sure what to call it, but it worked!) which I’ll post details of another time.

The hairpin legs were made by Designer Legs

Large

– this one weighs a ton and has some interesting features and curves.

It was initially cut from a massive log with a chainsaw “freestyle” as my milling setup wasn’t ready at the time. There are still 2 or three slightly wider and more uniform slabs still to come from the remains of this log, hopefully.

The “router-sled-jig-contraption” was used to flatten both sides, then it was sanded (and sanded and sanded again) to a very smooth finish and varnished with a tough matt glaze.

These three-prong hairpin legs were made by Designer Legs too.

Pin It on Pinterest