Installing Minecraft Forge and Pixelmon Mod

Notes on installing Minecraft Forge and setting up & running the Pixelmon Mod on Windows.


You need to have Minecraft installed first, then you can install Minecraft Forge which allows you to add-on and manage Minecraft Mods like Pixelmon.

There are 3 things you need:

1. Minecraft: https://minecraft.net/download
 – get the latest/current version and install it, if you haven’t already

2. Pixelmon: http://pixelmonmod.com/downloads.php
  – get the latest Recommended version; I’m going for 3.3.8, which works on Minecraft 1.7.10:

DownloadPixelmon

This should download “Pixelmon-1.7.10-3.3.7-universal.jar” or similar.

3. Minecraft Forge: http://files.minecraftforge.net/
 – open that link and download the “Installer-Win” version that matches the version of the Mod you are wanting to run – I wemt for Pixelmon 1.7.10 above, so I need the same version of Forge to run that – clicking the “*” link just after the “(Installer-Win) link as shown here should give you a direct download to the file you need:

Forgeor try this direct link http://files.minecraftforge.net/maven/net/minecraftforge/forge/1.7.10-10.13.2.1286/forge-1.7.10-10.13.2.1286-installer-win.exe


Once that’s downloaded run the exe and you should see a screen like this:

InstallClient_1

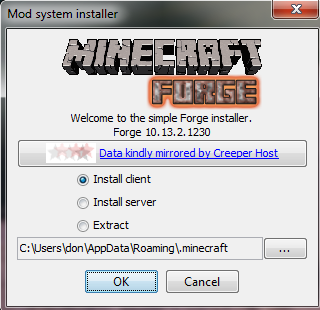
Leave the default “Install client” selected and take a note of the directory mentioned here (C:\Users\don\AppData\Roaming\.minecraft in my case) – this is your Minecraft install directory and you will need to know it later.

Install Java if required:

Forge_JRE1.6

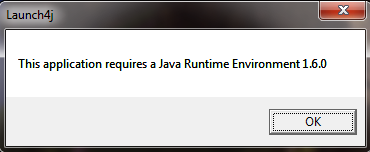
If you get the error message “This application requires a Java Runtime environment 1.6.0”, you need to install a Java runtime. Ok’ing the Launch4j message box should open a link to the Oracle website where you can install the latest version of Java (you don’t need 1.6 specifically).


If during the Forge installation you get the message “You need to run the version 1.7.10 manually at least once”:

Forge_InstallClient_2_RUNONCE
then start-up Minecraft, click on “Edit Profile” and select “release 1.7.10” from the “Use version:” dialog as shown here:

RunMinecraft1.7.10

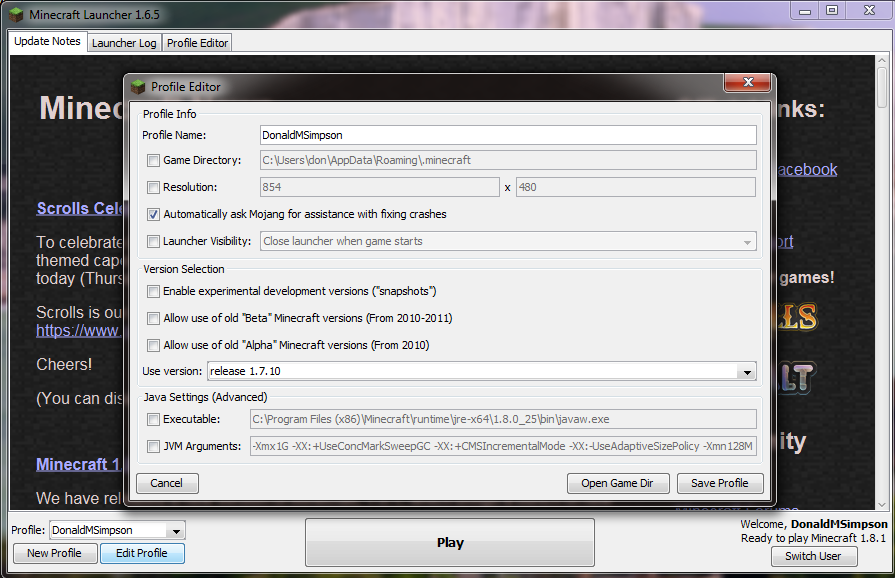
This step is needed as Forge creates a modified version of this specific version of Minecraft – running it once will make the Minecraft Launcher program download all of the files that are required for this version to work on your machine, which Forge will then use. Start up a normal Minecraft game using 1.7.10 then exit, and restart the Forge installation – it should work now. If you have played 1.7.10 before you should already have everything already though.


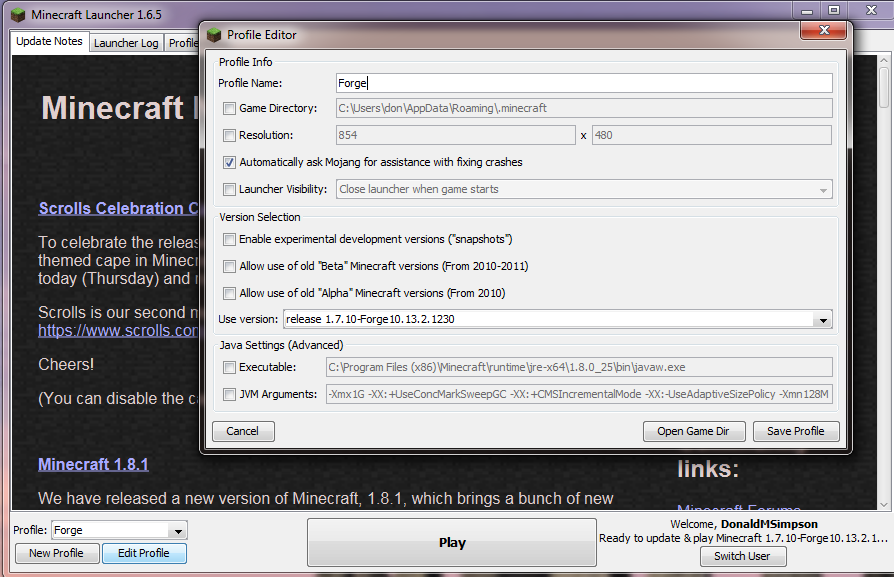
Once that’s done you should see a message saying something like “Successfully installed client profile Forge for version…” etc. Ok that and launch Minecraft again. You should now have a new Profile called “Forge” (see the dropdown box in the lower left corner), which you can select and Edit like this:

Forge_InstallClient_FirstPlay

You need to run Minecraft with the Forge profile whenever you want to play with a Mod, but you can select your normal profile to go back playing normal Minecraft.

Again, note that Game Directory location, and open it up in Windows Explorer:

ProfileDir_noMods

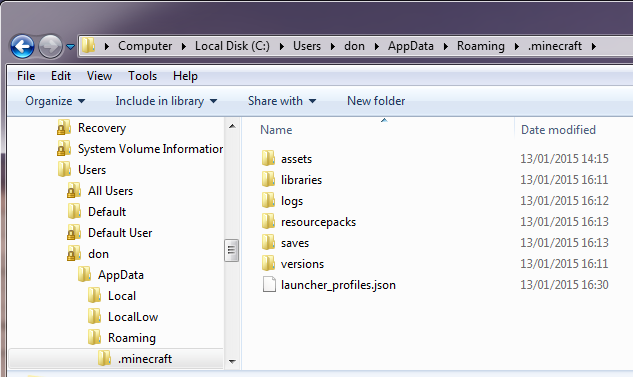
There is no “mods” directory there yet – this is created by Forge the first time it runs.
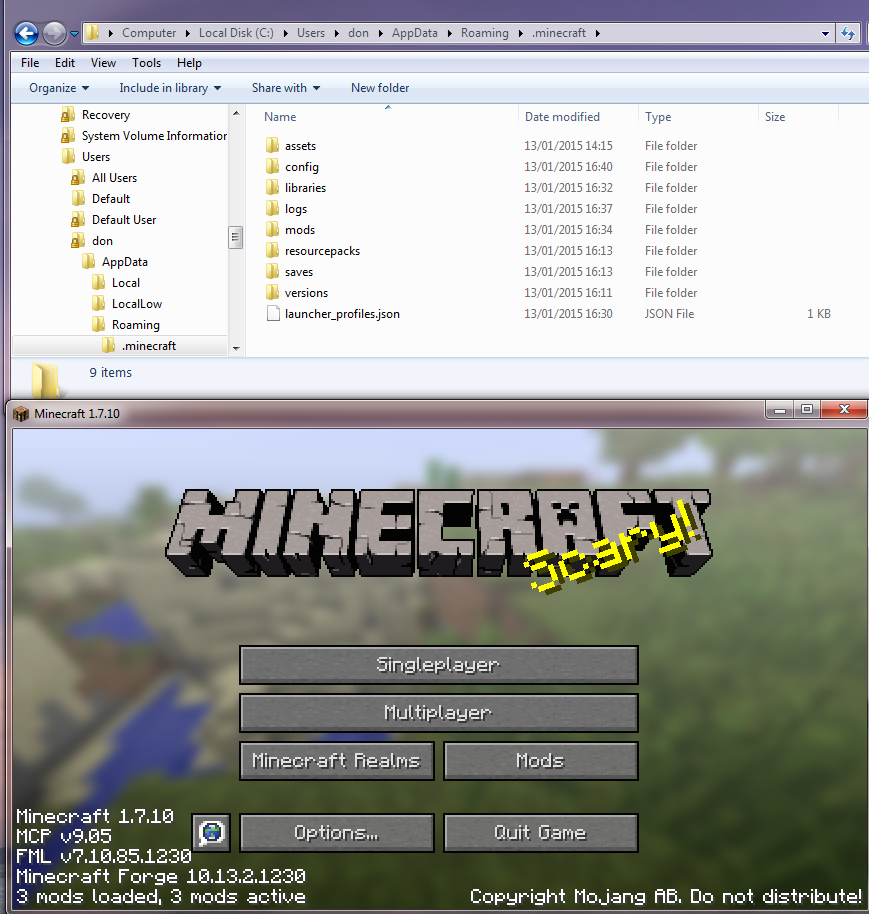
Click “Play” with the Forge Profile selected and Minecraft Forge should start-up and create the directory for you:

ForgeRunningProfileDir_NowWithMods

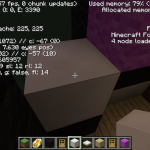
Now exit Minecraft and all you need to do to install Pixelmon Mod is to copy the Pixelmon-1.7.10-3.3.7-universal.jar file in to the mods directory, restart Minecraft using the Forge profile, and that should be it:

Forge_AllDone

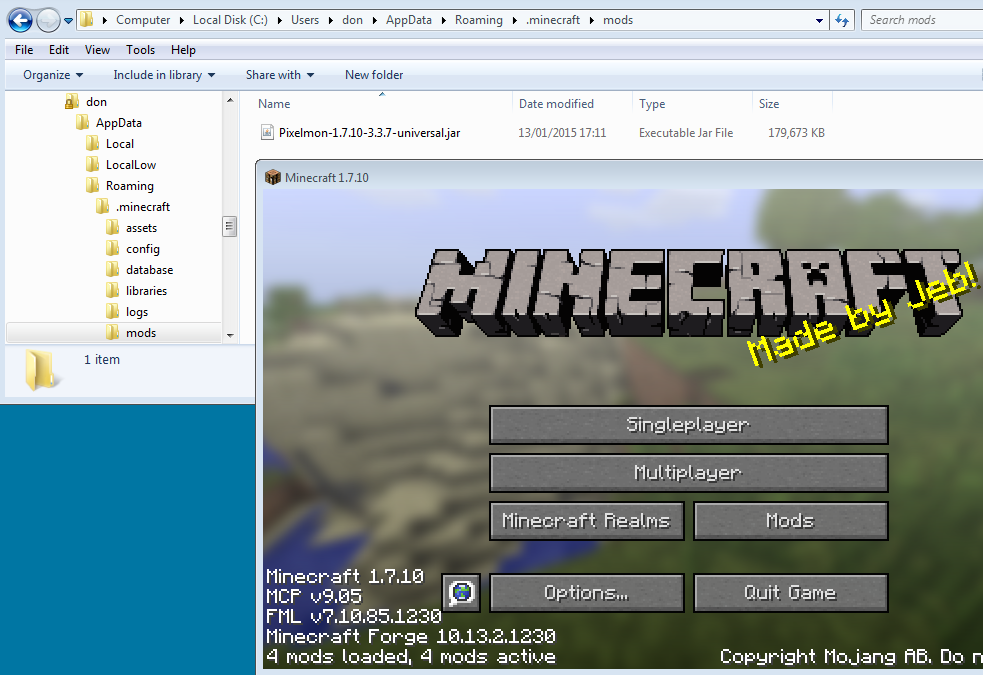
You can see there are now 4 mods loaded, and clicking on the Mods button will show the details – all done!


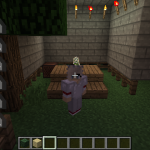
Update: my daughters PixelMon screenshot gallery…


Coming soon, a write up on setting up a server running Minecraft Forge with Pixelmon on Ubuntu Linux…

Minecraft Server Admin/Op commands

Minecraft Server Admin/Op commands are entered into the chat window and are preceded by a “/” when playing in-game, but when entering commands at the server console you need to miss out the preceding “/”.

(This table is copied from http://wiki.multiplay.co.uk/Minecraft/Operators and is here purely for my convenience and laziness)

Command Description Usage
help or ? Shows a list of server commands in the console or in-game. help
kick Removes player from the server with the message “Kicked by admin” kick username
ban Bans player from the server with the message “Banned by admin”, banned players who attempt to connect are presented with the message “You are banned from this server!” ban username
pardon Removes the specified player from banned-players.txt, allowing them to connect to the server again pardon username
ban-ip Bans an IP address from the server, the full IP address must be specified; wildcards are not valid. Players who are banned through this method will see “Your IP address is banned from this server!” when attempting to connect ban-ip ipaddress
pardon-ip Removes the specified IP from banned-ips.txt, allowing players with that IP to connect to the server again pardon-ip ipaddress
op Writes the players name to ops.txt, giving them access to the op commands op player
deop Removes a player from ops.txt, revoking their access to the op commands deop player
tp Moves the first player specified to the location of the second player specified tp player1 player2
give Gives a specified amount of a block, the ids are known as data values give player id amount
stop Gracefully stops the server stop
save-all Forces a server-wide level save save-all
save-off Disables terrain saving (useful for backup scripts) save-off
save-on Re-enables terrain saving. save-on
list Lists all currently connected players list
say Broadcasts a message to all players without a player name being shown and putting message in pink text say message
whitelist Enable or disable whitelisting (i.e. only listed players may join) whitelist on/off
whitelist Add or remove player from the whitelist whitelist add/remove player
whitelist list Lists all currently whitelisted players whitelist list
whitelist reload Reload the whitelist from white-list.txt whitelist reload
time Add to or set the world time. Amount may be a number between 0 and 24000, inclusive, where 0 is dawn and 12000 is dusk time add/set amount

Minecraft Server Admin tips – using the Linux screen command


Getting started with the Linux “screen” command:

This tip follows on from the the earlier post Minecraft and Minecraft Pocket Edition Servers on Ubuntu Linux

The Linux “screen” command is a very useful tool for managing one or many Minecraft and Minecraft Android/Pocket Edition processes.

First off, check you have screen installed on your Linux server by doing;

don@ubuntuserver:~$ which screen

that  should return something like:

/usr/bin/screen

if it doesn’t, you may need to install it like so:

sudo apt-get install screen

(or whatever works for your platform)

then you can start kicking off your Minecraft processes like this

 screen ./start.sh

when that’s up and running you can disconnect from the screen by doing

Ctrl-a d

This will detach you from the screen/console but leave the server running – meaning you can log off or go and do something else.

To reattach to the running screen (assuming there’s only one) and get back to the console at a later time, you just do this:

screen –r

If there is more than one screen sessions available you’ll be given a list of them, something like this:

There are several suitable screens on:
15772.pts-1.ubuntuserver(06/01/14 22:05:25)     (Detached)
2088.pts-4.ubuntuserver (06/01/14 15:20:59)     (Attached)
2013.pts-3.ubuntuserver (06/01/14 15:20:13)     (Detached)

from which you can then do:

screen -r [pid.]tty.host

using the pid and tty host values from that list, e.g. “screen –r 2013.pts-3.ubuntuserver” or “screen –r 15772.pts-1.ubuntuserver” in my example.

There are loads of other useful screen commands – check out the man page for further info – but the above allows me to manage multiple Minecraft servers easily.

Minecraft and Minecraft Pocket Edition Servers on Ubuntu Linux

I was asked to set up some Home LAN Minecraft and Pocketmine Servers for my children, so they can play at home and online with their friends in a safe/private environment – I was also interested in the geekier side of setting these servers up and seeing what all the Minecraft fuss is about 🙂

This post covers:

  • setting up a “normal” Minecraft Server on Linux
  • setting up a Minecraft Pocket Edition Server on Linux
  • getting started with the Linux “screen” command to manage multiple Minecraft Server processes

Setting up a normal Minecraft server on Linux (and I’d imagine any other OS) is very easy – you just need Java and the minecraft server jar file which you can get here:

https://minecraft.net/download

And as that page says, just sort out Java then kick off the process like this:

 java -Xmx1024M -Xms1024M -jar minecraft_server.jar nogui

Making sure you change the minecraft_server.jar  to match the name of the file you downloaded (e.g. minecraft_server.1.7.4.jar or whatever).

I originally put that command in a script and started it with nohup, but realised that you then lose the ability to interact with the process, so I have changed my approach and use the screen command which is much better – see the notes below on how that can be done, it’s easy and very useful.

Also, I think it’s safer to stop your Minecraft server/world cleanly by doing “stop” in the console, rather than Ctrl-c or killing the PID – after doing this I stopped getting these error messages in the console output:

 [ERROR] A level 8 error happened: "Uninitialized string offset: 8192" in...


Setting up a Minecraft Pocket Edition server… this was initially quite a contrast to the above, but it got better…

I started off by following the Pocketmine Server setup and installation instructions I found which said to simply download the install script (PocketMine-MP_Installer_XXXXX.sh) and run it:

https://github.com/PocketMine/PocketMine-MP/wiki/Setting-up-a-Server#wiki-linux

but this really didn’t work for me and led to a catalogue of vague errors and a whole load of googling which took me back to the olden times of fighting with make, configure, libraries, conflicts, missing tools and config files and installing all sorts of things based on vague hints from obscure error messages found in cryptic log files… you get the general idea I guess.

It has a simple and happy ending (below), but my experience started off something like this…

don@ubuntuserver:~/pe_minecraft$ ./start.sh
 09:43:39 [ERROR] Unable to find the pthreads extension.
 09:43:39 [ERROR] Unable to find the cURL extension.
 09:43:39 [ERROR] Unable to find the SQLite3 extension.
 09:43:39 [ERROR] Please use the installer provided on the homepage.

And that was after running the installer provided on the homepage and checking the dependencies were all there… so I debugged the steps in that script and was then on to the log files… where one thing led to another for quite a while… some of the more memorable ones are…

 “Compiler error reporting is too harsh for ./configure (perhaps remove -Werror).”
“configure: error: C compiler cannot create executables”

tried “apt-get install build-essential” to fix that, got a bit further

/usr/include/stdc-predef.h:30:26: fatal error: bits/predefs.h: No such file or directory

tried “apt-get install libc6-dev-i386” to fix that, got a bit further

There were several other issues and no end in sight, and I realised it really shouldn’t be this frustrating, so I looked for another approach.

The Minecraft MP Server code is all hosted on github here:

https://github.com/shoghicp/PocketMine-MP?1358555786480

So I simply downloaded everything from there (you could do “git clone” or “svn export”, but I went for wget’ing the latest zip file):

 wget https://github.com/PocketMine/PocketMine-MP/archive/master.zip

extracted that then ran compile :

./src/build/compile.sh

waited a while then ran start:

./start.sh

and this time there were no problems, my Minecraft Pocket Edition MP server was up and running on the home LAN and local devices were able to connect no problem.


The Linux “screen” command is very useful tool for Minecraft Server Admins – please see this post for details on getting started with it:

Minecraft Server Admin tips – using the Linux screen command

it allows you to manage multiple Minecraft Server Processes and consoles easily, without having to keep multiple sessions open.

Cheers,

Don

Pin It on Pinterest

%d bloggers like this: