Kubernetes – Dashboard with Heapster stats

Previous related posts:

Introduction/background

It’s pretty easy to deploy a functional Kubernetes dashboard to a Kubernetes Cluster, either using the stable Helm Chart or the official Kubernetes Dashboard project directly.

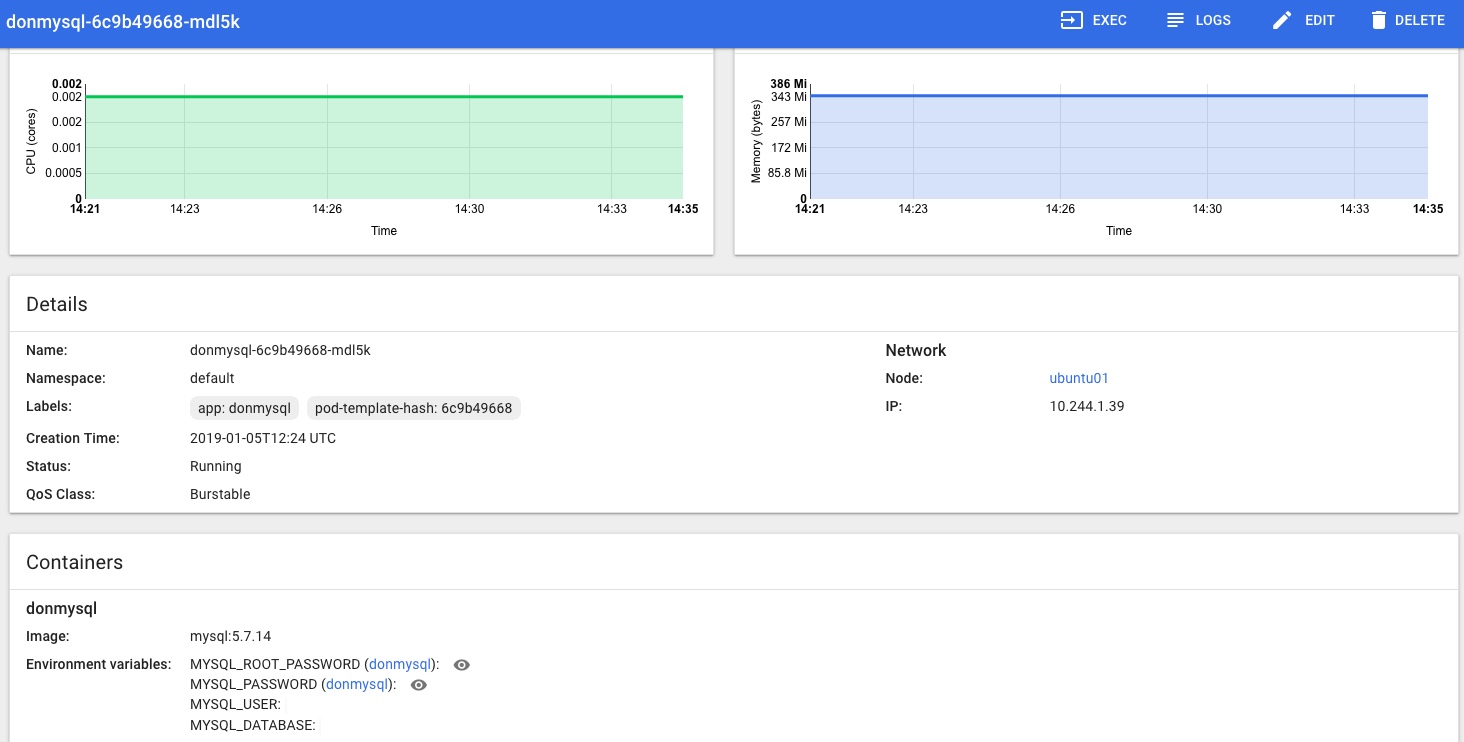
What was a little trickier, was getting live stats for my cluster – cpu and mem load etc – to show up inside the dashboard, so that you can see the status of the various deployments and pods on your cluster at a glance from one central location.

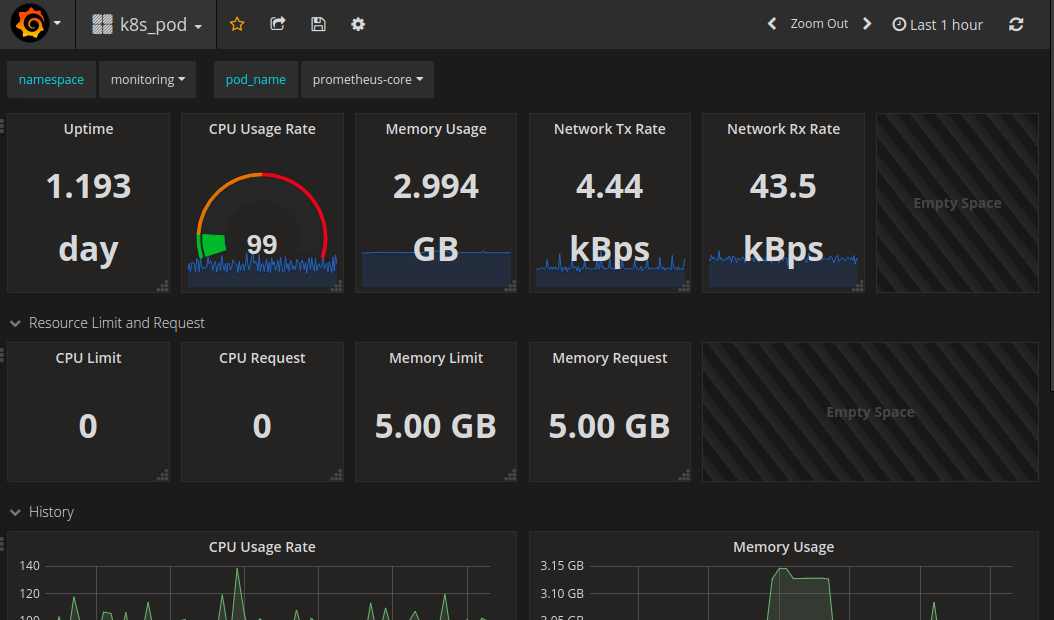
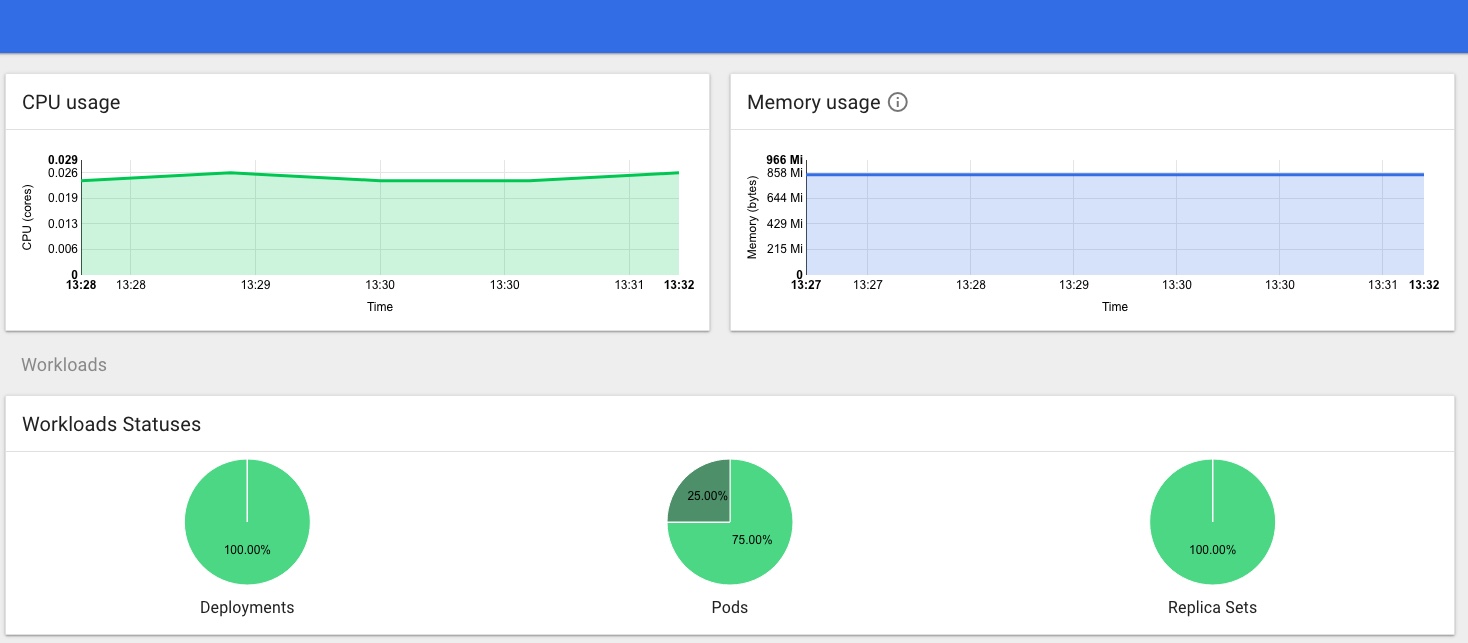
This combination of tools also makes it easy to add on Grafana dashboards that display whatever cluster stats you want from InfluxDB or Prometheus via Heapster, producing something along these lines:

Image
Image

This post documents the steps I took to get things working the way I want them.

Adding Heapster to a Kubernetes Cluster

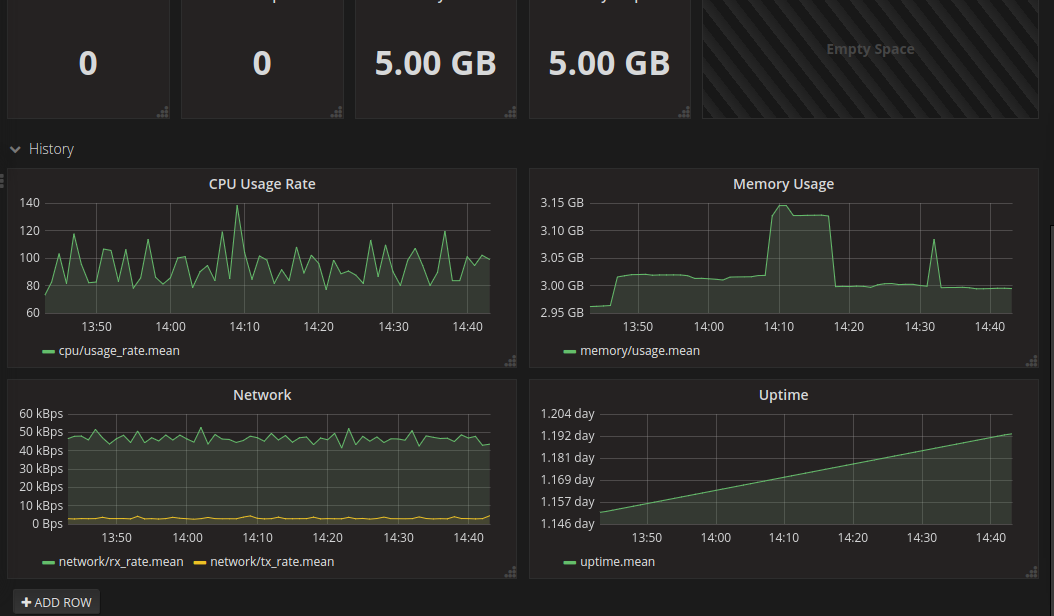
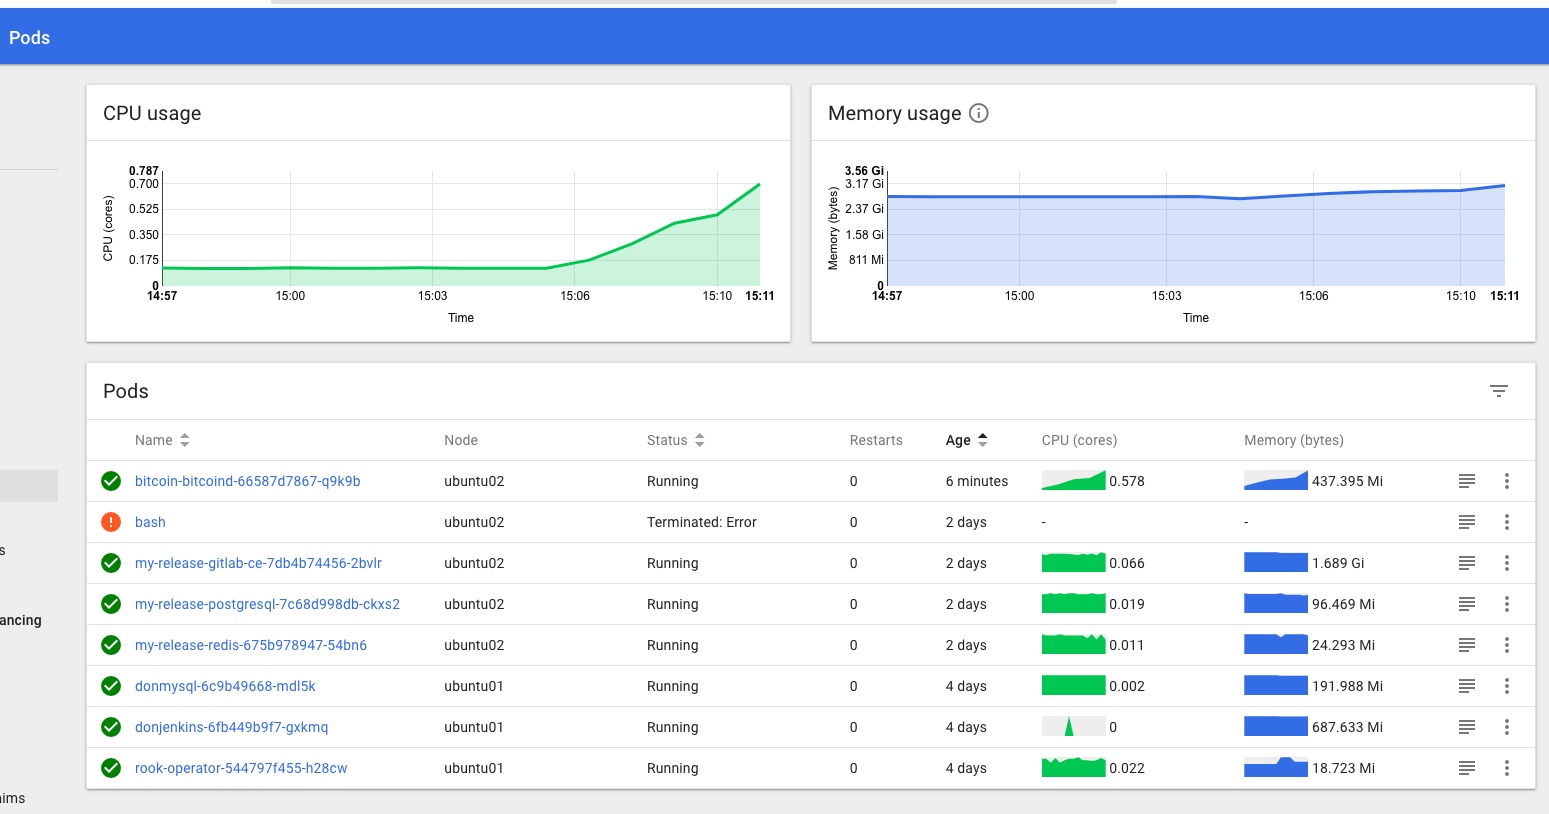
I’ve used Heapster before and found it did everything I wanted without any problem, especially with an InfluxDB backend, but it’s now being deprecated and replaced with the new metrics-server (and others), which at the time I was doing this doesn’t integrate with the kubernetes dashboard so wouldn’t give me the stats I was looking for., which are this kind of thing…

and this

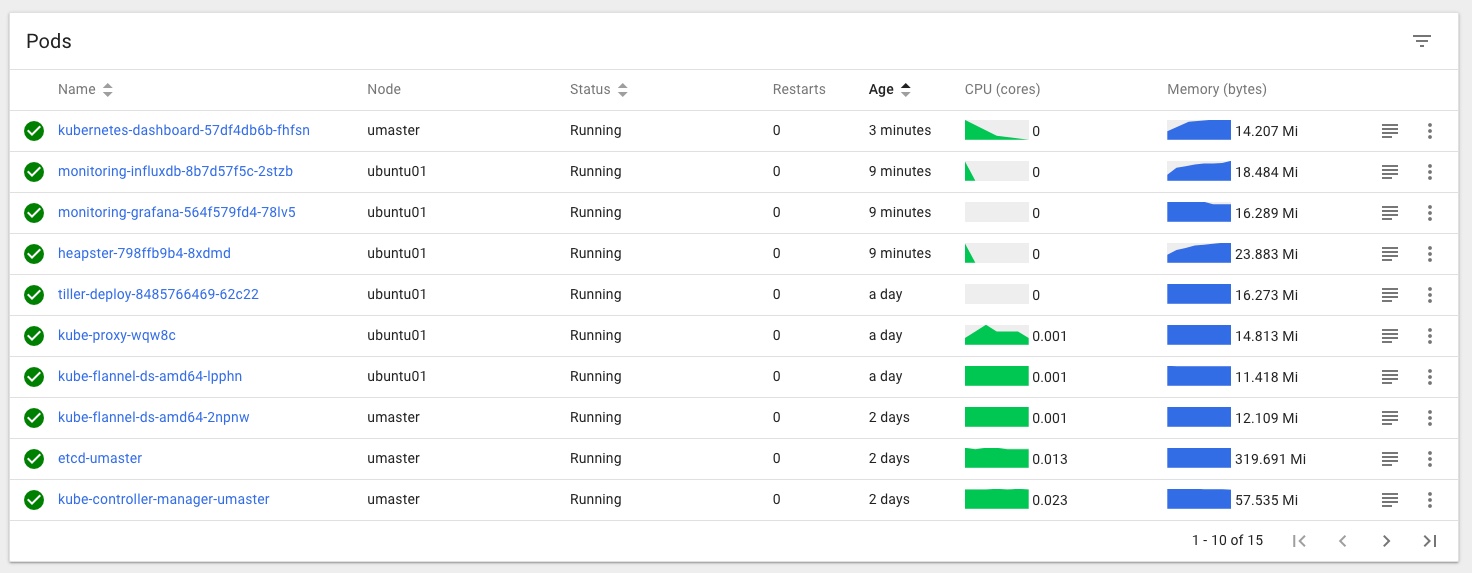
Note that it’s slightly easier to get Heapster stats working first, then when you add on the dashboard it’ll pick them up.

Heapster can be installed using the default project here, but it will not work with the current/latest version of Kubernetes Dashboard like that, and some changes are needed to make the two play nicely together.

I followed the steps in this very helpful post: https://brookbach.com/2018/10/29/Heapster-on-Kubernetes-1.11.3.html

and created my own fork of the official Heapster repo with the recommended changes then made to it, so now I can then simply (re)apply those settings whenever I rebuild my Cluster, and things should keep working.

My GitHub repo for this is here:

https://github.com/DonaldSimpson/heapster

and after cloning it (with the needed changes already done in that repo) locally I applied those files as described in the above post:

$ kubectl create -f ./deploy/kube-config/rbac/

then

$ kubectl create -f ./deploy/kube-config/influxdb/

Note that it may take a while for things to start happening…

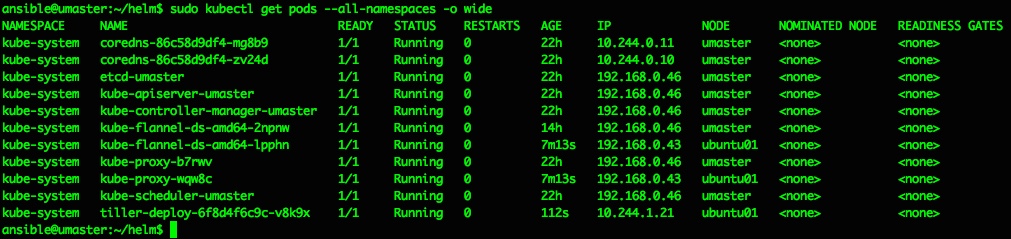
The simplest test to see when/if Heapster is working is to check with kubectl top against a node or pod like so:

ansible@umaster:~$ kubectl top node umaster
NAME CPU(cores) CPU% MEMORY(bytes) MEMORY%
umaster 144m 3% 3134Mi 19%

ansible@umaster:~$ kubectl top node ubuntu01
NAME CPU(cores) CPU% MEMORY(bytes) MEMORY%
ubuntu01 121m 6% 2268Mi 59%
ansible@umaster:~

If you get stats something like the above back things are looking good, but if you get a “no stats available” message, you’ve got some fundamental issues. Time to go check the logs and look for errors. I had quite a series of them until I made the above changes, including many access verboten errors like:

reflector.go:190] k8s.io/heapster/metrics/util/util.go:30: Failed to list *v1.Node: nodes is forbidden: User “system:serviceaccount:kube-system:heapster


Kubernetes Dashboard with user & permissions sorted

Next, I deployed the dashboard as simply as this:

https://github.com/kubernetes/dashboard
kubectl apply -f https://raw.githubusercontent.com/kubernetes/dashboard/v1.10.1/src/deploy/recommended/kubernetes-dashboard.yaml

but will probably use the Helm Chart for the kubernetes-dashboard next, which I think uses the same project.

Once deployed, I needed to edit

kubectl -n kube-system edit service kubernetes-dashboard

as per here:
https://github.com/kubernetes/dashboard/wiki/Accessing-Dashboard—1.7.X-and-above
and change

 type: ClusterIP 

to

type: NodePort

And I also applied these changes to create a Cluster Role and Service Admin account:

ansible@umaster:~/ansible01$ cat <<EOF | kubectl create -f -
apiVersion: rbac.authorization.k8s.io/v1beta1
kind: ClusterRoleBinding
metadata:
name: kubernetes-dashboard
labels:
k8s-app: kubernetes-dashboard
roleRef:
apiGroup: rbac.authorization.k8s.io
kind: ClusterRole
name: cluster-admin
subjects:
kind: ServiceAccount
name: kubernetes-dashboard
namespace: kube-system
EOF

I then restarted the dashboard pod to pick up the changes:

kubectl delete pod kubernetes-dashboard-57df4db6b-4tcmk --namespace kube-system

Now it should be time to test logging in to the Dashboard. If you don’t have a service endpoint created already/automatically, you can find and do a quick test via the current NodePort by running

kubectl -n kube-system get service kubernetes-dashboard

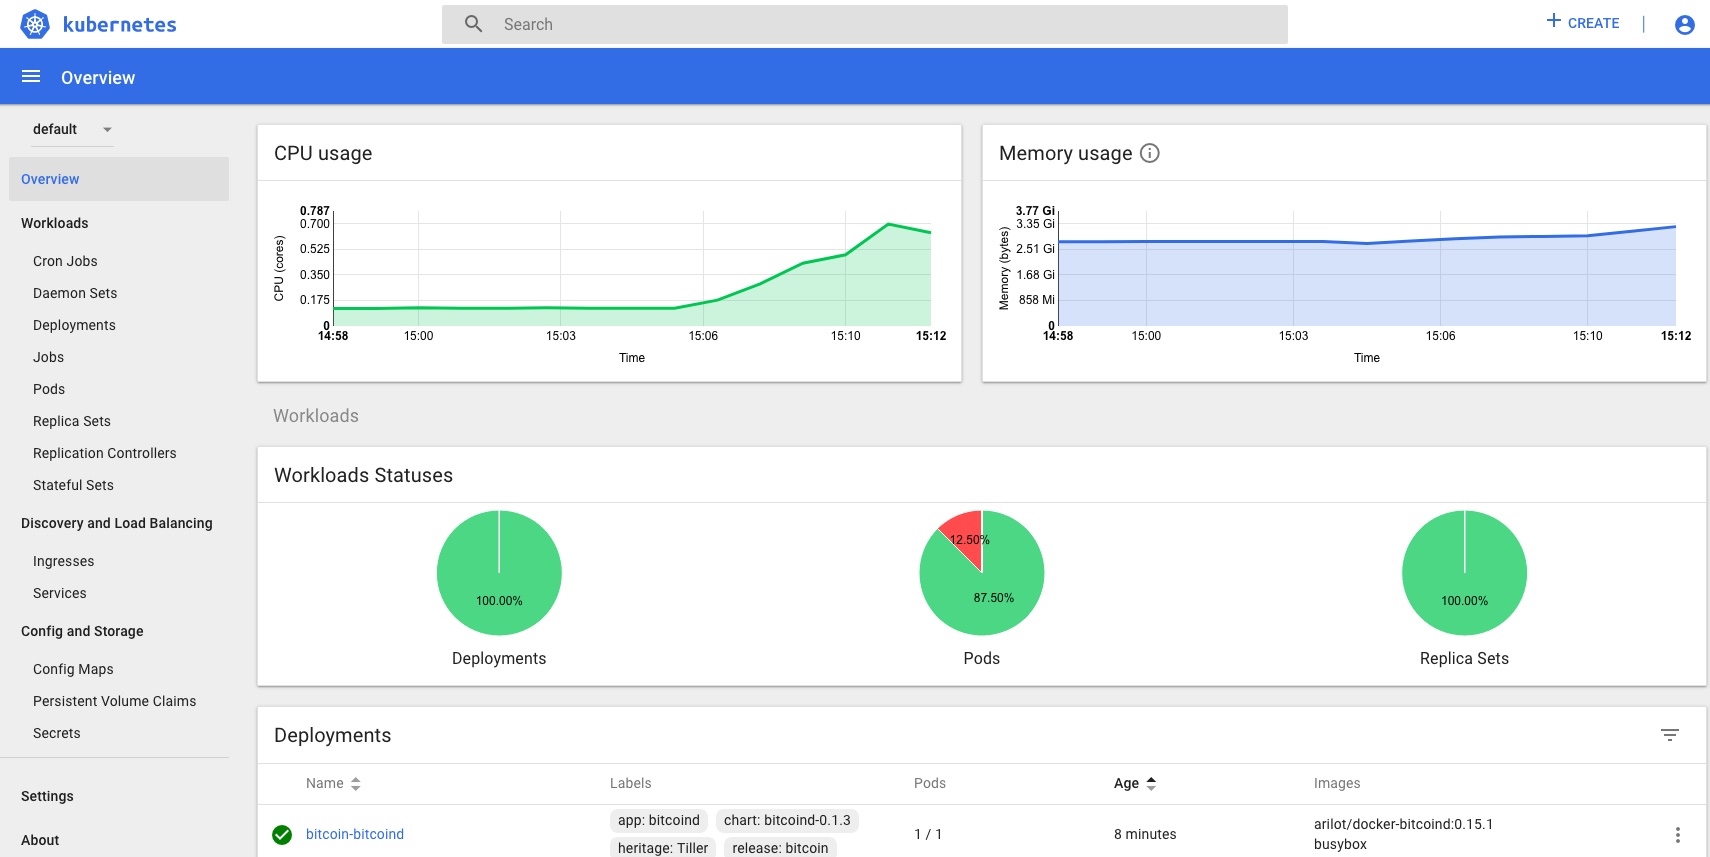
Then hit your cluster IP with that PORT in your browser and you should see a login page like:

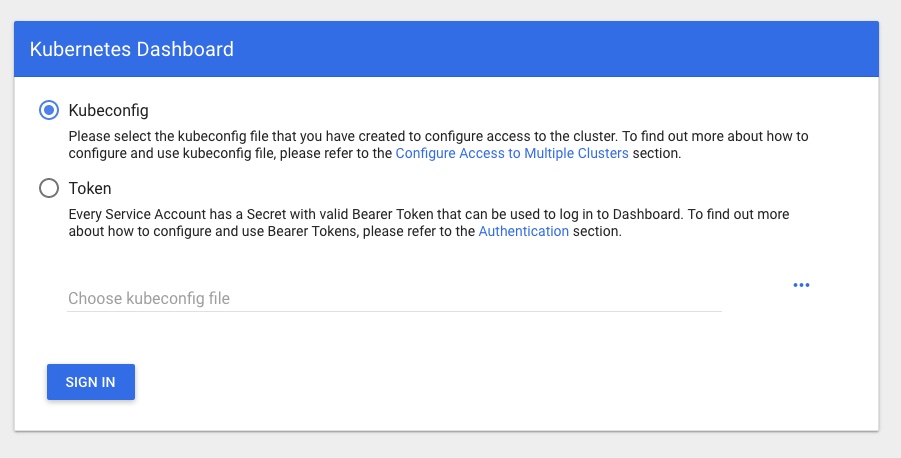
Presenting the next hurdle… how to log in to your nice new Dashboard and see all the shiny new info and metrics!

Run
sudo kubectl -n kube-system get secret
and look/grep for something starting with “kubernetes-dashboard-token-” that we created above. Then do this to get the token to log in with full perms:


sudo kubectl -n kube-system describe secret kubernetes-dashboard-token-rlr9m

or whatever unique name you found above – hitting tab after the last “-” should work if you have completion set up.

That should give you a TOKEN you can copy and log in to the Dashboard with.

You should now have full access in the dashboard, no more permissions errors, and be able to see the stats provided by Heapster too.

My TODO list to finish off this part of the project properly includes:

  • exposing the dashboard as a service on a suitable free port
  • resetting the cluster
  • running through things again to ensure it all works first time
  • see if using the Helm chart provides any benefits
  • adding in monitoring and alerting via Grafana.

If you’re interested in monitoring and metrics for Kubernetes, this post takes things further: Kubernetes – Operators for monitoring with Prometheus and Grafana dashboards

Kubernetes – adding persistent storage to the Cluster

Previously

In the last Kubernetes post…

I wrote about getting Helm and Tiler working on the Kubernetes Cluster I set up here…

There was an obvious flaw in the example MySQL Chart I deployed via Helm and Tiller, in that the required Persistent Volume Claims could not be satisfied so the pod was stuck in a “Pending” state for ever.

Adding Persistent Storage

In this post I will sort that out, by adding Persistent Storage to the Cluster and redeploying and testing the same Chart deployed via “helm deploy stable/mysql“. This time, it should be able to claim all of the resources it needs with no tweaking or hints supplied…

First a few notes on some of the commands and tools I used for troubleshooting what was wrong with the mysql deploy.

watch -d 'sudo kubectl get pods --all-namespaces -o wide'

watch -d kubectl describe pod wise-mule-mysql

kubectl attach wise-mule-mysql-d69788f48-zq5gz -i

The above commands showed a pod that generally wasn’t happy or connectable, but little detail.

Running “kubectl get events -w” is much more informative:

LAST SEEN   TYPE      REASON              KIND                    MESSAGE
17m         Warning   FailedScheduling    Pod                     pod has unbound immediate PersistentVolumeClaims
17m         Normal    SuccessfulCreate    ReplicaSet              Created pod: quaffing-turkey-mysql-65969c88fd-znwl9
2m38s       Normal    FailedBinding       PersistentVolumeClaim   no persistent volumes available for this claim and no storage class is set
17m         Normal    ScalingReplicaSet   Deployment              Scaled up replica set quaffing-turkey-mysql-65969c88fd to 1

and doing “kubectl describe pod <pod name>” is also very useful:

<snip a whole load of events and details>
  Type     Reason            Age                    From               Message
  ----     ------            ----                   ----               -------
  Warning  FailedScheduling  5m26s (x2 over 5m26s)  default-scheduler  pod has unbound immediate PersistentVolumeClaims

Making it pretty clear what’s going on and exactly what is noticeably absent from the Cluster.

My initial plan had been to use GlusterFS and Heketi, but having dabbled with this before and knowing it wasn’t really something I wanted to do for this use case, it was a bit of Yak Shaving I’d really like to avoid if possible.

So, I had a look around and found “Rook“. This sounded much simpler and more suited to my needs. It’s also open source, Apache licensed, and works on multi-node clusters. I’d previously considered using hostPath storage but it’s a bit too basic even for here, and would restrict me to a single node cluster due to the (lack of) replication, missing a lot of the point of a Cluster, so I thought I’d give Rook a shot.

Here’s the guide on deploying Rook that I used:

https://github.com/hobby-kube/guide#deploying-rook

Which says to

Apply the storage manifests in the following order:

storage/00-namespace.yml

storage/operator.yml (wait for the rook-agent pods to be deployed kubectl -n rook get pods before continuing)

storage/cluster.yml

storage/storageclass.yml

storage/tools.yml

I tried to follow this but had some issues, which I will try and clarify when I run through this again – I’d made a bit of a mess trying a bit of Gluster and some hostPath and messing about with the default storage class etc, so it was quite possibly “just me”, and not Rook to blame here 🙂 This is some of my shell history:

kubectl apply -f https://raw.githubusercontent.com/rook/rook/release-0.5/cluster/examples/kubernetes/rook-operator.yaml
kubectl apply -f https://raw.githubusercontent.com/rook/rook/release-0.5/cluster/examples/kubernetes/rook-cluster.yaml
kubectl apply -f https://raw.githubusercontent.com/rook/rook/release-0.5/cluster/examples/kubernetes/rook-storageclass.yaml
kubectl -n rook get pods
kubectl apply -f https://github.com/hobby-kube/manifests/blob/master/storage/00-namespace.yml
kubectl apply -f https://raw.githubusercontent.com/rook/rook/release-0.5/cluster/examples/kubernetes/rook-operator.yaml
kubectl apply -f https://raw.githubusercontent.com/rook/rook/release-0.5/cluster/examples/kubernetes/rook-cluster.yaml
watch -d 'sudo kubectl get pods --all-namespaces -o wide'
kubectl apply -f https://raw.githubusercontent.com/rook/rook/release-0.5/cluster/examples/kubernetes/rook-storageclass.yaml

I definitely ran through this more than once, and I think it also took a while for things to start up and work – the subsequent runs went much better than the initial ones anyway. I also applied a few patches to the rook user and storage class (below) – these and many other alternatives were recommended by others facing similar sounding issues, but I think for me the fundamental is solved further below, re the rbd binary missing from $PATH, and installing ceph:


kubectl get secret rook-rook-user -oyaml | sed "/resourceVer/d;/uid/d;/self/d;/creat/d;/namespace/d" | kubectl -n kube-system apply -f -

kubectl get secret rook-rook-user -oyaml | sed "/resourceVer/d;/uid/d;/self/d;/creat/d;/namespace/d" | kubectl -n default -f -
 kubectl get secret rook-rook-user -oyaml | sed "/resourceVer/d;/uid/d;/self/d;/creat/d;/namespace/d" | kubectl -n default apply -f -
  kubectl patch storageclass rook-block -p '{"metadata":{"annotations": {"storageclass.kubernetes.io/is-default-class": "true"}}}

That all done, I still had issues with my pods, specifically this error:

MountVolume.WaitForAttach failed for volume “pvc-4895a379-104b-11e9-9d98-000c29702bc8” : fail to check rbd image status with: (executable file not found in $PATH), rbd output: ()

which took me a little while to figure out. I think reading this page on RBD gave me the hint that there was something (well yeah, the rbd binary specifically) missing on the hosts, but there’s a lot of talk of folk solving this by creating custom images with the rbd binary added to the $PATH in them, replacing core k8s containers with them, which didn’t sound too appealing to me. I had assumed that the images would include the binaries, but hadn’t checked this is any way.

This issue may well be part or possibly all of the reason why I ran the above commands repeatedly and applied all of those patches.

The simple yet not too obvious solution to this – in my case anyway – was to ensure that the ceph common package was available both on the master:

apt-get update && apt-get install ceph-common -y

and critically that it was also available on each of the worker nodes too.

Once that was done, I think I deleted and reapplied everything rook-related again, then things started working as they should, finally.

A quick check:

ansible@umaster:~$ kubectl get sc
NAME PROVISIONER AGE
rook-block (default) rook.io/block 22h

And things are looking much better now.

Checking the Dashboard I can see a Rook namespace with a number of Rook pods all looking green, and Persistent Volume Claims in the default namespace too:

Test with an example – “helm install stable/mysql”, take 2…

To verify this I re ran the same Helm Chart for mysql, with no changes or overrides, to ensure that rook provisioning was working, that it was properly detected and used as the default storage class in the Cluster with no args/hints needed.

The output from running “helm install stable/mysql” includes this info:


MySQL can be accessed via port 3306 on the following DNS name from within your cluster:
donmysql.default.svc.cluster.local

To get your root password run:

    MYSQL_ROOT_PASSWORD=$(kubectl get secret –namespace default donmysql -o jsonpath=”{.data.mysql-root-password}” | base64 –decode; echo)

To connect to your database:

1. Run an Ubuntu pod that you can use as a client:

    kubectl run -i –tty ubuntu –image=ubuntu:16.04 –restart=Never — bash -il

2. Install the mysql client:

    $ apt-get update && apt-get install mysql-client -y

3. Connect using the mysql cli, then provide your password:
    $ mysql -h donmysql -p

So I tried the above, opting to create an ubuntu client pod, installing mysql utils to that then connecting to the above MySQL instance with the root password like so:

ansible@umaster:~$  MYSQL_ROOT_PASSWORD=$(kubectl get secret --namespace default donmysql  -o jsonpath="{.data.mysql-root-password}" | base64 --decode; echo)
ansible@umaster:~$ echo $MYSQL_ROOT_PASSWORD
<THE ROOT PASSWORD WAS HERE>
ansible@umaster:~$ kubectl run -i --tty ubuntu --image=ubuntu:16.04 --restart=Never -- bash -il
If you don't see a command prompt, try pressing enter.
root@ubuntu:/#
root@ubuntu:/# apt-get update && apt-get install mysql-client -y
Get:1 http://archive.ubuntu.com/ubuntu xenial InRelease [247 kB]
Get:2 http://security.ubuntu.com/ubuntu xenial-security InRelease [107 kB]
<snip a load of boring apt stuff>
Setting up mysql-common (5.7.24-0ubuntu0.16.04.1) ...
update-alternatives: using /etc/mysql/my.cnf.fallback to provide /etc/mysql/my.cnf (my.cnf) in auto mode
Setting up mysql-client-5.7 (5.7.24-0ubuntu0.16.04.1) ...
Setting up mysql-client (5.7.24-0ubuntu0.16.04.1) ...
Processing triggers for libc-bin (2.23-0ubuntu10) ...
root@ubuntu:/# mysql -h donmysql -p
Enter password:
Welcome to the MySQL monitor.  Commands end with ; or \g.
Your MySQL connection id is 67
Server version: 5.7.14 MySQL Community Server (GPL)
<snip some more boring stuff>
mysql> show databases;
+--------------------+
| Database           |
+--------------------+
| information_schema |
| mysql              |
| performance_schema |
| sys                |
+--------------------+
4 rows in set (0.00 sec)
mysql> exit
Bye
root@ubuntu:/

In the Kubernetes Dashboard (loads more on that little adventure coming soon!) I can also see that the MySQL Pod is Running and looks happy, no more Pending or Init issues for me now:

and that the Rook Persistent Volume Claims are present and looking healthy too:

Conclusion & next steps

That’s storage sorted, kind of – I’m not totally happy everything I did was needed, correct and repeatable yet, or that I know enough about this.

Rook.io looks very good and I’m happy it’s the best solution for my current needs, but I can see that I should have spent more time reading the documentation and thinking about prerequisites, yadda yadda. To be honest when it comes to storage I’m a bit of a Luddite – i just want it to be there and work as I’d expect it to, and I was keen to move on to the next steps….

I plan to scrub the k8s cluster shortly and run through this again from scratch to make sure I’ve got it clear enough to add to my provisioning pipeline process.

Next, a probably not-too-brief post on how I got Heapster stats working with an InfluxDB backend monitoring stats for both the Master and Nodes, installing a usable Kubernetes Dashboard, and getting that working with suitable access/permissions, aaaaand getting the k8s Dashbaord showing the CPU and Memory stats from Heapster as seen in the Dashboard pic of the pod statuses above…. phew!

Kubernetes – adding Helm and Tiller and deploying a Chart

Introduction

This is Step 3 in my recent series of Kubernetes blog posts.

Step 1 covers the initial host creation and basic provisioning with Ansible: https://www.donaldsimpson.co.uk/2019/01/03/kubernetes-setting-up-the-hosts/

Step 2 details the Kubernetes install and putting the cluster together, as well as reprovisioning it: https://www.donaldsimpson.co.uk/2018/12/29/kubernetes-from-cluster-reset-to-up-and-running/

Caveat

My aim here is to create a Kubernetes environment on my home lab that allows me to play with k8s and related technologies, then quickly and easily rebuild the cluster and start over.

The focus here in on trying out new technologies and solutions and in automating processes, so in this particular context I am not at all bothered with security, High Availability, redundancy or any of the usual considerations.

Helm and Tiller

The quick start guide is very good: https://docs.helm.sh/using_helm/ and I used this as I went through the process of installing Helm, initializing Tiller and deploying it to my Kubernetes cluster, then deploying a first example Chart to the Cluster. The following are my notes from doing this, as I plan to repeat then automate the entire process and am bound to forget something later 🙂

From the Helm home page, Helm describes itself as

The package manager for Kubernetes

and states that

Helm is the best way to find, share, and use software built for Kubernetes.

I have been following this project for a while and it looks to live up to the hype – there’s a rapidly growing and pretty mature collection of Helm Charts available here: https://github.com/helm/charts/tree/master/stable which as you can see covers an impressive amount of things you may want to use in your own Kubernetes cluster.

Get the Helm and Tiller binaries

This is as easy as described – for my architecture it meant simply

wget https://storage.googleapis.com/kubernetes-helm/helm-v2.12.1-linux-amd64.tar.gz

and extract and copy the 2 binaries (helm & tiller) to somewhere in your path

I usually do a quick sanity test or 2 – e.g. running “which helm” as a non-root user and maybe check “helm –help” and “helm version” all say something sensible too.

Install Tiller

Helm is the Client side app that directs Tiller, which is the Server side part. Just like steering a ship… and stretching the Kubernetes nautical metaphors to the max.

Tiller can be installed to your k8s Cluster simply by running “helm init“, which should produce output like the following:


ansible@umaster:~/helm$ helm init
Creating /home/ansible/.helm
Creating /home/ansible/.helm/repository
Creating /home/ansible/.helm/repository/cache
Creating /home/ansible/.helm/repository/local
Creating /home/ansible/.helm/plugins
Creating /home/ansible/.helm/starters
Creating /home/ansible/.helm/cache/archive
Creating /home/ansible/.helm/repository/repositories.yaml
Adding stable repo with URL: https://kubernetes-charts.storage.googleapis.com
Adding local repo with URL: http://127.0.0.1:8879/charts
$HELM_HOME has been configured at /home/ansible/.helm.
Tiller (the Helm server-side component) has been installed into your Kubernetes Cluster
Please note: by default, Tiller is deployed with an insecure 'allow unauthenticated users' policy.
To prevent this, run `helm init` with the --tiller-tls-verify flag.
For more information on securing your installation see: https://docs.helm.sh/using_helm/#securing-your-helm-installation
Happy Helming

That should do it, and a quick check of running pods confirms we now have a tiller pod running inside the kubernetes cluster in the kube-system namespace:

ansible@umaster:~/helm$ sudo kubectl get pods --all-namespaces -o wide
NAMESPACE     NAME                              READY   STATUS    RESTARTS   AGE     IP             NODE       NOMINATED NODE   READINESS GATES
kube-system   coredns-86c58d9df4-mg8b9          1/1     Running   0          22h     10.244.0.11    umaster    <none>           <none>
kube-system   coredns-86c58d9df4-zv24d          1/1     Running   0          22h     10.244.0.10    umaster    <none>           <none>
kube-system   etcd-umaster                      1/1     Running   0          22h     192.168.0.46   umaster    <none>           <none>
kube-system   kube-apiserver-umaster            1/1     Running   0          22h     192.168.0.46   umaster    <none>           <none>
kube-system   kube-controller-manager-umaster   1/1     Running   0          22h     192.168.0.46   umaster    <none>           <none>
kube-system   kube-flannel-ds-amd64-2npnw       1/1     Running   0          14h     192.168.0.46   umaster    <none>           <none>
kube-system   kube-flannel-ds-amd64-lpphn       1/1     Running   0          7m13s   192.168.0.43   ubuntu01   <none>           <none>
kube-system   kube-proxy-b7rwv                  1/1     Running   0          22h     192.168.0.46   umaster    <none>           <none>
kube-system   kube-proxy-wqw8c                  1/1     Running   0          7m13s   192.168.0.43   ubuntu01   <none>           <none>
kube-system   kube-scheduler-umaster            1/1     Running   0          22h     192.168.0.46   umaster    <none>           <none>
kube-system   tiller-deploy-6f8d4f6c9c-v8k9x    1/1     Running   0          112s    10.244.1.21    ubuntu01   <none>           <none>

So far so nice and easy, and as per the docs the next steps are to do a repo update and a test chart install…

ansible@umaster:~/helm$ helm repo update
Hang tight while we grab the latest from your chart repositories…
…Skip local chart repository
…Successfully got an update from the "stable" chart repository
Update Complete. ⎈ Happy Helming!⎈
ansible@umaster:~/helm$ helm install stable/mysql
Error: no available release name found
ansible@umaster:~/helm$

Doh. A quick google makes that “Error: no available release name found” look like a k8s/helm version conflict, but the fix is pretty easy and detailed here: https://github.com/helm/helm/issues/3055


So I did as suggested, creating a service account cluster role binding and patch to deploy them to the kube-system namespace:

kubectl create serviceaccount --namespace kube-system tiller 
kubectl create clusterrolebinding tiller-cluster-rule --clusterrole=cluster-admin --serviceaccount=kube-system:tiller
kubectl patch deploy --namespace kube-system tiller-deploy -p '{"spec":{"template":{"spec":{"serviceAccount":"tiller"}}}}'

and all then went ok:

ansible@umaster:~/helm$ kubectl create serviceaccount --namespace kube-system tillerserviceaccount/tiller created 

ansible@umaster:~/helm$ kubectl create clusterrolebinding tiller-cluster-rule --clusterrole=cluster-admin --serviceaccount=kube-system:tillerclusterrolebinding.rbac.authorization.k8s.io/tiller-cluster-rule created

ansible@umaster:~/helm$ kubectl patch deploy --namespace kube-system tiller-deploy -p '{"spec":{"template":{"spec":{"serviceAccount":"tiller"}}}}'deployment.extensions/tiller-deploy patchedansible@umaster:~/helm$

From then on everything went perfectly and as described:

try the example mysql chart from here https://docs.helm.sh/using_helm/

like this:

helm install stable/mysql
and check with "helm ls"
helm lsansible@umaster:~/helm$ helm ls 
NAME REVISION UPDATED STATUS CHART APP VERSION NAMESPACEdunking-squirrel 1 Thu Jan 3 15:38:37 2019 DEPLOYED mysql-0.12.0 5.7.14 defaultansible@umaster:~/helm$
and all is groovy
list pods with ansible@umaster:~/helm$ sudo kubectl get pods --all-namespaces -o wide 

NAMESPACE NAME READY STATUS RESTARTS AGE IP NODE NOMINATED NODE READINESS GATES
default dunking-squirrel-mysql-bb478fc54-4c69r 0/1 Pending 0 105s
kube-system coredns-86c58d9df4-mg8b9 1/1 Running 0 22h 10.244.0.11 umaster
kube-system coredns-86c58d9df4-zv24d 1/1 Running 0 22h 10.244.0.10 umaster
kube-system etcd-umaster 1/1 Running 0 22h 192.168.0.46 umaster
kube-system kube-apiserver-umaster 1/1 Running 0 22h 192.168.0.46 umaster
kube-system kube-controller-manager-umaster 1/1 Running 0 22h 192.168.0.46 umaster
kube-system kube-flannel-ds-amd64-2npnw 1/1 Running 0 15h 192.168.0.46 umaster
kube-system kube-flannel-ds-amd64-lpphn 1/1 Running 0 45m 192.168.0.43 ubuntu01
kube-system kube-proxy-b7rwv 1/1 Running 0 22h 192.168.0.46 umaster
kube-system kube-proxy-wqw8c 1/1 Running 0 45m 192.168.0.43 ubuntu01
kube-system kube-scheduler-umaster 1/1 Running 0 22h 192.168.0.46 umaster
kube-system tiller-deploy-8485766469-62c22 1/1 Running 0 2m17s 10.244.1.22 ubuntu01 ansible@umaster:~/helm$

The MySQL pod is failing to start as it has persistent volume claims defined, and I’ve not set up default storage for that yet – that’s covered in the next step/post 🙂

If you want to use or delete that MySQL deployment all the details are in the rest of the getting started guide – for the above it would mean doing a ‘helm ls‘ then a ‘ helm delete <release-name> ‘ where <release-name> is ‘dunking-squirrel’ or whatever you have.

A little more on Helm

Just running out of the box Helm Charts is great, but obviously there’s a lot more you can do with Helm, from customising the existing Stable Charts to suit your needs, to writing and deploying your own Charts from scratch. I plan to expand on this in more detail later on, but will add and update some notes and examples here as I do:

You can clone the Helm github repo locally:

git clone https://github.com/kubernetes/charts.git

and edit the values for a given Chart:

vi charts/stable/mysql/values.yaml

then use your settings to override the defaults:

helm install --name=donmysql -f charts/stable/mysql/values.yaml stable/mysql

using a specified name makes installing and deleting much easier to automate:

helm del donmysql

and the Helm ‘release’ lifecycle is quite docker-like:

helm ls -a
helm del --purge donmysql

There are some Helm tips & tricks here that I’m working my way through:

https://github.com/helm/helm/blob/master/docs/charts_tips_and_tricks.md

in conjunction with this Bitnami doc:

https://docs.bitnami.com/kubernetes/how-to/create-your-first-helm-chart/


Conclusion

For me and for now, I’m just happy that Helm, Tiller and Charts are working, and I can move on to automating these setup steps and some testing to my overall pipelines. And sorting out the persistent volumes too. After that’s all done I plan to start playing around with some of the stable (and perhaps not so stable) Helm charts.

As they said, this could well be “the best way to find, share, and use software built for Kubernetes” – it’s very slick!

Kubernetes – setting up the hosts

Introduction

This is Step 1 in my recent Kubernetes setup where I very quickly describe the process followed to build and configure the basic requirements for a simple Kubernetes cluster.

Step 2 is here https://www.donaldsimpson.co.uk/2018/12/29/kubernetes-from-cluster-reset-to-up-and-running/

and Step 3 where I set up Helm and Tiller and deploy an initial chart to the cluster: https://www.donaldsimpson.co.uk/2019/01/03/kubernetes-adding-helm-and-tiller-and-deploying-a-chart/

The TL/DR

A quick summary should cover 99% of this, but I wanted to make sure I’d recorded my process/journey to get there – to cut a long story short, I ended up using this Ansible project:

https://github.com/DonaldSimpson/ansible-kubeadm


which I forked from the original here:

https://github.com/ben-st/ansible-kubeadm

on the 5 Ubuntu linux hosts I created by hand (the horror) on my VMWare ESX home lab server. I started off writing my own ansible playbook which did the job, then went looking for improvements and found the above fitted my needs perfectly.

The inventory file here: https://github.com/DonaldSimpson/ansible-kubeadm/blob/master/inventory details the addresses and functions of the 5 hosts – 4 x workers and a single master, which I’m planning on keeping solely for master role.

My notes:

Host prerequisites are in my rough notes below – simple things like ssh keys, passwwordless sudo from the ansible user, installing required tools like python, setting suitable ip addresses and adding the users you want to use. Also allocating suitable amounts of mem, cpu and disk – all of which are down to your preference, availability and expectations.

https://kubernetes.io/docs/setup/independent/create-cluster-kubeadm/

ubuntumaster is 192.168.0.46
su – ansible
check history

ansible setup

https://www.howtoforge.com/tutorial/setup-new-user-and-ssh-key-authentication-using-ansible/
1 x master  - sudo apt-get install open-vm-tools-desktop - sudo apt install openssh-server vim whois python ansible - export TERM=linux re https://stackoverflow.com/questions/49643357/why-p-appears-at-the-first-line-of-vim-in-iterm
 - /etc/hosts:
127.0.1.1       umaster
192.168.0.43    ubuntu01
192.168.0.44    ubuntu02
192.168.0.45    ubuntu03
// slave nodes need:ssh-rsa AAAAB3NzaC1y<snip>fF2S6X/RehyyJ24VhDd2N+Dh0n892rsZmTTSYgGK8+pfwCH/Vv2m9OHESC1SoM+47A0iuXUlzdmD3LJOMSgBLoQt ansible@umaster
added to root user auth keys in .ssh and apt install python ansible -y
//apt install python ansible -y
useradd -m -s /bin/bash ansible
passwd ansible <type the password you want>

echo  -e ‘ansible\tALL=(ALL)\tNOPASSWD:\tALL’ > /etc/sudoers.d/ansibleecho  -e 'don\tALL=(ALL)\tNOPASSWD:\tALL' > /etc/sudoers.d/don
mkpasswd --method=SHA-512 <type password "secret">
Password:
$6$dqxHiCXHN<snip>rGA2mvE.d9gEf2zrtGizJVxrr3UIIL9Qt6JJJt5IEkCBHCnU3nPYH/
su - ansible
ssh-keygen -t rsa

cd ansible01/
vim inventory.ini
ansible@umaster:~/ansible01$ cat inventory.ini
[webserver]
ubuntu01 ansible_host=192.168.0.43
ubuntu02 ansible_host=192.168.0.44
ubuntu03 ansible_host=192.168.0.45

ansible@umaster:~/ansible01$ cat ansible.cfg
[defaults]
 inventory = /home/ansible/ansible01/inventory.ini
ansible@umaster:~/ansible01$ ssh-keyscan 192.168.0.43 >> ~/.ssh/known_hosts
# 192.168.0.43:22 SSH-2.0-OpenSSH_7.6p1 Ubuntu-4
ansible@umaster:~/ansible01$ ssh-keyscan 192.168.0.44 >> ~/.ssh/known_hosts
# 192.168.0.44:22 SSH-2.0-OpenSSH_7.6p1 Ubuntu-4
ansible@umaster:~/ansible01$ ssh-keyscan 192.168.0.45 >> ~/.ssh/known_hosts
# 192.168.0.45:22 SSH-2.0-OpenSSH_7.6p1 Ubuntu-4
ansible@umaster:~/ansible01$ cat ~/.ssh/known_hosts
or could have donefor i in $(cat list-hosts.txt)
do
ssh-keyscan $i >> ~/.ssh/known_hosts
done
cat deploy-ssh.yml

 – hosts: all
   vars:
     – ansible_password: ‘$6$dqxHiCXH<kersnip>l.urCyfQPrGA2mvE.d9gEf2zrtGizJVxrr3UIIL9Qt6JJJt5IEkCBHCnU3nPYH/’
  gather_facts: no
   remote_user: root

   tasks:

   – name: Add a new user named provision
     user:
          name=ansible
          password={{ ansible_password }}

   – name: Add provision user to the sudoers
     copy:
          dest: “/etc/sudoers.d/ansible”
          content: “ansible ALL=(ALL)  NOPASSWD: ALL”

   – name: Deploy SSH Key
     authorized_key: user=ansible
                     key=”{{ lookup(‘file’, ‘/home/ansible/.ssh/id_rsa.pub’) }}”
                     state=present

   – name: Disable Password Authentication
     lineinfile:
           dest=/etc/ssh/sshd_config
           regexp=’^PasswordAuthentication’
           line=”PasswordAuthentication no”
           state=present
           backup=yes
     notify:
       – restart ssh

   – name: Disable Root Login
     lineinfile:
           dest=/etc/ssh/sshd_config
           regexp=’^PermitRootLogin’
           line=”PermitRootLogin no”
           state=present
           backup=yes
     notify:
       – restart ssh

   handlers:
   – name: restart ssh
     service:
       name=sshd
       state=restarted

// end of the above file

ansible-playbook deploy-ssh.yml –ask-pass
results inLAY [all] *********************************************************************************************************************************************************************************************************************************************************************

TASK [Add a new user named provision] ******************************************************************************************************************************************************************************************************************************************
fatal:

[ubuntu02]

: FAILED! => {"msg": "to use the 'ssh' connection type 
with passwords, you must install the sshpass program"}
for each node/slave/hostsudo apt-get install -y sshpass
ubuntu01 ansible_host=192.168.0.43
ubuntu02 ansible_host=192.168.0.44
ubuntu03 ansible_host=192.168.0.45

kubernetes setup
https://www.techrepublic.com/article/how-to-quickly-install-kubernetes-on-ubuntu/run install_apy.yml against all hosts and localhost too
on master:

kubeadm init

results in:root@umaster:~# kubeadm init
[init] using Kubernetes version: v1.11.1
[preflight] running pre-flight checks
I0730 15:17:50.330589   23504 kernel_validator.go:81] Validating kernel version
I0730 15:17:50.330701   23504 kernel_validator.go:96] Validating kernel config
    [WARNING SystemVerification]: docker version is greater than the most recently validated version. Docker version: 17.12.1-ce. Max validated version: 17.03
[preflight] Some fatal errors occurred:
    [ERROR Swap]: running with swap on is not supported. Please disable swap
[preflight] If you know what you are doing, you can make a check non-fatal with `–ignore-preflight-errors=…`
root@umaster:~#
doswapoff -a then try again
kubeadm init… wait for images to be pulled etc – takes a while

Your Kubernetes master has initialized successfully!

To start using your cluster, you need to run the following as a regular user:

  mkdir -p $HOME/.kube
  sudo cp -i /etc/kubernetes/admin.conf $HOME/.kube/config
  sudo chown $(id -u):$(id -g) $HOME/.kube/config

You should now deploy a pod network to the cluster.
Run “kubectl apply -f [podnetwork].yaml” with one of the options listed at:
https://kubernetes.io/docs/concepts/cluster-administration/addons/

You can now join any number of machines by running the following on each node
as root:

  kubeadm join 192.168.0.46:6443 --token 9e85jo.77nzvq1eonfk0ar6 --discovery-token-ca-cert-hash sha256:61d4b5cd0d7c21efbdf2fd64c7bca8f7cb7066d113daff07a0ab6023236fa4bc
root@umaster:~#

Next up…

The next post in the series is here: https://www.donaldsimpson.co.uk/2018/12/29/kubernetes-from-cluster-reset-to-up-and-running/ and details an automated process to scrub my cluster and reprovision it (form a Kubernetes point of view – the hosts are left intact).

Pin It on Pinterest

%d bloggers like this: