Loading CSV data in to MySQL – random quotations app Part 1

Time for a new PHP and MySQL app – “Who said that?” – a search tool for famous quotations.

I created these two web applications a while back:

UK post code search
crossword solver

and then wrote this page:
Some PHP examples
detailing roughly how they were put together, but this time I wanted to create a searchable database of famous quotations, and focus on the MySQL side of things a bit more too (so that next time I will have a note of how I did it!).

I found a very nice CSV data file on http://thewebminer.com/download for free – I don’t really do Facebook much and don’t have a Twitter account so I thought/hoped they’d settle for a blog post in exchange…

After installing and setting up MySQL, connect to your database…

mysql –user=myuser –password=myusualpassword dev

— or connect without specifying a database/schema and do “show databases;”

mysql> show tables;
 +---------------+
 | Tables_in_dev |
 +---------------+
 | areacodes |
 | dictionary |
 +---------------+
 2 rows in set (0.02 sec)

For this little app, I want to create a new table with fields for each row in the CSV file
plus I’d like an auto_increment field to make fetching random numbers easier

CREATE TABLE quotes (
 id INT NOT NULL AUTO_INCREMENT PRIMARY KEY,
 quote varchar(800),
 author varchar(100),
 genre varchar(100)
 );
mysql> show tables;
 +---------------+
 | Tables_in_dev |
 +---------------+
 | areacodes |
 | dictionary |
 | quotes |
 +---------------+
 3 rows in set (0.00 sec)
mysql> describe quotes;
 +--------+--------------+------+-----+---------+----------------+
 | Field | Type | Null | Key | Default | Extra |
 +--------+--------------+------+-----+---------+----------------+
 | id | int(11) | NO | PRI | NULL | auto_increment |
 | quote | varchar(800) | YES | | NULL | |
 | author | varchar(100) | YES | | NULL | |
 | genre | varchar(100) | YES | | NULL | |
 +--------+--------------+------+-----+---------+----------------+
 4 rows in set (0.06 sec)

ok, the table looks good, so I can load the CSV data file – note that I’ve got the “quotes35000.csv” file I downloaded from
http://thewebminer.com/download sitting in the current directory:

mysql> load data local infile 'quotes35000.csv' into table quotes
 -> fields terminated by ';'
 -> lines terminated by 'n'
 -> (quote, author, genre);
 Query OK, 35002 rows affected (1.54 sec)
 Records: 35002 Deleted: 0 Skipped: 0 Warnings: 0

that looks like it went well (“35002 rows affected”), time to check it:

mysql> select count(*) from quotes;
 +----------+
 | count(*) |
 +----------+
 | 35002 |
 +----------+
 1 row in set (0.04 sec)
mysql> select * from quotes where author like '%Einstein' and genre like 'attitude%';
 +------+-----------------------------------------------------+-----------------+-----------+
 | id | quote | author | genre |
 +------+-----------------------------------------------------+-----------------+-----------+
 |4647 | Weakness of attitude becomes weakness of character. | Albert Einstein | attitude
 +------+-----------------------------------------------------+-----------------+-----------+
 1 row in set (0.02 sec)

All looking good, the row count and the returned query match what I’d expect having looked at the contents of the CSV file.

I also want to do a “random quote of the day thing”, so looked in to ways to do this in MySQL – my initial thought was to use something basic like “ORDER BY RAND() LIMIT 0,1;” to bring back one random row, but I guessed there may be better ways.

Google led me to this site which has some good examples and some performance/comparison details too:
http://akinas.com/pages/en/blog/mysql_random_row/

so I tried this…

mysql> SELECT * FROM quotes WHERE id >= (SELECT FLOOR( MAX(id) * RAND()) FROM quotes ) ORDER BY id LIMIT 1;
 +-----+--------------------------------------------------------------------------+-----------------+-------+
 | id | quote | author | genre |
 +-----+--------------------------------------------------------------------------+-----------------+-------+
 |84 | Men are like wine - some turn to vinegar, but the best improve with age. | Pope John XXIII | age
 +-----+--------------------------------------------------------------------------+-----------------+-------+
 1 row in set (1.54 sec)

then this…

mysql> SELECT * FROM quotes ORDER BY RAND() LIMIT 0,1;
 +-------+-------------------------------------------------------------------------------------+----------------+-------+
 | id | quote | author | genre |
 +-------+-------------------------------------------------------------------------------------+----------------+-------+
 |29470 | The good die young, because they see it's no use living if you have got to be good. | John Barrymore | good
 +-------+-------------------------------------------------------------------------------------+----------------+-------+
 1 row in set (0.73 sec)

and found to my surprise that in this case, looking at the timings, the simple approach looks to be faster – probably because of the relatively small table and its simple structure?

Anyway, that’s the database side of things sorted, the next part is to put together some PHP code to allow searching for quotes based on author, partial quote or genre, and to write a simple “random quote” generator kind of thing.

Cheers,

Don

Minecraft and Minecraft Pocket Edition Servers on Ubuntu Linux

I was asked to set up some Home LAN Minecraft and Pocketmine Servers for my children, so they can play at home and online with their friends in a safe/private environment – I was also interested in the geekier side of setting these servers up and seeing what all the Minecraft fuss is about 🙂

This post covers:

  • setting up a “normal” Minecraft Server on Linux
  • setting up a Minecraft Pocket Edition Server on Linux
  • getting started with the Linux “screen” command to manage multiple Minecraft Server processes

Setting up a normal Minecraft server on Linux (and I’d imagine any other OS) is very easy – you just need Java and the minecraft server jar file which you can get here:

https://minecraft.net/download

And as that page says, just sort out Java then kick off the process like this:

 java -Xmx1024M -Xms1024M -jar minecraft_server.jar nogui

Making sure you change the minecraft_server.jar  to match the name of the file you downloaded (e.g. minecraft_server.1.7.4.jar or whatever).

I originally put that command in a script and started it with nohup, but realised that you then lose the ability to interact with the process, so I have changed my approach and use the screen command which is much better – see the notes below on how that can be done, it’s easy and very useful.

Also, I think it’s safer to stop your Minecraft server/world cleanly by doing “stop” in the console, rather than Ctrl-c or killing the PID – after doing this I stopped getting these error messages in the console output:

 [ERROR] A level 8 error happened: "Uninitialized string offset: 8192" in...


Setting up a Minecraft Pocket Edition server… this was initially quite a contrast to the above, but it got better…

I started off by following the Pocketmine Server setup and installation instructions I found which said to simply download the install script (PocketMine-MP_Installer_XXXXX.sh) and run it:

https://github.com/PocketMine/PocketMine-MP/wiki/Setting-up-a-Server#wiki-linux

but this really didn’t work for me and led to a catalogue of vague errors and a whole load of googling which took me back to the olden times of fighting with make, configure, libraries, conflicts, missing tools and config files and installing all sorts of things based on vague hints from obscure error messages found in cryptic log files… you get the general idea I guess.

It has a simple and happy ending (below), but my experience started off something like this…

don@ubuntuserver:~/pe_minecraft$ ./start.sh
 09:43:39 [ERROR] Unable to find the pthreads extension.
 09:43:39 [ERROR] Unable to find the cURL extension.
 09:43:39 [ERROR] Unable to find the SQLite3 extension.
 09:43:39 [ERROR] Please use the installer provided on the homepage.

And that was after running the installer provided on the homepage and checking the dependencies were all there… so I debugged the steps in that script and was then on to the log files… where one thing led to another for quite a while… some of the more memorable ones are…

 “Compiler error reporting is too harsh for ./configure (perhaps remove -Werror).”
“configure: error: C compiler cannot create executables”

tried “apt-get install build-essential” to fix that, got a bit further

/usr/include/stdc-predef.h:30:26: fatal error: bits/predefs.h: No such file or directory

tried “apt-get install libc6-dev-i386” to fix that, got a bit further

There were several other issues and no end in sight, and I realised it really shouldn’t be this frustrating, so I looked for another approach.

The Minecraft MP Server code is all hosted on github here:

https://github.com/shoghicp/PocketMine-MP?1358555786480

So I simply downloaded everything from there (you could do “git clone” or “svn export”, but I went for wget’ing the latest zip file):

 wget https://github.com/PocketMine/PocketMine-MP/archive/master.zip

extracted that then ran compile :

./src/build/compile.sh

waited a while then ran start:

./start.sh

and this time there were no problems, my Minecraft Pocket Edition MP server was up and running on the home LAN and local devices were able to connect no problem.


The Linux “screen” command is very useful tool for Minecraft Server Admins – please see this post for details on getting started with it:

Minecraft Server Admin tips – using the Linux screen command

it allows you to manage multiple Minecraft Server Processes and consoles easily, without having to keep multiple sessions open.

Cheers,

Don

New Home/lab ESXi 5 Server – Part 1

I wrote a while ago about my plans to set up a home VM Ware ESXi 5 server… and although you can’t tell the difference, this site is now happily running on it 🙂

Spec:

The server I went for is an HP ProLiant ML110 G6. It’s got a single socket Xeon Quad Core X3430 processor, 16GB of RAM and at the moment 2TB of SATA3 disk – I will add more when I finish migrating data off the old servers.

There are some limits on the spec you can use with the free version of ESX – I think it’s currently one physical processor and 32G RAM, which means this server is fine.

Install and setup:

The ML110 is a compact and well-made server and is very quiet when up and running – it sounds like a hovercraft for the first few seconds, but quickly calms down to run not much louder than a normal desktop PC. The chassis isn’t large but it’s well laid out and there’s room for 4 HDD’s in there, maybe more if required if the DVD drive was removed (it’s not on the ESX compatibility list anyway so I can’t use it for this).

I installed ESXi 5 from a 2GB USB drive which is attached to the USB socket directly on the motherboard – the BIOS boots from this no problem, and gave me the option to install ESXi 5 on to the USB drive, leaving my HDD(‘s) free to use as 100% dedicated ESX Datastores, and also meaning I can exchange them when I need to without having to reinstall or worry about the VM Ware OS.

The server-side installation of ESXi 5 is a breeze – I rehearsed and wrote about it on my ESXi 5 on an iMac under Fusion post  and it was no different here – it took about 10 minutes or so and there were no tricky questions. Specify the user name and password, tell it to use all of the available HDD and there’s not much more to it. Once you have set up networking the way you want it (the DHCP setup should be fine for most installs) you don’t really need to go near the server again – it’s all managed remotely via the client applications and SSH (more on that in Part 2) from then on.

Creating VMs:

Once you have the vSphere client install done (it’s far more trouble than the server install – plus it requires .Not and J# runtimes – argh! – so it requires Windows – double-argh! – so had to be done initially on a Windows VM running on my iMac in my case… triple-argh!) you can connect to your ESXi 5 server using the IP address, User Name and Password that you set up and start creating some VMs.

To get the first VM created (in my case this had to be a Windows one that I could then use to run the vSphere client on and RDP over to instead of having to run a VM on my Mac all the time), I uploaded an ISO image to the datastore that I had created, then added a new VM in the vSphere Client and set that ISO as the CD image it should load at boot time. You just specify the OS type, RAM, CPU, Networking and disk(s) you want and power it on – all very easy and quick.

Converting a VM Ware Workstation VM in to a VM Ware ESX Guest

I also wanted to convert the Ubuntu VM Ware Workstation image that this web site runs on, so I could move it off the old server and have it running on ESX as a “proper” ESX guest/host. This was really easy too; the VM Ware Converter allows you to specify a local VM of pretty much any type and supply the details of the target ESX server, and it then converts and loads it all for you – it took quite a while to complete but it worked without issues, and I was then able to power on my Ubuntu website VM under ESXi 5, where it’s happily running right now. No need to reinstall WordPress, Postfix, PHP, Java, Jenkins, MySQL etc etc – happy days.

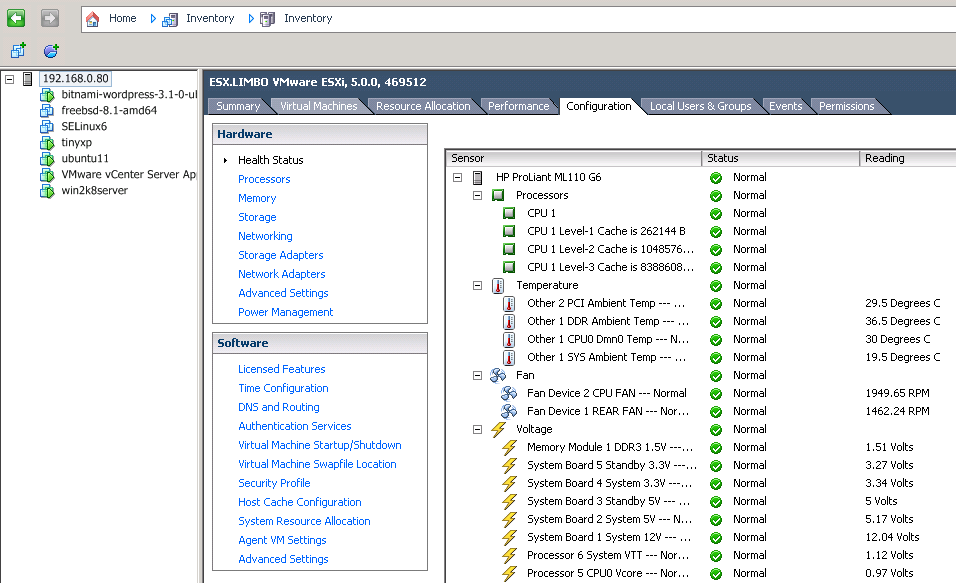
Here are some Pics of the ESXi5 console shortly after set-up…


1. General info on the reported spec and current overall resource usage of the HP ProLiant ML110 G6:

ESXi 5 console general information


2. Some of the Health Monitoring and General Configuration options:

Inventory and general settings and diagnostics pic

3. Overview of Guest and Host resources:

Guest and Host resources


Summary:

I did a fair bit of research beforehand to make sure the install and hardware would be ok, which meant the actual set up was trivial – once it’s done all you need to do is create VMs and allocate resources; there is very little work or maintenance required – especially compared to what would be needed to run multiple physical servers all with their own hardware. Creating new VMs is very easy, and the performance is good so far – the processor is not stressed at all, and the ESX memory management does a good job – I’ve had up to 6 VMs running at the same time and still have about half the memory free!

Next plans:

One of my main reasons for doing this was to provide a test platform for automating, creating and managing Linux VMs using Jenkins as a front end and DNS records to control what is deployed where and when – I want to be able to select a few options, then click a button and have my new host created in minutes and to the right spec, similar to the Amazon EC2 set up but code deployment linked in too, and I will write more on this when I’ve done it.

Plans include a mixture of: VM Ware Templates, Perl, Jenkins jobs, Jenkins Nodes, Puppet, Tomcat, etc

Next Post:

There are a few other things I have already done that I’d like to document too including…

Accessing ESXi 5 via SSH – how to and a summary of useful commands etc
More detail on Remote desktop via ssh tunnels etc
VM Ware command line tools
DNS and AD/LDAP servers

Some PHP examples

I recently wrote a couple of PHP Pages for my site:

UK Area Code Search which searches my database for a specified full or partial area code or town

and

Crossword Solver  which searches for possible matches to a partial word.

It’s been a while since I’d done any PHP (all of the recent web-dev stuff I’ve written has been either JSP, Python or CGI) so I thought I’d keep some notes on my own ‘refresher course’ and do a brief write up of the main steps involved.

Both of these apps are basically quite similar; they take some user input, search in a database, then display the results on a web page.

For tasks that need done repeatedly, like sanitising user inputs, it’s worth creating a simple function:

function cleanvar($input){
if (strlen($input) > 1){
$input = ‘_’;
}
return $input;
}

this allows you to quickly create, populate and sanitise a variable in one go like so:

$mynewvar = cleanvar($_POST[‘userselection’]);

When the page loads, you can check if there is anything to process or not by looking at the “submit” element:

if(isset($_POST[‘submit’]))
{
# do posty type things…
}

iterate through and clean up all passed parameters:

$myquery = “”;
foreach($_POST as $vblname => $value)
$myquery = $myquery . $value;

with some text replacements:

$myquery = str_replace(“Unknown”,”_”,$myquery);
$myquery = str_replace(“Search”,””,$myquery);

alternatively you could use the Request object to get each passed var explicitly, e.g. $_REQUEST[‘myparam’]

Connecting to a database is very nice and easy in PHP:

$con = mysql_connect(“myservername”,”myusername”,”mypassword”);
if (!$con)
{
die(‘Could not connect: ‘ . mysql_error());
}
mysql_select_db(“myschema”, $con);

Once connected, execute a query – I use a hard LIMIT to avoid returning all data:

$result = mysql_query(“SELECT lcase(word) as word FROM mytable where word like ‘$myquery’ LIMIT 0, 200”);

you could change the LIMIT parameters to create “paging” for your results, so the next page would show

LIMIT 200, 400

and so on.

Check for results and iterate through them:

while($row = mysql_fetch_array($result))
{
$counter++;
echo “Found ” . $counter . ” records: ” . $row[‘word’] . “”;
# etc etc
}

remember to close the MySQL connection when done:

mysql_close($con);

And that’s about it – some sanity checking and error handling is needed, plus outputting the HTML part, but for a quick and simple PHP page that takes user input, queries a database and shows results, the above steps should do the job.

As I’m using WordPress I wanted to get my PHP pages looking like they “belong” (getting my custom PHP pages to use the current WordPress Theme and CSS etc); there are several solutions for this like WordPress plugins for custom PHP pages and creating custom WordPress Templates. For now I have just included my PHP examples in an iFrame and explicitly use the site’s CSS to make them fit in, but I’d like to investigate what works best for me and sort this out “properly” at some point.


Quick directory listing for large file systems


Useful bit of Perl code – folk at work found this useful approach on the web somewhere – it’s much quicker than doing a recursive find apparently:


my @dirlist = ();

sub process_files

{

my $path = shift;

opendir (DIR, $path) or die “Unable to open $path: $!”;

my @files =

map { $path . ‘\’ . $_ }

grep { !/^.{1,2}$/ }

readdir (DIR);

closedir (DIR);

for (@files)

{

if (-d $_))

{

print $_.”n”;

push @dirlist, $_;

push @files, process_files ($_);

}

}

}

process_files(“.”);


Pardon the indentation/formatting 😉

Cheers,


Don

Pin It on Pinterest

%d bloggers like this: