UPDATE: This post is from 2016, things have changed since then, I would strongly recommend Frigate and Home Assistant these days!
This post details the processes I went through to create my own DIY home CCTV system.
Topics covered include:
1. Hardware – some cheap but impressive Tenvis TH692 720p IP cameras, and some Power over Ethernet (PoE) injectors and extractors to go with them
2. Camera setup – how to set them up, connect to them, and a quick summary of basic functions
3. Clients – info on a few different ways to attach to and use the cameras – VLC, Kodi/XBMC, RTSP and the built-in app and web interfaces
4. Jenkins – using Jenkins jobs to capture and record from Tenvis cameras
5. ZoneMinder – installation, OVA and manual install, settings used
6. Summary, links and general info
1. Hardware
On recommendation from a friend, the cameras I went for are these:
Tenvis TH692’s
“720P HD Outdoor Network Wireless CCTV IP Camera with 15M Night Vision”

these cameras are currently available on Amazon for only £27 each!
The cameras can happily run over WiFi but as they will still need a power connection, I have opted to run them over Ethernet and to send the power over the CAT6 cable too – this way there’s still only 1 cable required, and I get a faster network connection too.
To do this I have used these:
AKORD® POE Passive Power Over Ethernet Adapter Injector Extractor Kit

These clever little beasties work with the power adapter that comes with the Tenvis TH692’s, and come complete with both a PoE Injector and Extractor, for only £3.99 – another mega-bargain! I haven’t tested them for outdoor use in bad weather yet, but suspect they may require some protection from the elements, which is fair enough.
2. Camera Setup
Connecting the cameras to your home network and getting them up and running is pretty easy. You need to connect them wired initially and use DHCP to assign an address. With that done, you can then use the supplied software to find, connect to and configure the cameras. After that’s complete, you can connect them to your WiFi, change the name/label for the camera, set up users and passwords, set up Email and FTP alerts and settings and so on.
3. Clients
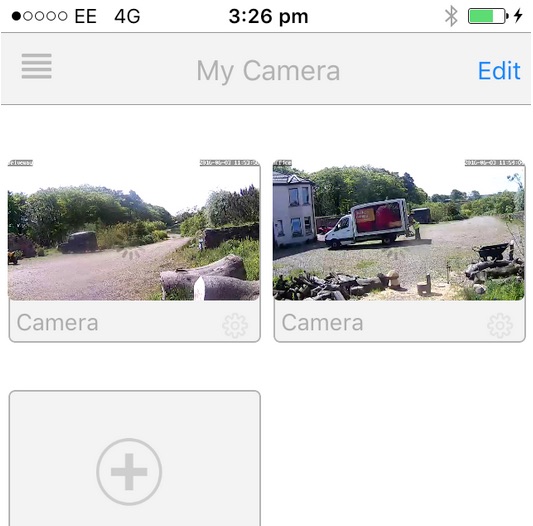
I found the supplied software sufficient for the initial setup, and the phone app (search for “NEW Tenvis” in the App store) works very well, allowing you to monitor your camera(s) from anywhere in the world assuming you’ve got an internet connection at both ends. Here’s a picture from my iPhone:
The web interface relies on browser plugins and didn’t work on my Mac under Chrome, Firefox or Safari – it wanted an out dated QuickTime plugin which I couldn’t get working, though I confess I didn’t try too hard. It worked ok on my Windows VM, but I don’t want to use that interface or that OS. Luckily there are plenty of alternative options though, as these cameras use RTSP…
“The Real Time Streaming Protocol (RTSP) is a network control protocol designed for use in entertainment and communications systems to control streaming media servers. The protocol is used for establishing and controlling media sessions between end points.”
[ Source: Real Time Streaming Protocol – Wikipedia, the free encyclopedia ]
This opens up several options for connecting to the cameras, and means that you don’t need to rely on the supplied software and interfaces. For me, this is what makes these cameras so good.
Here are the solutions I use, though there are many more available…
VLC – VideoLAN – as you’ll probably know, this great free and open source cross-platform multimedia player plays pretty much anything, and on pretty much every platform. Not surprisingly, I found I could point this player at the cameras RTSP feed, enabling me to view the video content from all devices that VLC runs on.
I use this approach on my Mac laptop mostly, and it’s as easy as creating a small config file for each camera feed then clicking on it to open the live feed. The files can be saved with “.m3u” extensions, as long as you’ve set that file type to be handled by VLC.
For example, here are the contents of the “cctv_driveway.m3u” file I currently have on my OSX Desktop, and that I click to connect to that feed:
#EXTM3U
#EXTINF:0, Driveway CCTV
rtsp://USERNAME:YOURPASSWORD@192.168.0.151:554/1
that’s it – just 3 lines.
Line 1, “#EXTM3U” is the file header which must be the first line of the file – like a Bash “shebang”.
Line 2, “#EXTINF:0, Driveway CCTV” contains the track information (just a zero here) and the title of the feed. This is displayed as “Driveway CCTV” in the VLC Window title, which is a handy feature.
Line 3, ” rtsp://USERNAME:YOURPASSWORD@192.168.0.151:554/1″ is simply the RTSP URL for the camera feed you want to stream from.
The RTSP URL contains the protocol (rtsp://), then user and password details, then the address of the camera (192.168.0.151 in this case), which is followed by the port the feed is served on: 554. This port can be seen in the camera config during the initial setup, but if you are unsure you can run a simple nmap scan against your camera like this:

Here we can see port 80 and 8080 are open for the web interfaces (viewing and configuration respectively), and 554 which is the standard RTSP port.
This useful web page can also generate the correct RTSP URL for many popular cameras:
Tenvis IP camera URL
The final part of the URL is the endpoint to connect to on the remote camera/host – you can see in the config above that I am connecting to “/1” at the very end of the third line in my M3U file; this is the location for the full 720 HD feed for these particualr cameras. There are also lower resolution feeds available which can also be useful to know about, especially when monitoring multiple cameras or connecting remotely (e.g. with lower bandwidth).
For these Tenvis cameras, changing to the “/12” endpoint will fetch the lower quality feed, and there are other options inbetween that you can use to suit your requirements. These end points can also be modified further through the Tenvis settings app (which is running on port 8080).
Kodi (formerly XBMC) – from a quick google it looks like there are several ways in which Kodi can be set up to consume and view RTSP feeds. The simple option I’ve gone for is, again, to create a tiny config file containing the settings for each camera, and to place these files on my NAS storage. This means that watching a camera live on my TV is as simple as selecting the corresponding file in Kodi, and it will launch the stream just like you had clicked on a movie.
The files I use have the “.strm” extension and simply contain the full URL for the RTSP stream:
rtsp://user:password@192.168.0.156:554/1
Using this simple approach, I can click on files like “cctv_driveway.strm” in Kodi to launch the various streams. Because I only ever use this on my TV or Projector, I go for the full 720 HD feed in these files via the “/1” end points.
4. Jenkins
Disclaimer: I have a tendency to use Jenkins to automate everything.
Sometimes this extends to things that don't really need it, just to see if/how it can be done.
This section and idea is driven from that personal tendency/obsession.
The ZoneMinder solution (described below) is by far the more sensible option for most cases :-)
After setting up some cameras and connecting to them, I then wanted to record and archive the footage. The provided software enables you to set up FTP archiving and email alerts, but I wanted to do something more flexible, that would allow me to easily change & tune the retention, housekeeping and archiving. The approach I used is slightly unusual, but it’s very simple, effective and flexible, allowing me to easily tweak things to suit my requirements.
To use Jenkins for recording and managing my CCTV Camera feeds, I went through the following high-level steps:
1. Create a new ‘Freestyle’ Jenkins job, set to run on my Ubuntu host
2. Add an ‘Execute shell’ step. To this I added the following shell commands:
export MY_DATE=`date +"%Y%m%d%H%M%S"`
rm -f *.ts
/usr/bin/vlc -vvv rtsp://USER:PASSWORD@192.168.0.151:554/12 --sout=file/ts:/home/don/cctv/recording-${MY_DATE}.ts -I dummy --stop-time=1800 vlc://quit
mv /home/don/cctv/recording-${MY_DATE}.ts .
This is cleaning up any previous/old files then capturing 30 minutes of output from the camera via VLC, writing the data stream to a file. After 30 minites VLC quits, and I move the newly captured file to the current working directory with a timestamp in the filename.
3. Archive files
After the shell command above is complete, I have configured the Jenkins job to archive the captured file along with this job run. This makes it nice and easy to browse through previous (date & timestamped) jobs and simply click to view the corresponding video capture from that time.
4. Create a Jenkins job loop
At the end of every 30 minute run, I set the “Build other projects” option for this build to trigger another run of this same job, creating an infinite loop of 30 minute runs. There’s a tiny pause between the job ending and the next build starting, but it’s only a second or two at most, which I can live with.
Once I was happy that the data was being captured and archived ok, I was then able to configure and tune the retention through Jenkins – there are loads of Jenkins built-in options that enable you to do things like ‘keep the last x builds’, or ‘keep builds for n days’, or whatever you would like. You can also mark certain builds as ‘keep forever’ if you wanted to preserve anything interesting.
This process works well for me, and the CPU and memory usage created from having 3 of these jobs running constantly is, to my surprise, next to nothing; thanks to the impressive efficiency of VLC.
The disk usage is the main issue here; with this approach I’m constantly recording, and you can fill up a LOT of disk by writing several HD video streams to disk! One plan I was considering is to reencode video footage at a lesser bitrate (to reduce the file size) as they get older (using another Jenkins job), but I think that may be over-kill: for me, 2 weeks retention with the ability to archive/keep anything I want to quite easily is more than enough really.
5. ZoneMinder
Nearly every search I did when looking for software to manage my new CCTV cameras led me to the same place – https://zoneminder.com/
Like VLC, Kodi and Jenkins, ZoneMinder is a fantastic bit of software; it’s free, there’s loads of documentation, and it’s extremely configurable. For managing CCTV video recordings I’ve not yet seen anything that compares to it, even if you are willing to spend serious money.
Initially I tried installing everything in a ready-made VM Template – an OVA file – I think it was this one:
http://blog.waldrondigital.com/2012/09/23/zoneminder-virtual-machine-appliance-for-vmware-esxi-workstation-fusion/
This is a great solution and can be a real timesaver to get you up and running, especially if you don’t have a VM with Ubuntu and a LAMP stack to hand. It took something like 2 minutes to deploy this to my ESX server, and it was working a few minutes after that. The software was out of date with the VM I downloaded and deployed, but there are clear and easy instructions on that page explaining how to update to the latest versions.
I decided I didn’t want the overhead of running another VM just for this one function, and as I already have a few running I looked in to installing ZoneMinder from scratch on an existing Ubuntu VM, which is actually pretty easy as detailed here:
http://zoneminder.readthedocs.io/en/stable/installationguide/ubuntu.html
This went quite smoothly, I had to do a couple of MySQL tweaks but it took about 20 minutes from start to finish, and I ended up with ZoneMinder running on an existing Ubuntu host which will mean less update and maintenance grief for me (as oppposed to running a separate and dedicated VM just for ZoneMinder).
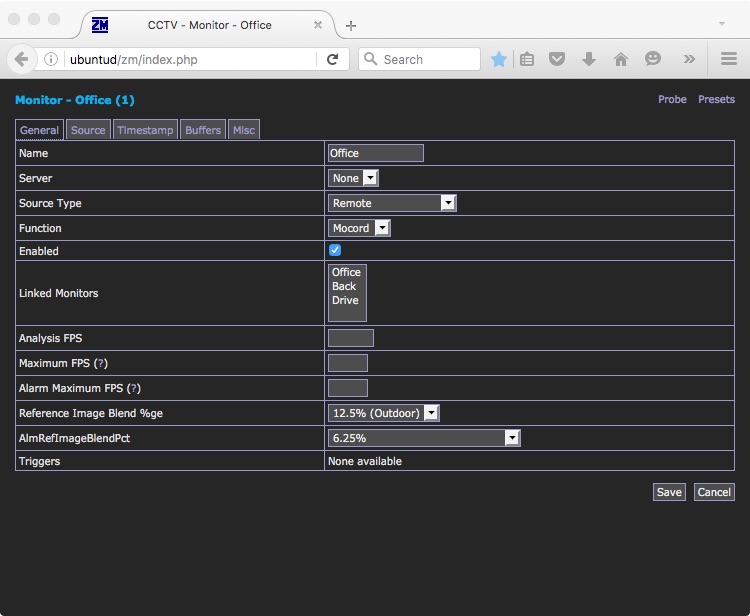
It took a little experimenting to get the Tenvis TH692 cameras working in ZoneMinder, but nothing complex – here’s what I used for the “General” settings with the Tenvis TH692 cameras:
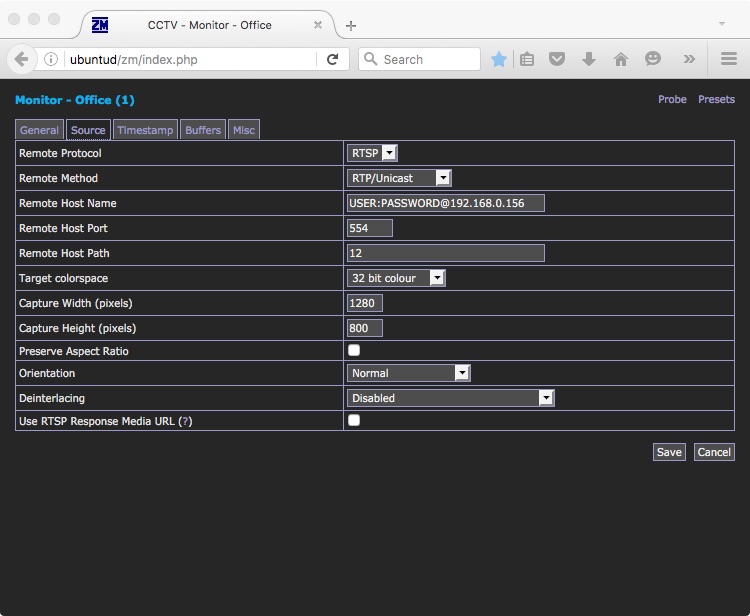
and here are the “Source” settings for the RTSP Stream, using the same basic details we’ve used to set up VLC, Kodi etc previously:
Once that’s done, you can tweak the settings to your liking. You can have ZoneMinder record events as they happen and archive them, and/or use it to act as a nicer web interface to your cameras. You get the option to cycle through your different cameras automatically, or you can watch several feeds on one page – the options and possibilities are great.
One of the main points of using ZoneMinder for me is that it serves the camera feeds to the browser without the need for plugins like QuickTime, and it works well on all operating systems I’ve tried – and all devices.
Note that it’s advisable to set up a ZoneMinder Filter to archive your old footage – preferably before your disks get full!
This link explains how to do this in a variety of ways:
http://zoneminder.readthedocs.io/en/latest/faq.html
After some inital experimenting I have gone for both a “Purge after x days” filter and a “Purge when disk over 50% full” – both types of Filter are detailed in that FAQ.
Summary
I can now connect to all of my cameras from all of my devices – my Nexus tablet, mobile phone, Mac and Linux computers, television, projector – quickly and easily, and from anywhere. I can also monitor, record, replay and generate alerts whenever they are required, and tune each camera to suit my needs. I think these cameras are a total bargain, the HD picture quality is excellent, and the night time IR is good too. If you are happy to set up your own connectivity and monitoring solutions like ZoneMinder (or Jenkins) you can quite easily create a sophisicated system for very little cost, and it’s good fun too!
Like this:
Like Loading...

 Will post progress!