This Jenkins Agent Nodes post covers:
- What are they?
- Why may I want one?
- How do you create one?
- tasks on On the Master/Server
- tasks on On the Agent/Client
- Other ways of creating Agent Nodes
- Related posts and links
What are they?
Jenkins Agents are small Java “Client” processes that connect back to a “Master” Jenkins instance over the Java Network Launch Protocol (JNLP).
Why may I want one?
Once it’s up and running, an Agent instance can be used to run tasks from a Master Jenkins instance on one or more remote machines providing an easy to use and flexible distributed system which can lend itself to a wide variety of tasks.
As these are Java processes, you are not restricted by architecture and can mix and match the OS’s of your agent nodes as required – Windows, Linux, UNIX, iSeries, OVMS etc – anything capable of running a modern version of Java (I think JNLP was introduced in 1.5?) and you can also group and categorize subsets of different types (both logical and physical) of Agents; intended use, availability, location, available resources, Cloud or VM versus Physical tin – anything that helps you decide when you want to use which host.
There are many different ways you can choose to utilize these nodes – they can be used to spread the load of an intensive build process over many machines when they are available, you can delegate specific tasks to specific machines only, or you can use labels to group different classes or types of Nodes that are available for certain tasks, making the most use of your available resources. You can also have Jenkins create Cloud server instances – Amazon EC2 for example – when certain thresholds are reached, and stop them when they are no longer required.
This post focuses on a pretty manual approach to the creation of Jenkins Agent Nodes with the intention of explaining them well enough to allow you to create them on any platform that can run a modern version of Java – there are probably simpler solutions depending on your needs and setup. A later post will touch on a few of the many possible uses for these nodes.
So, how do you create one?
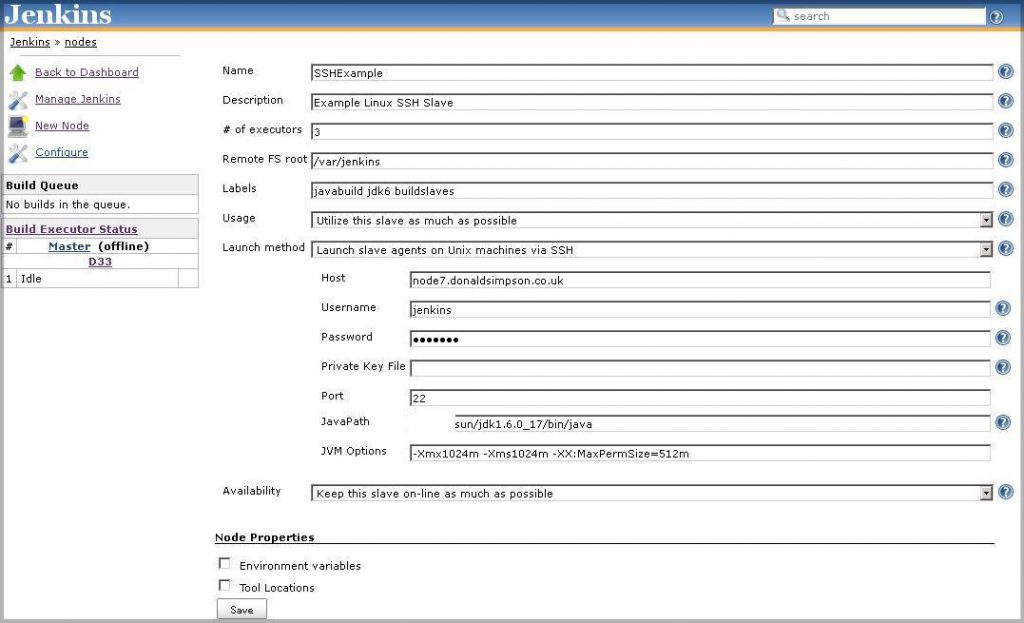
There are several different ways to go about setting up an Agent, and the “best” approach depends on your situation, needs and environment(s) – for a simple Linux setup letting Jenkins do all the work for you makes life really easy, you can just select that option in your new Jenkins Agent Node and complete this screen to have Jenkins set it up for you:
Where the Username and Password are the credentials you want Jenkins to use to connect and start the Agent process on the remote server. This simple approach also allows the Master instance to initiate the JNLP connection and bring your agents online when required, avoiding any need to manually visit each agent node.
This keeps things nice and simple and reduces the admin overhead too, but sometimes this type of approach can’t be used (on different OS’s like OVMS, iSeries, Windows etc) and I’m going to go on to outline what I think is the most “versatile” method – defining the Node on the Master instance, and manually setting up and starting the corresponding Agent/Client Node on the remote host – going through these steps should provide enough detail on how Agent Nodes work and connect to get one up and running on anything that can run a JVM.
1. On the Master/Server
Define the host: navigate to Jenkins > Manage Jenkins > Manage Nodes > New Node
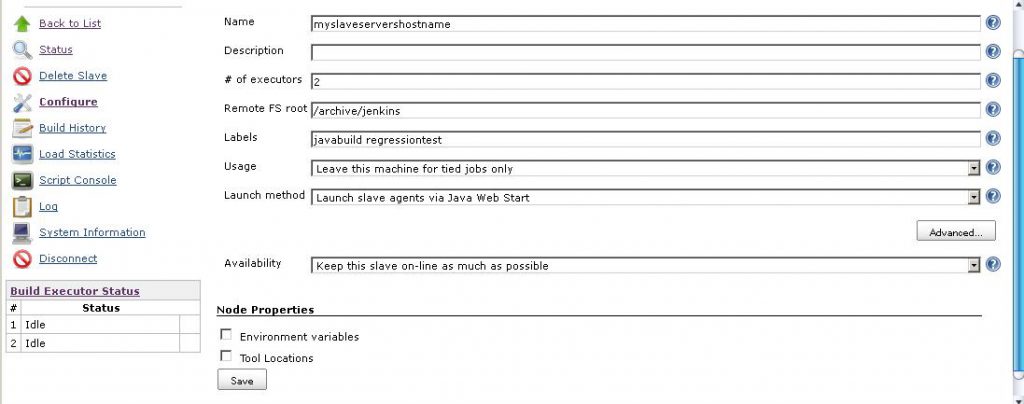
Enter a suitable Node Name (I’d recommend something descriptive, and usually including the host name or part of it) then either select to create a “Dumb Agent” or copy an existing Node if you have one, then complete the configuration page similar to this:
where you specify the requested properties – path, labels, usage, executors etc. These are explained in more detail in the “?” for each item if required.
Here you can also state if you want to keep your Jenkins Agent for tied jobs only, or if it is to be utilized as much as possible – this obviously depends on your requirements. You can also specify the Launch method that best applies to your needs & requirements.
2. On the Agent/Client host
You don’t need to do very much to create a new agent node – typically if I’m setting up a few *NIX and Windows hosts I would archive a simple shell/DOS script that starts and manages the process along with the slave.jar file from the Master Jenkins instance. There are alternative methods that may suit your needs – you can start agents via SSH from the Master server for example and there’s a comparable method for Windows – but this simple approach should help you understand the underlying idea that applies to them all.
You can “wget” (or use a Browser on Windows) the slave.jar file directly from the Master Jenkins instance using the URL
http://[your jenkins host]:[port number]/jnlpJars/slave.jar
If you let JNLP initiate the process, the slave.jar will be downloaded from Jenkins automatically.
Note that Jenkins will inherit the effective permissions of the user that starts the process – this is to be expected, but it’s often worth having a think about the security aspects of this, along with the access requirements for the types of things you want your agent to be able to do… or not do.
On Windows hosts, you can use the jenkins-agent.exe to easily install Jenkins as a Windows Service, which can then be started at boot time and run under whatever user/permissions you wish set via the Services panel.
My *NIX “startagent.sh” script does a few environment/sanity checks, then kicks of the agent process something like so:
${NOHUP} ${JAVA} -jar slave.jar -jnlpUrl http://SERVERNAME:PORT/computer/USER__NODENAME/slave-agent.jnlp &
The HTTP URL there should match the one provided by the Jenkins page when you were defining the Node. If all goes well you should see the node state changed to Connected on the Master Hudson instance, and if not, then nohup.out should provide some pretty obvious pointers on the problem.
Some common causes are:
Jenkins host, port or node name wrong
Java version not found/wrong
Lack of write permissions to the file system
Lack of space (check /tmp too)
Port already in use
Errors in the jenkins-slave.xml file if you’ve tweaked it
Firewalls…
Jenkins also provides some health monitoring of the connected Node which you can see in the Jenkins > Nodes page:
Disk Space, Free Temp Space, Clock time/sync, Response Time and Free Swap are monitored
and you can have your Node taken off line if any of these passes a set threshold.
This should hopefully be enough info to provide an overview of what Jenkins Agents are, and enough to get one up and running on your chosen platform. Where possible it’s best to keep things simple – use SSH and let the Master instance manage things for you if you can – but when that’s not possible there are alternatives.
When I get the chance I will add some information on the next steps – creating and delegating jobs on Jenkins Agent Nodes, and some thoughts and suggestions for just a few of the many uses for this sort of distributed Build and Deployment system.
Related Posts and Links:
Monitoring Jenkins Slave Nodes with Groovy
– how to keep an eye on your Jenkins Slaves
Jenkins Slave Nodes – using the Swarm Plugin
– automatically connect new Slave Nodes to create a “Swarm”
Getting the current user in Jenkins
– several approaches
Managing Jenkins as a service and starting at boot time
– on Linux & Windows
Jenkins plugins
– details on some of my most frequently used plugins
Jenkins DIY Information Radiators
– what they are for, and how to make your own
The Jenkins Wiki has more details information on Distributed Builds and different slave-launching strategies.
Feedback, questions and constructive comments are very welcome!


