Kind – local kubernetes with docker nodes made quick and easy

Quick notes on trying out Kind for a local and lightweight Kubernetes cluster.

The “getting started” steps for Kind are easy and well documented on the Kind site, but I didn’t find a good guide on adding the Kubernetes Dashboard to a newly created Kind cluster… I’m planning on using this as the basis for a few local projects so wanted to capture it here, plus checkout using the Lens IDE to manage and monitor a local “Kind” cluster.

As it says on the Kind website… if you have go 1.16+ and docker or podman installed go install sigs.k8s.io/kind@v0.20.0 && kind create cluster is all you need!

Here’s me doing just that to create a new kind cluster on my Mac in 21 seconds….

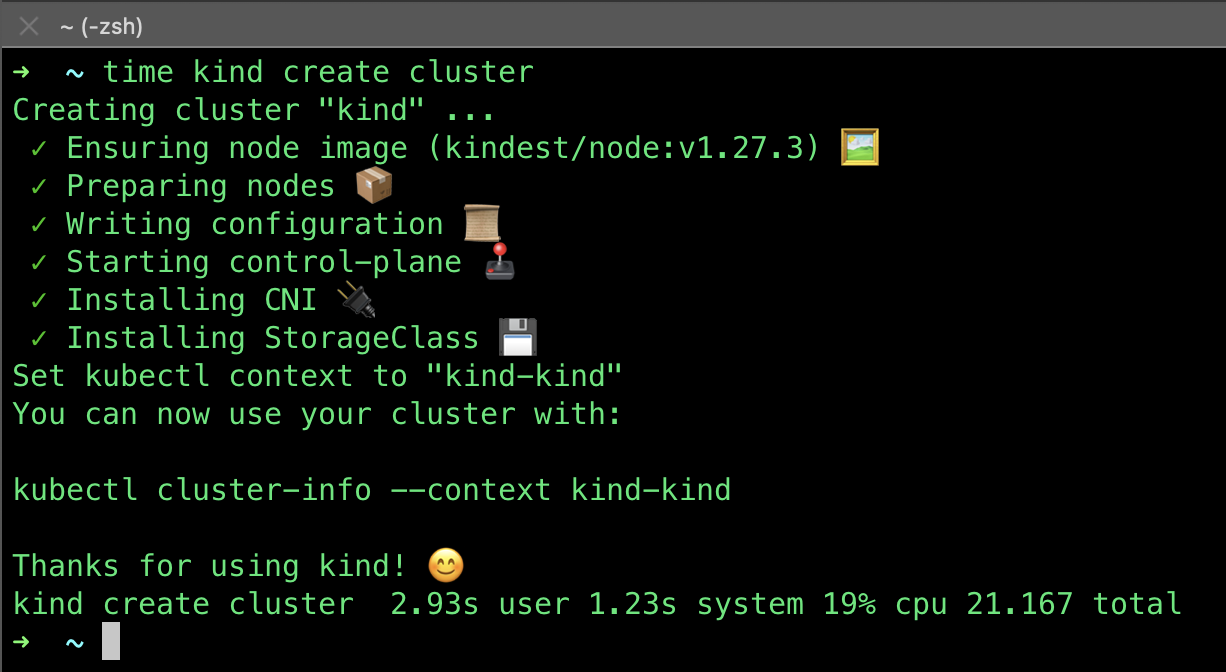
all very quick and very easy, and it is incredibly light on resources too.

Notes on adding the Kubernetes Dashboard to a new Kind cluster

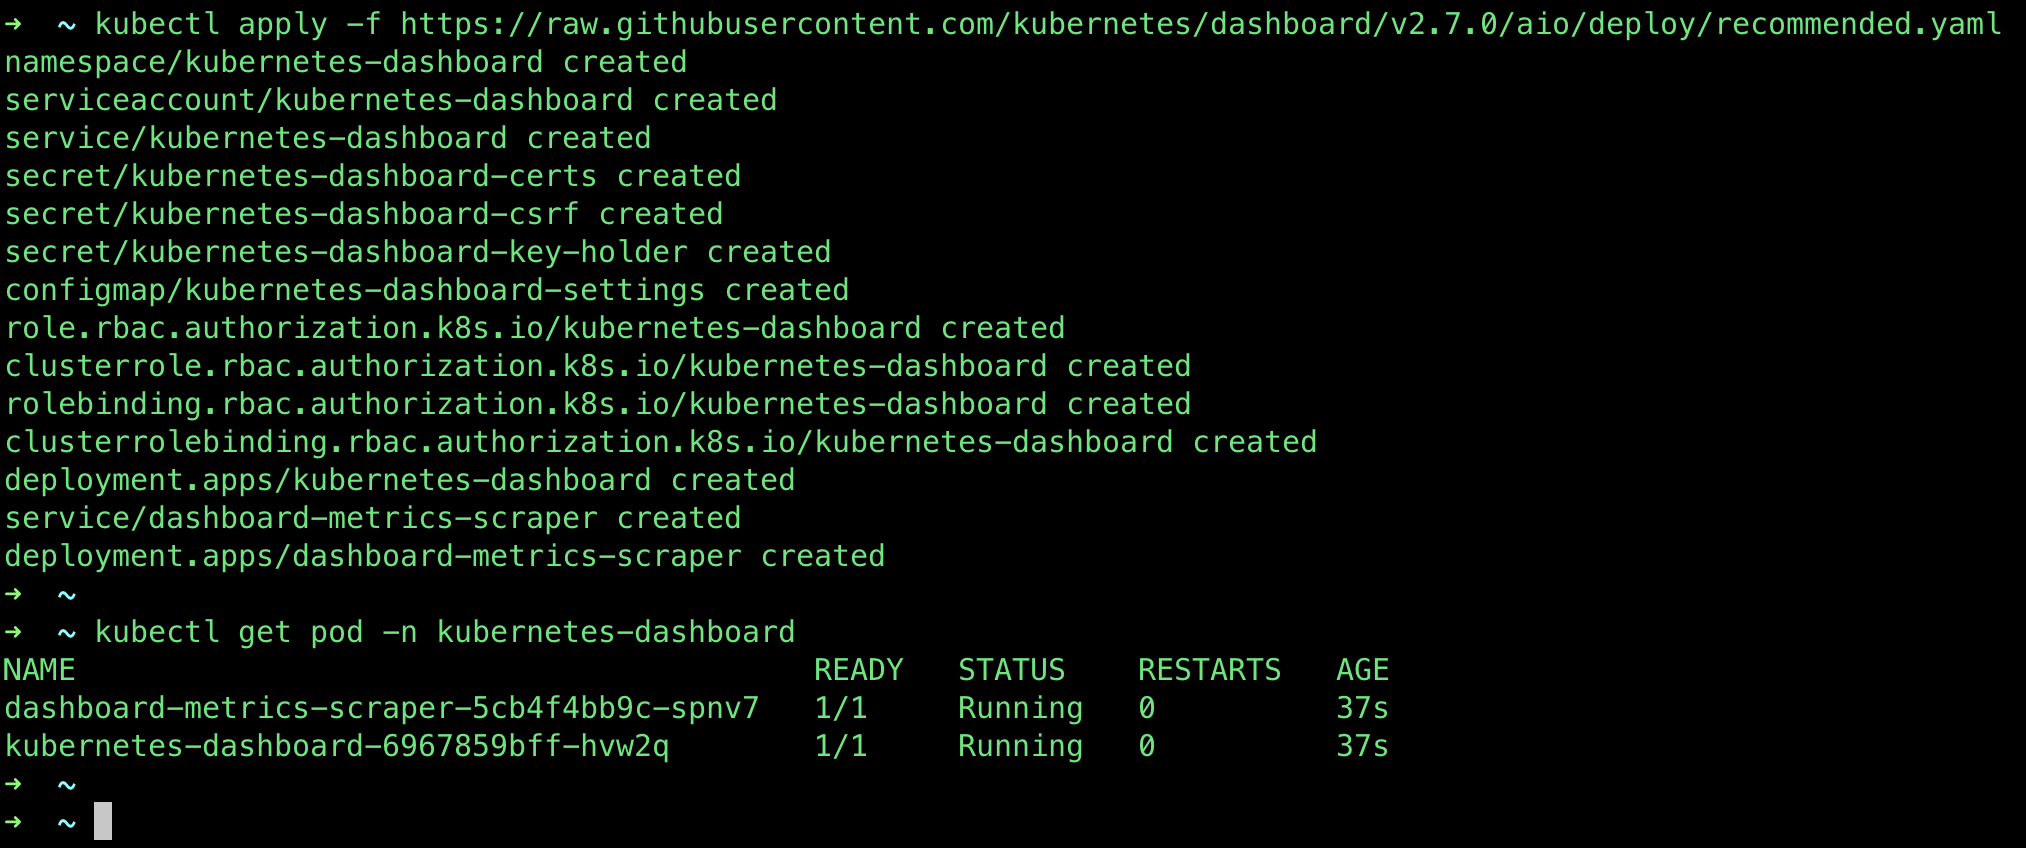
Apply the dashboard yaml

kubectl apply -f https://raw.githubusercontent.com/kubernetes/dashboard/v2.7.0/aio/deploy/recommended.yaml

Give it a moment or two to start up, checking with:

kubectl get pod -n kubernetes-dashboard

then create the admin user & cluster role bindings

kubectl create serviceaccount -n kubernetes-dashboard admin-user

kubectl create clusterrolebinding -n kubernetes-dashboard admin-user --clusterrole cluster-admin --serviceaccount=kubernetes-dashboard:admin-user

Next, get the auth token:

kubectl -n kubernetes-dashboard create token admin-user

Start up the local proxy

kubectl proxy

Browse to the local login endpoint here and pass it the token from above

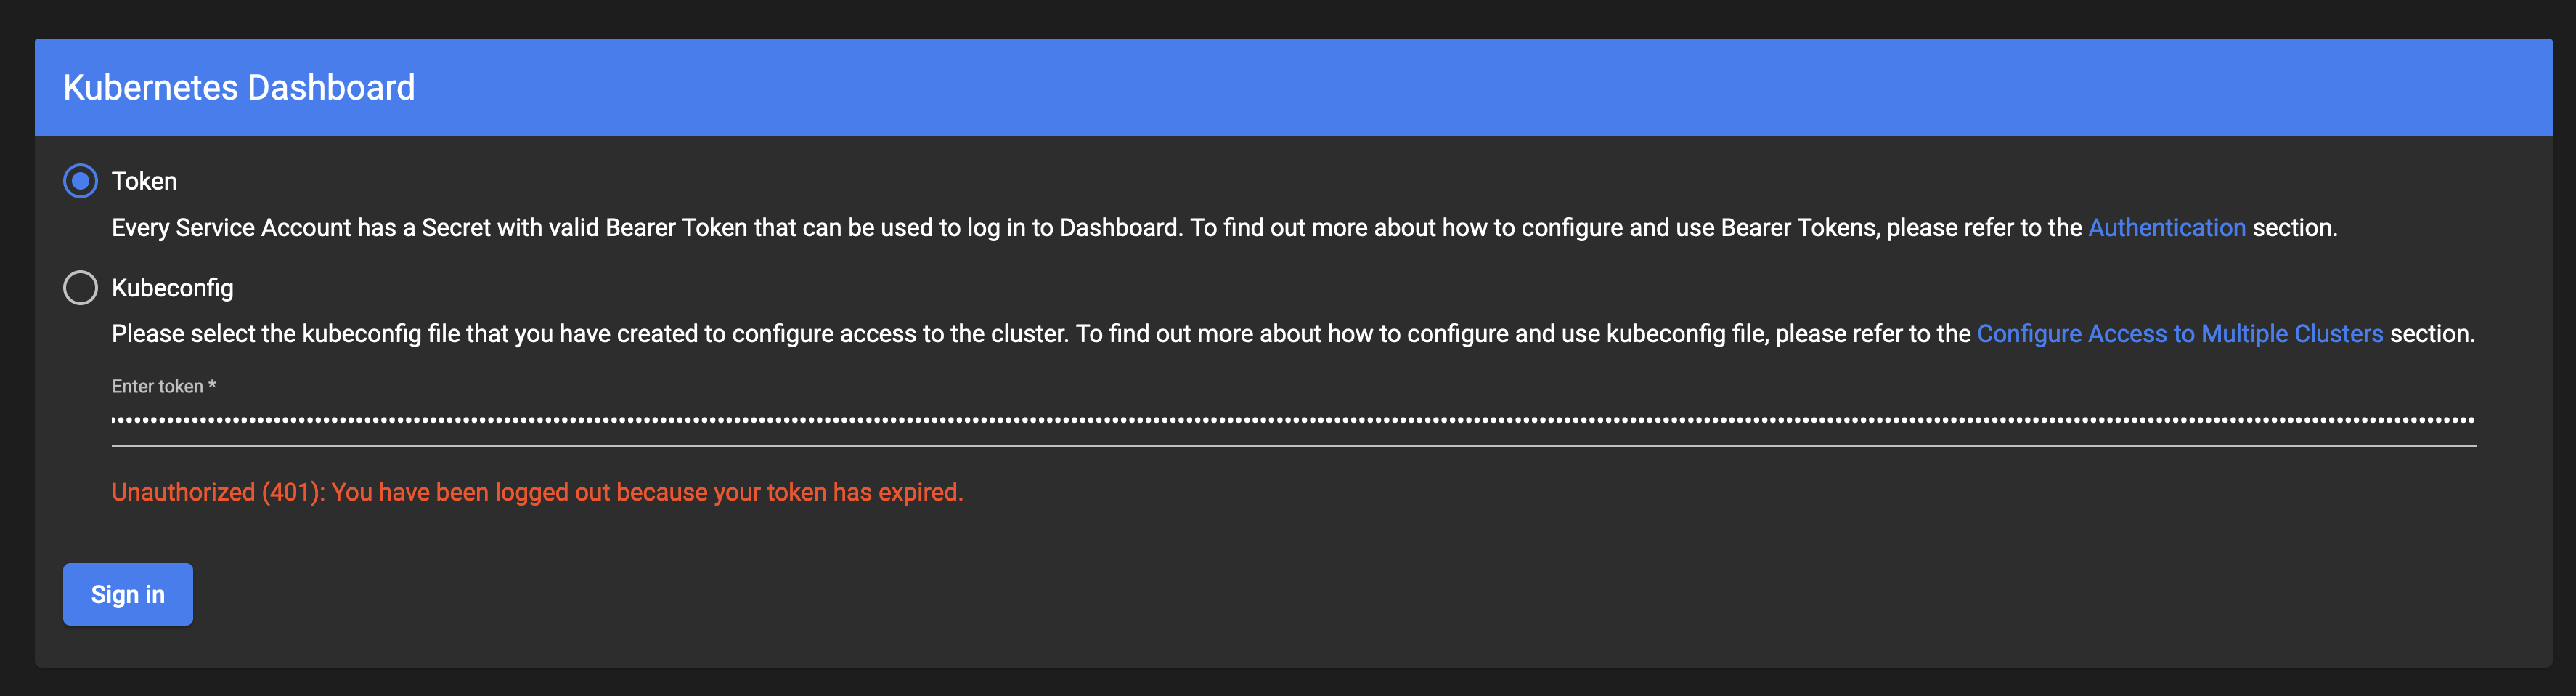
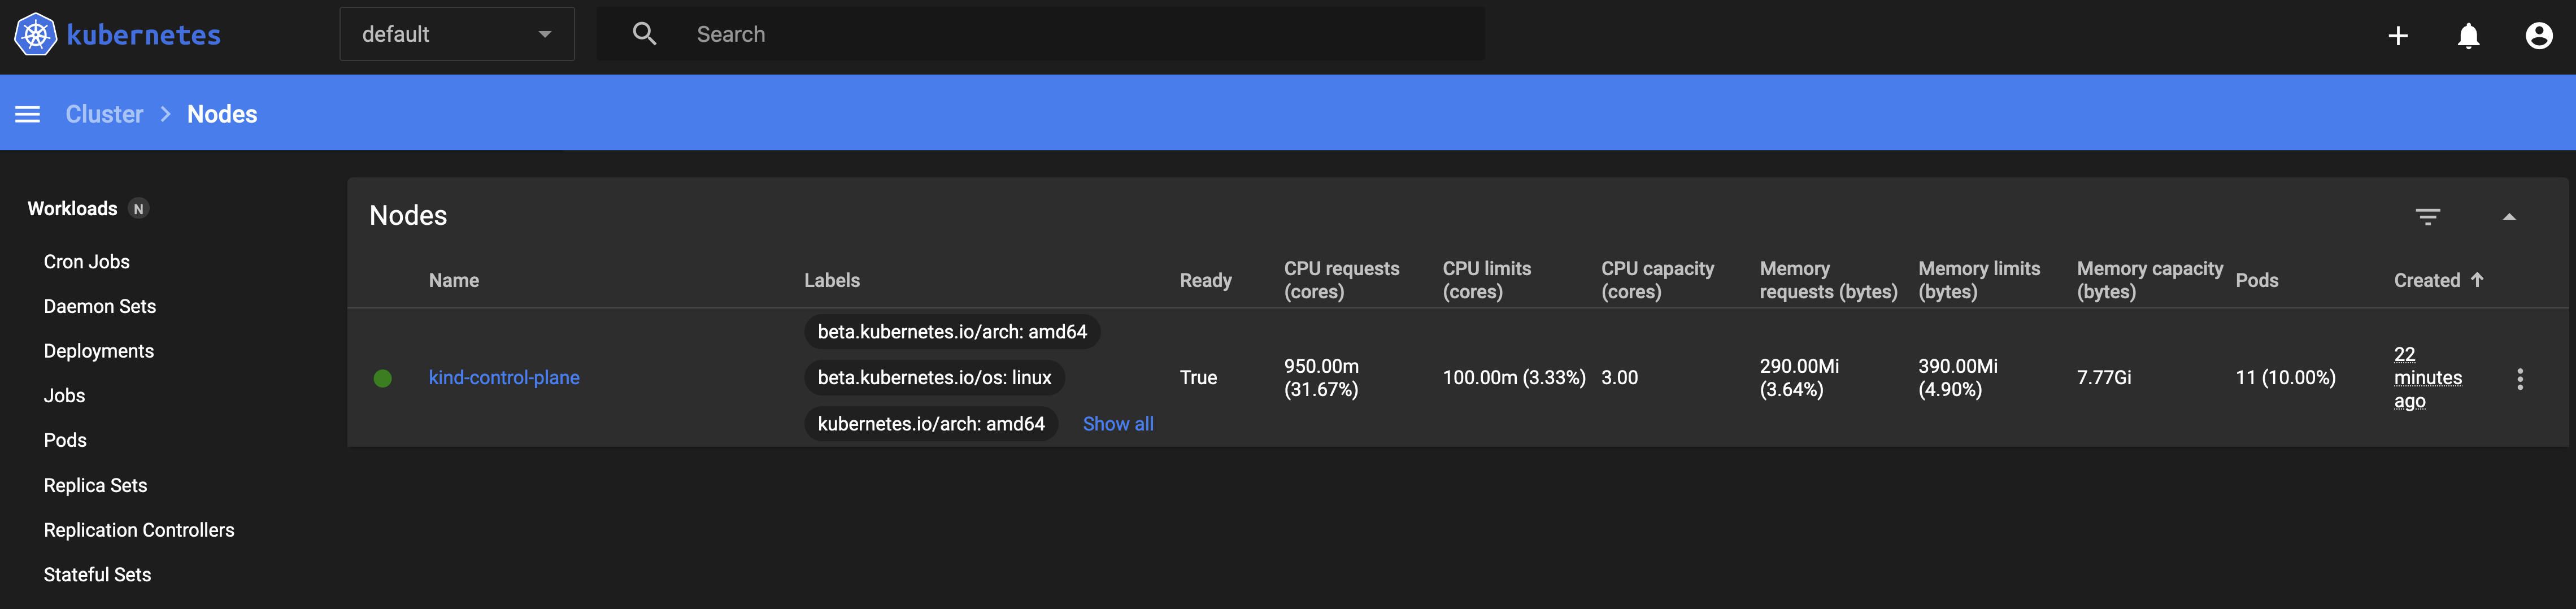
and you should see the Kubernetes Dashboard for your (very new) Kind cluster like this…

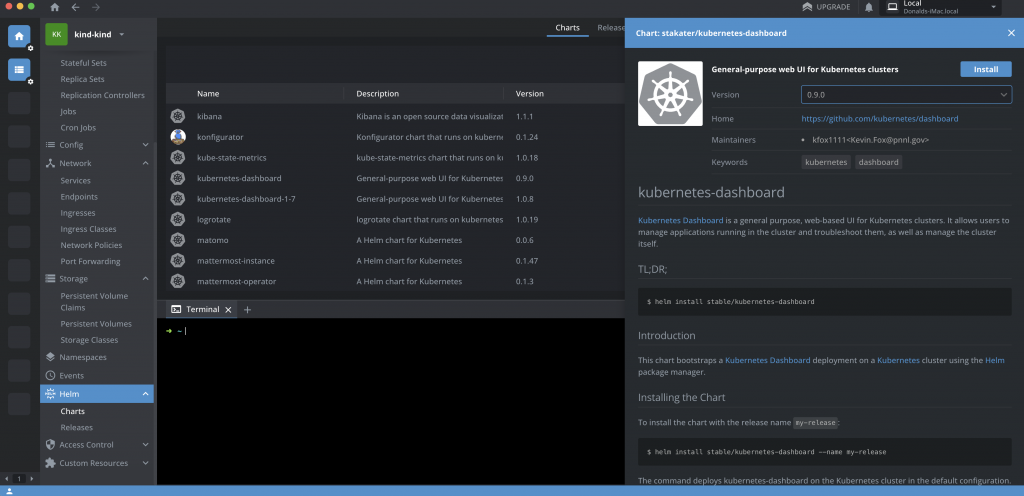
The Kubernetes Dashboard could also be deployed via Helm:

helm install stable/kubernetes-dashboard --name my-release

or via the Lens UI (more on that below):

Setting up Lens is even simpler

Download Lens and log in:

https://k8slens.dev/

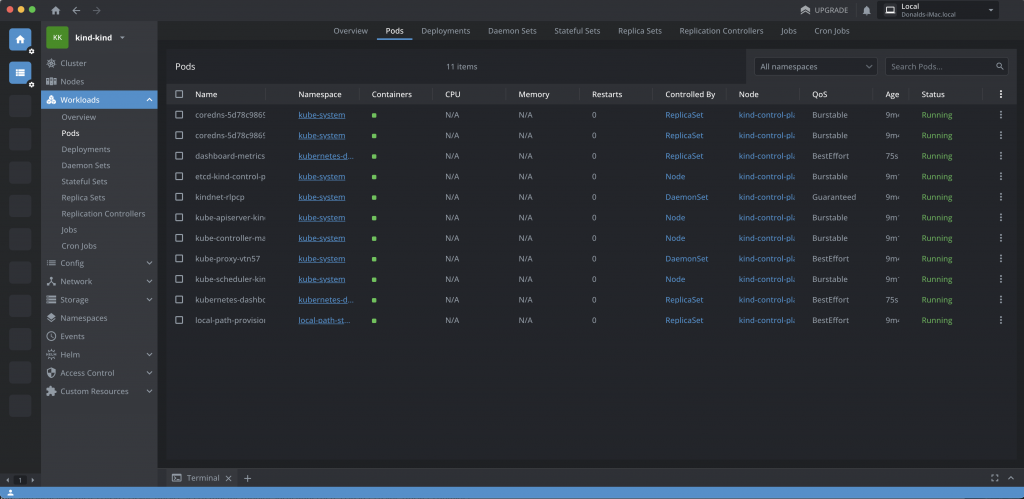
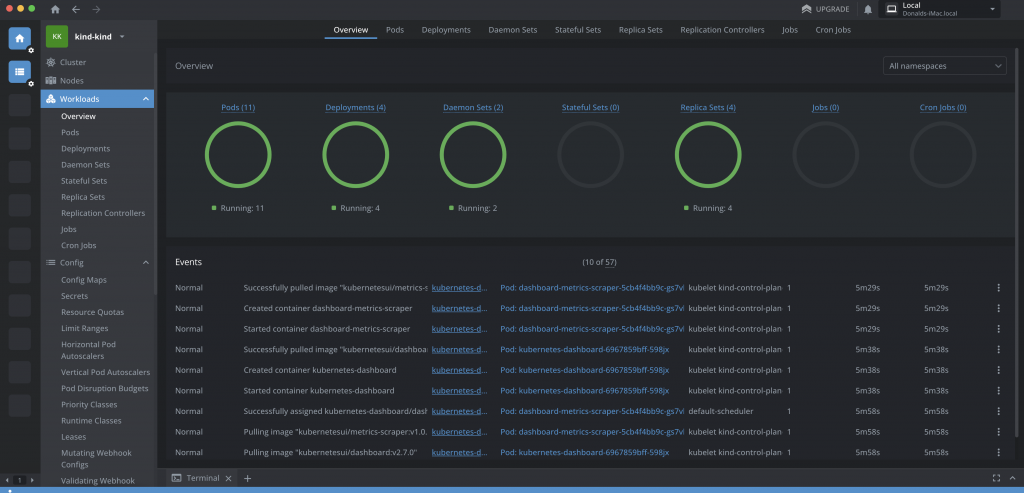
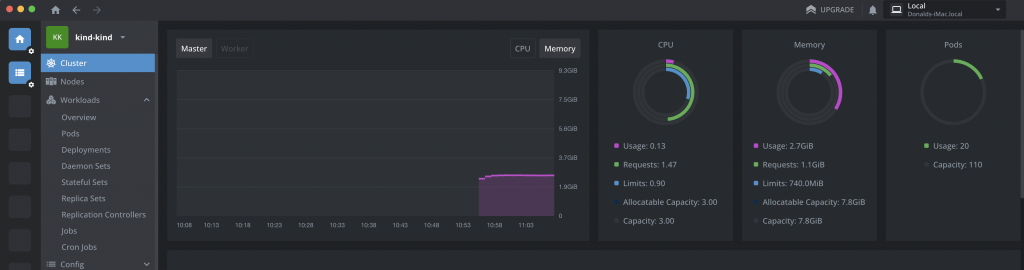
then select your “kind-kind” cluster from Lens > Catalogue > Clusters and you can see & do a whole load more with your cluster via Lens:

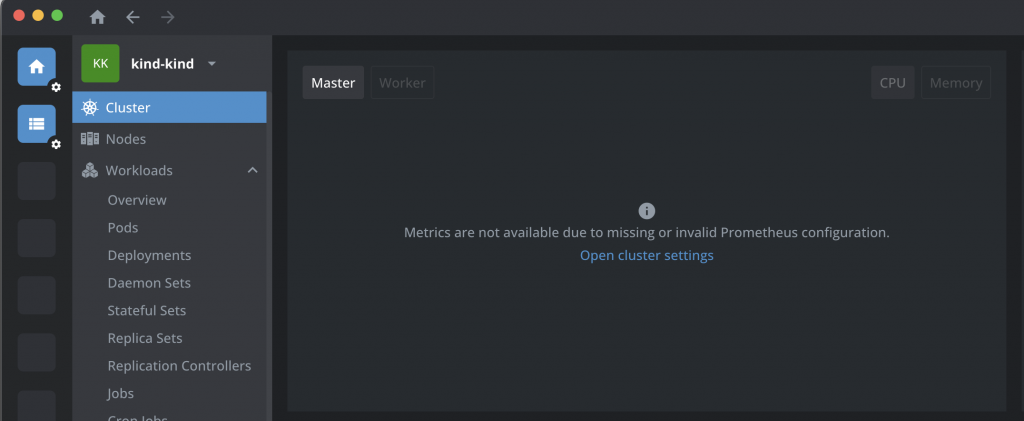
The missing metrics warning in Lens saying “Metrics are not available due to missing or invalid prometheus configuration.”

can be sorted by installing Prometheus using Helm via the CLI or from Lens:

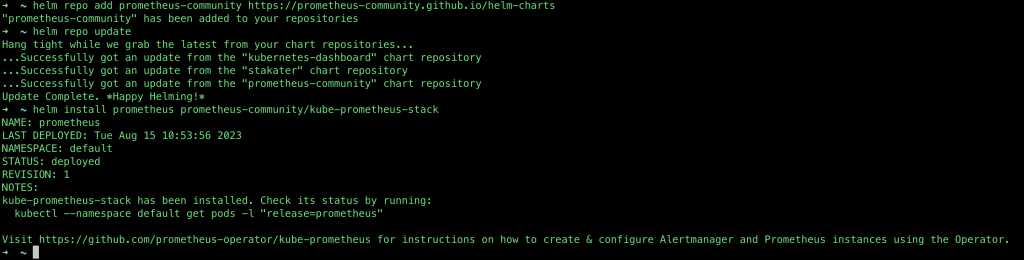
helm repo add prometheus-community https://prometheus-community.github.io/helm-charts
helm repo update
helm install prometheus prometheus-community/kube-prometheus-stack

Alternatively, you can enable the inbuilt Metrics options in Lens:

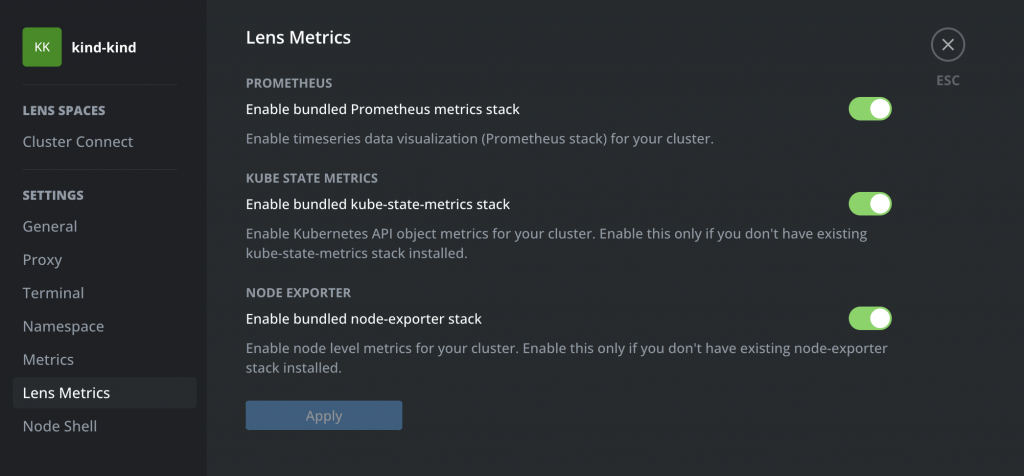
Either way, things should soon look much better:

Adding multiple worker nodes to a kind cluster

This can be done in Kind by defining a cluster manifest with multiple worker nodes like this:

kind: Cluster
apiVersion: kind.x-k8s.io/v1alpha4
nodes:
- role: control-plane
- role: worker
- role: worker
- role: worker

then creating the cluster specifying that file, e.g.

kind create cluster --config my-kind-cluster-config.yaml

“docker ps” should then show your multiple nodes, as will Lens:

Firefox on Mac issue – finally fixed!

This one caused me some grief for the last few weeks, thought I’d share in case it helps anyone else…

Firefox is my prefered browser on Mac, it’s setup with all my passwords, bookmarks, extensions etc and I use Chrome for work, so when it stopped loading and started crashing for no good reason it was VERY annoying. Couldn’t find any cure for it, little mention of issues and nothing more helpful than the usual: update it, restart, disable extensions, clear your profile, reinstall etc etc.

The issue being that Firefox would hang on startup – nothing would load, not even the basic home page, and I had to force-restart the browser on a regular basis until it would eventually decide to work like nomal again…. ARGH!

The solution to my issue was to disable support for HTTP3. That’s very easily done and has completely fixed things on my Mac (in this case it’s an iMac Retina 5k, 27-inch with macOS Monterey).

Here’s how – it takes 5 seconds + a restart.

enter “about:config” in the address bar and then hit the “Accept the Risk and Continue” button…

filter the settings for “http3” via the search bar, click on the bottom right icon seen in this pic to change the value from true to false:

so that it loks like this:

then just restart the browser and if you had the same issue as me, it should now be sorted! Happy surfing.

Update: There is a some more detailed info here:
https://bugzilla.mozilla.org/show_bug.cgi?id=1749908
incluing reports that disabling all of the data collection features may solve this (without the HTTP3 disabling update). Looks like this has been around for a while but only started affecting me a couple of weeks ago, and was hard to debug as there’s no obvious/searchable error message.

Optoma Projector overheating problem – Failing Fan – mega easy fix!!

Disclaimers/tips:
– unplug projector before removing the covers
– do not blame me if you try this and it doesn’t work
– don’t get any moisture on or near the bulb
– do not blame me if anything goes wrong
– if you have any better ideas, please share
– do not blame me for anything you do

I bought an “Optoma H181x Full 3D HD Projector” back in 2015, and it’s been awesome for 7 years. No issues at all, just many happy hours of HD and 3D movie & TV watching.

Recently though, it started to overheat and switch itself off after just a couple of minutes running, with the ominous message “Fan locked. Projector will switch off automatically. Please contact service centre for repair“.

Looking around online I could see it was a common problem in older projectors, usually due to dust buildup, and often sorted by either cleaning or replacing a failing fan.

I tried to clean (what I could easily access of) the fan but the blades etc were not ery dirty and it made no difference. Looking through the front vents with a torch, I could see the fan was trying to turn on startup then giving up. It’s a pretty ordinary component but taking the projector apart sounded complex and error prone (many reports of this going badly for others) and after a partial attempt I decided it wasn’t something I was comfortable or confident doing…. too many hidden clips and other fragile parts needing disconnected or removed, like the IR receiver, the switches, the zoom/focus wheel, etc.

This pic shows the top panel removed (just one captive screw on the left of the cover needs undone, then it slides left and lifts up & off easily.). Note: there’s a sensor that prevents the projector from powering on while this cover is removed.

You can see the culprit fan lurking just behind that yellow tape, it cools the bulb housing. To get anywhere near it I had to disconnect the wires via the plastic molex/clip on the left, remove those three screws on the far right, then carefully lift the bulb housing out (straight upwards), using the little metal handle with one hand and guiding the heat shields/flaps past the top of the cover with the other.

With that out of the way you can now see one side of the fan, but you can’t remove it from this side – here’s a close up:

I noticed the fan blades were stiffer and harder to rotate (by hand) than they probably should be, and I knew fans like these could sometimes be cleaned and lubricated… this sounded worth a shot (given the age and cost of repair, it was looking quite like ‘new projector time’ for me otherwise), but that cover was stuck down fast….

This pic shows the same side of the fan after I scraped off the cover to reveal four small holes. I then carefully placed 2-3 drops of ordinary multi-purpose oil in each hole. I let the projector stand in this position for a while, so the oil could work its way in/down, then cleaned the surface with Isopropyl Alcohol to remove any excess oil, before sticking some insulating tape back where the original label/cover had been. My projector sits up high and points downwards and I didn’t want any oil escaping…. or dripping on to the lamp. That would cause a kaboom.

I replaced the lamp housing and the cover and gave it a whirl – it’s now starting up first time no problem and running smoothly and quietly, just like it used to!

I think the placement of the fan – especially when the projector points downwards – means the fans central bearing is exposed to a lot of heat, which dries it out over time. It’s given many hours of use over the past 7 years so I’m not complaining, and hopefully I’ll get some more use out of it now.

This all took me quite a while to figure out and think through, but the actual fix was really easy and took about 10 minutes.

I thought I’d share this for anyone else facing the same issue.

Update: this projector worked ok for about 10 months after this fix then the bulb went – there were a lot of hours on it by then, and it was finally deemed to be ‘new projector time’.

Good luck, be careful,

Don

Milling massive beech tree trunk

Pics and updates on milling a large beech tree trunk.

This is the trunk section of this massive tree that blew over in a storm back in 2019:


I posted progress on other things made from this tree here too:
https://www.donaldsimpson.co.uk/2020/07/27/slabs-sleepers-and-stumps/

These giant chunks of wood have sat patiently outside my shed for the last 2+ years, like a massive looming todo list…

Now this (and a lot of sawdust) is all that’s left in the spot they occupied for so long:

It took me years to get around to it, but only a couple of Saturday afternoons to mill it all.

I used my Husqvarna 365 X-Torq chainsaw, along with a 42″ low-profile bar fitted with a 3/8 Lo Pro .050 ripping chain with 137 drive links… 137… I am not looking forward to sharpening that!

This, for me, is a whole load of bar and chain to run. It more than maxed out the cutting width of my Alaskan Mill setup, which was just a little too short to cope with the widest parts of this trunk, so I had to take a couple of edge sections off.

The Husqvarna 365 did a great job getting through this much solid beech wood – I expected more of a struggle, but as long as I took it slowly and used wedges to keep the weight from pinching the bar & chain, it chugged through it no problem. Having the trunks at a slight angle meant that gravity lent a hand too.

Great chain and bar from https://www.chainsawbars.co.uk/ along with their usual great service and helpful advice too, thank you again guys, this worked perfectly.

Here are some of the slabs that were produced – I don’t think the pics properly show how big these are, and they definately don’t convey the weight of them! I had to ‘walk’ the thicker ones over to the shed, one corner at a time.

These slabs are now stacked, spaced and weighted in my wood shed with a dehumidifier and fan on them (running off my small solar setup!). Hopefully in a year or so I can try giving the thinner slabs a final flattening with the router sled then turn them in to tables.

I’m hoping that void and inclusion on two of the slabs could work out quite nicely too – I’m not normally a fan of epoxy resin but this could be a good place for it? Maybe? Or just go with the ‘feature’ perhaps?

There are three 4″ thick slabs that will take even longer to properly dry, but if they don’t warp or split they should become very characterful – and heavy – tables.

To fit these in to my shed I had to take out a load of planks I milled a couple of years ago, many of which have come out nice and straight – so making something useful from those is now next on the todo list. My wife has already placed an order for some waney-edged bookcases for the Yurt… possibly curved to match the walls… ?!

Storm Arwen- windfall beech tree 2022

Cleaning up a beech tree that fell over in late 2021 during storm “Arwen”, squishing some stock fencing. There were ditches on both sides so getting the tractor close enough to be much help was awkward, but I used it to drag out the thickest trunk sections and bring things home. I plan to mill the trunks in to slabs, and will add pics of that (and whatever becomes of them) to this post.

Pics of the fallen tree and damaged fence

Progress pics – a fun day or two of chainsawing and throwing logs around…

Bringing things home – mostly firewood but a few big sections…

All cleaned up like new – the fence needed some new posts & staples but it’s now stock proof again. The stump and a section of trunk are left to keep bugs & critters happy:

Will add posts on progress when milling the trunk sections….

Hey Siri, manage my server…

Intro

I use Siri and Apple Homekit to automate some basic things – switching lights and heaters on/off, etc – and was wondering if there was some way I could use Siri to run tasks on my computers and servers at home.

Some googling showed me this was possible and also reasonably easy to set up – these are my notes on the process and some examples of what I’ve done with it so far.

Setup on iPhone

There’s a free Apple “Shortcuts” app for iPhones:

https://apps.apple.com/us/app/shortcuts/id915249334

which can perform a wide range of tasks, including – as of reasonably recently – the abiltiy to run scripts over SSH.

Open the Shortcuts App, click + and then Add action. These pics show the process from that point on:

Click on Add Action….

From here you fill out the details – the IP address of the remote computer, the user and password, and the path to the script you want to run.

Requirements

You need to have SSH setup and a working script you can run over SSH first.

On Ubuntu that means installing and configuring SSH as described here:

https://linuxize.com/post/how-to-enable-ssh-on-ubuntu-20-04/

On MacOS you need to enable Remote Login under Sharing here:

You also need a script that is executable as the user you are connecting with.

Obviously, be aware of the security risk of enabling tasks to be run remotely, etc.

Examples

Here are some I made earlier.

This one connects to my old Mac Pro (it runs Ubuntu) and runs a ‘shutdown’ script.

My /home/don/shutdown script simply contains “sudo init 0” and the ‘don‘ user is enabled for passwordless sudo.

and this one connects to the same host and powers on the attached monitor, that runs Firefox showing my CCTV/Zoneminder conosole:

The “/home/don/screenon” script contains this:

xset -display :0.0 dpms force on

and there’s a ‘screenoff’ that switches the display off when I don’t want it too.

For my iMac runnning MacOS I’ve added a shutdown script – useful when I don’t want to go and power it off manually.

I’ve ended up with a selection of shortcuts to power things on & off, and can now say “Hey Siri, CCTV on please“, or “Hey Siri, shutdown iMac please“, and Siri makes it so….

This setup enables me to run pretty much anything on a Linux or Mac host simply by asking Siri – it could trigger deployment pipelines, perform updates, start/stop/restart services…. anything you can put in a shell script.

If you have any interesting ideas or suggestions please let me know below.

Kodi on Apple TV 4k 2nd Gen

Intro

Notes on installing Kodi on a new Apple TV 4K (2nd generation). This didn’t go smoothly and it needs redone/updated anually when the certificate expires. If the solution I came up with also works for you, please let me know.

The Kodi Wiki HOW-TO here explains the steps in detail

I followed the steps as closely as I could, but it didn’t work for me. Here’s a note of the diagnostic steps I took, and the changes I made to get it installed and working successfully…

Problems & error messages

The process appeared to go well up until the point of installing the newly built and freshly signed ipa on the target device, but after a minute or two the XCode deploy step ended with a generic “Unable to install” followed by the name of the package was I was trying to deploy (and I tried quite a few!).

Example error messages:
Unable to install "kodi-20210422-3a7c0f50-master-tvos"
Unable to install "org.xbmc.kodi-tvos_19.1-0-tvos"

After clicking OK the process ended with no further info, so I went to look for some logs in XCode -> Windows -> Devices & Simulators -> “Open Console“:

then in the Console selected Devices (on the left), then my AppleTV from the list on the left, and narrowed things down by filtering for “Errors & Faults“.

I could then see that each attempted deploy had resulted in an error log entry like this:

Failed to install application at <~~~> : Error Domain=MIInstallerErrorDomain Code=37 "<~~~>" UserInfo={LegacyErrorString=<~~~>, FunctionName=<~~~>, SourceFileLine=652, NSLocalizedDescription=<~~~>}

This is the full original message – I haven’t taken out my details and replaced them with <—> or anything, there was just exactly the above: interesting elements being an installer error, code=37 and reference to line 652 in some source file… not a lot to go on.

There were no good hits from a search on this message at the time, and the few roughly related suggestions were where there was a mismatch between the deployment target version and the built application – e.g. when the app was built for a specific iPad version, but deployed to a later version. No good match and nothing obviously helpful.

What worked for me

I think it took a combination of two things to get this working for me.

The first thing was using an older version of the iOS App Signer application (details and link below) to sign my newly generated ipa file, while I was trying to replicate the steps from other guides as closely as possible.

The other thing I did just before that which seems to have contributed was to deploy the sample example “Hello World” XCode project to my device from XCode first, then was able to deploy the Kodi ipa (signed with the older App Signer), and it then “just worked”, after many failures.

Verification
I have recently deleted Kodi from  my device and tried to add the same singed Kodi ipa again - resulting in "Unable to install". 

After deploying the example app first, I was then able to replace it with the same signed Kodi ipa without issues.
iOS App Signer

Following the guide, I had originally downloaded and used the latest available version – 1.13.1 at the time – with no joy, but getting the older Version 1.7 (r17) worked for me with these settings:

These are the same settings I used when (unsucessfully) trying to sign with the latest version of the app.

Deploy XCode project to Apple TV

While trying to verify connectivity and permissions and rule some things out, I tried to deploy the sample project from XCode to my Apple TV. This was done by selecting my physical device (as opposed to the default emulator) as the deployment target, then building & deploying the “Hello world” project.

This worked and I could see a new application appear on my Apple TV home screen – when clicked in the Apple TV Menu page, it said Hello World, as you’d expect…

I could now see this application on the Installed Apps page for my device in XCode. When I then attempted to deploy the signed Kodi IPA I’d built, signed with the older iOS App Signer, this was replaced with Kodi and it now works as expected.

It would be great to know if both of these steps are required, or if just one of them was all that was needed. If you are hitting the same issue please let me know what works for you – deploying an initial test app then using the latest iOS App Signer, or not deploying the test app and using the older iOS App Signer version, perhaps?

Links

The older version of app signer I used was:

https://github.com/DanTheMan827/ios-app-signer/releases/download/r17/iOS.App.Signer.app.zip

and the deb file I used was org.xbmc.kodi-tvos_19.1-0-tvos.deb from:

https://mirrors.kodi.tv/releases/darwin/tvos/org.xbmc.kodi-tvos_19.1-0-tvos.deb

the end result is a happy Kodi install on my new Applt TV 4k 2nd Gen:

AWS CodeCommit – prep for AWS CDK & CodePipelines

This is the next step in a series on using the AWS CDK and AWS CodePipeline.

In the previous post I set up a new local AWS CDK environment and a remote AWS Cloud account, user etc, and connected the two. That got as far as deploying a simple local AWS CDK application to my AWS account and then cleaning it up. This post looks at the next step which is setting up CodeCommit – AWS’s managed and git-based version control system, much like github or gitlab – in preparation for some AWS CodePipeline and AWS CodeBuild posts that will follow on.

The first step is to add permissions to AWS CodeCommit for your IAM user – I’m using the “cdk-user” that was created previously – as detailed here:

https://docs.aws.amazon.com/codecommit/latest/userguide/setting-up-gc.html

In the AWS UI, go to IAM > User > Security Credentials:
Select the “HTTPS Git credentials for AWS CodeCommit (Generate)” option then download the newly generated credentials:

In CodeCommit, create a new Repo if you don’t already have one, click Clone and select/copy the HTTPS link

In your local cli, do a “git clone” of the HTTPS repo

when prompted, supply the credentials from above.

You should now be able to interact with the AWS CodeCommit repo in your AWS account using your local git cli in the same way you would for github, bitbucket or gitlab – an example clone, add, merge and push to master (!) as a quick test:

In the next post, this setup will be used to manage and host the source code for new AWS CDK applications, and to manage and trigger the AWS CodePipelines (also written in CDK!) that will build and deploy them.

AWS CDK setup and test

These are my notes on setting up a new development environment to use the AWS CDK.

Most of this is very well documented already but I’m planning on using this setup for a few upcoming posts, so thought I’d start at the very beginning.

I’m using a Mac but the steps are much the same regardless of OS.

Local tooling install & config

AWS CLI install from here:
https://docs.aws.amazon.com/cli/latest/userguide/install-cliv2-mac.html

Install node.js from: https://nodejs.org/ if you don’t have it already

Then use node to install the aws-cdk

npm install -g aws-cdk

Check the cdk is working with:

cdk --version

Optionally, you may also want to install python or java

Remote account creation

An AWS Cloud is needed, so you must have or create an AWS account.

Once that’s done, we need to setup an AWS User & give it sufficient access:
https://cdkworkshop.com/15-prerequisites/200-account.html

Go to the IAM console in your AWS account and select Users > Create User

I called mine “cdk-user“. Select to enable Programattic Access and add an Admin policy. At the end of the process, select to download the new users credentials.

In your local command line, run:

aws configure

this will prompt you to supply the newly created credentials.
Once that is done, you can test connectivity from your local shell to your AWS account with some simple aws commands like:

aws s3 ls

which should simply list the S3 buckets in your account to prove connectivity is working; it may return nothing if there are no buckerts, or an error if it can’t connect.

Verify with a simple example

Now is a good time to decide on an IDE like vscode or atom.

They both have extensions and plugins that make CDK development easier, no matter which language you choose to develop your CDK apps in.

To create a new simple project, run

cdk init sample-app --language typescript

as described here:
https://cdkworkshop.com/20-typescript/20-create-project.html
this is a very simple project but ideal for testing the setup and end to end process.

Before you can deploy you need to initialise CDK in the account:
https://cdkworkshop.com/20-typescript/20-create-project/100-cdk-init.html

cdk bootstrap

This creates an S3 bucket in our AWS account with the supporting files needed by CDK. This only needs done once.

take a look around the example app’s code, there are a few files of interest:
lib/cdk-workshop-stack.ts contains the tiny amount of code used to create an SQS queue and an SNS topic
package.json details the project dependencies and node shortcuts for building, watching, testing etc
README.md details some useful commands and describes the overall project

After boot-strapping, if you run another

aws s3 ls 

you should now see the bootstrap S3 bucket.

and when ready, you can deploy the simple example app with

cdk deploy

CDK will let you know in advance what is is planning on doing – which resources will be created, deleted or altered, giving you a chance to backout

After confirming you want to go ahead with these changes, you should soon see the new stack within your CloudFormation console, along with the CDK toolkit stack we bootstrapped


to delete the example stack and clean up, simply do

cdk destroy

That’s it – the local environment is set up and can connect to the AWS account, a very simple app has been built, tested, deployed and deleted, and the one-off CDK bootstrapping has been done.

Next: on to something more interesting!