Setting up Perforce on a Linux Server and a Windows Client

As described on WikiPedia, Perforce “is a commercial, proprietary, centralized revision control system developed by Perforce Software, Inc.”

Like Subversion, it’s a client/server system where the server manages a database of revisioned files, and clients connect to checkout, modify and send back changes for others to pick up.

I wanted to check out the latest version so thought I’d install it on this server and set up a client… and that I may as well capture the steps and put them here.

In my case, the server is an Ubuntu Linux  host, and my client machine is a Windows XP workstation.

There’s not a lot to do when installing Perforce, so getting a straightforward instance up and running is a breeze. Basically, get the binary, export or pass it a few settings if you don’t want the defaults, then kick it off – here’s the detail from my notes:

Download p4d binary (for this platform and architecture):
wget http://www.perforce.com/downloads/perforce/r10.2/bin.linux26x86/p4d

You can put this wherever you want, and set up a P4ROOT to specify the Perforce root directory – but don’t use that location for anything else (including client workspaces).

mkdir /apps/perforce
mv p4d /apps/perforce; cd /apps/perforce
chmod +x p4d


Most  Perforce options can either be exported or passed as a command-line arg, so you can choose

export P4ROOT=/apps/perforce
– or –
-r /apps/perforce

The default port is 1666, and remember that if you change this on the Server you will need to change it on your Perforce client(s) too.  In my example I’m using 9002:

export P4PORT=9002
– or –
-p 9002

So I ended up with a command line that looked like this:

nohup ./p4d -r /apps/perforce -J /var/log/journal -L /var/log/p4err -p 9002 &

Which I will probably put in to a simple startPerforce.sh script, and a probably a stopPerforce.sh script too that contains this and maybe the port number and full path to the binary location:

p4 admin stop

That’s it for the Server side at the moment, there’s a process up and running (you can check the output in nohup.out) so it’s time to set up and connect a client…


I’m going for a Windows client installation, which means downloading the correct version from the Perforce site then running p4vinst.exe. There’s nothing really to report here; select the usual options like directories and let it install.

Oh, I also needed to create a user, so back on the Linux Server I also downloaded the p4 binary:

wget http://www.perforce.com/downloads/perforce/r10.2/bin.linux26x86/p4

Exported the P4PORT (since I was using a custom one to get through my firewalls), then add a user:

export P4PORT=9002
chmod +x p4
./p4 user -f Donald
User Donald saved.

Now you can test connecting to your Perforce Server with the  P4Admin GUI and the P4V GUI on the Windows client host by specifying the correct port (if you changed the default) and a valid user name. Once that’s done, you can admin your Depot’s and add/change/commit files, see revision and history information and all that good stuff. There are also command line and web interfaces too which can be useful for temporary use and for scripting but the Windows GUI’s are nice to use and quite self explanatory – if you’ve used a similar revision control system like Subversion and an Eclipse-like IDE before there’s not much of a learning curve here.

The Perforce Help and Documentation is all very good, and their Perforce 2010.2: System Administrator’s Guide covers all of the above in more detail, and touches on more advanced topics too – Perforce Performance Tuning, Backup and Recovery, Replication, and the Perforce Broker (P4Broker) etc.

There’s also a Perforce plugin for Jenkins, which once installed allows you to choose Perforce as one of the SCM option in your Jenkins jobs, but the above hopefully covers the initial setup of both the Perforce Client and the Perforce Server on Windows and Linux respectively.


Some PHP examples

I recently wrote a couple of PHP Pages for my site:

UK Area Code Search which searches my database for a specified full or partial area code or town

and

Crossword Solver  which searches for possible matches to a partial word.

It’s been a while since I’d done any PHP (all of the recent web-dev stuff I’ve written has been either JSP, Python or CGI) so I thought I’d keep some notes on my own ‘refresher course’ and do a brief write up of the main steps involved.

Both of these apps are basically quite similar; they take some user input, search in a database, then display the results on a web page.

For tasks that need done repeatedly, like sanitising user inputs, it’s worth creating a simple function:

function cleanvar($input){
if (strlen($input) > 1){
$input = ‘_’;
}
return $input;
}

this allows you to quickly create, populate and sanitise a variable in one go like so:

$mynewvar = cleanvar($_POST[‘userselection’]);

When the page loads, you can check if there is anything to process or not by looking at the “submit” element:

if(isset($_POST[‘submit’]))
{
# do posty type things…
}

iterate through and clean up all passed parameters:

$myquery = “”;
foreach($_POST as $vblname => $value)
$myquery = $myquery . $value;

with some text replacements:

$myquery = str_replace(“Unknown”,”_”,$myquery);
$myquery = str_replace(“Search”,””,$myquery);

alternatively you could use the Request object to get each passed var explicitly, e.g. $_REQUEST[‘myparam’]

Connecting to a database is very nice and easy in PHP:

$con = mysql_connect(“myservername”,”myusername”,”mypassword”);
if (!$con)
{
die(‘Could not connect: ‘ . mysql_error());
}
mysql_select_db(“myschema”, $con);

Once connected, execute a query – I use a hard LIMIT to avoid returning all data:

$result = mysql_query(“SELECT lcase(word) as word FROM mytable where word like ‘$myquery’ LIMIT 0, 200”);

you could change the LIMIT parameters to create “paging” for your results, so the next page would show

LIMIT 200, 400

and so on.

Check for results and iterate through them:

while($row = mysql_fetch_array($result))
{
$counter++;
echo “Found ” . $counter . ” records: ” . $row[‘word’] . “”;
# etc etc
}

remember to close the MySQL connection when done:

mysql_close($con);

And that’s about it – some sanity checking and error handling is needed, plus outputting the HTML part, but for a quick and simple PHP page that takes user input, queries a database and shows results, the above steps should do the job.

As I’m using WordPress I wanted to get my PHP pages looking like they “belong” (getting my custom PHP pages to use the current WordPress Theme and CSS etc); there are several solutions for this like WordPress plugins for custom PHP pages and creating custom WordPress Templates. For now I have just included my PHP examples in an iFrame and explicitly use the site’s CSS to make them fit in, but I’d like to investigate what works best for me and sort this out “properly” at some point.


Jenkins Agent Nodes

This Jenkins Agent Nodes post covers:

  • What are they?
  • Why may I want one?
  • How do you create one?
    • tasks on On the Master/Server
    • tasks on On the Agent/Client
  • Other ways of creating Agent Nodes
  • Related posts and links

What are they?

Jenkins Agents  are small Java “Client” processes that connect back to a “Master” Jenkins instance over the Java Network Launch Protocol (JNLP).

Why may I want one?

Once it’s up and running, an Agent instance can be used to run tasks from a Master Jenkins instance on one or more remote machines providing an easy to use and flexible distributed system which can lend itself to a wide variety of tasks.

As these are Java processes, you are not restricted by architecture and can mix and match the OS’s of your agent nodes as required – Windows, Linux, UNIX, iSeries, OVMS etc – anything capable of running a modern version of Java (I think JNLP was introduced in 1.5?) and you can also group and categorize subsets of different types (both logical and physical) of Agents; intended use, availability, location, available resources, Cloud or VM versus Physical tin – anything that helps you decide when you want to use which host.

There are many different ways you can choose to utilize these nodes – they can be used to spread the load of an intensive build process over many machines when they are available, you can delegate specific tasks to specific machines only, or you can use labels to group different classes or types of Nodes that are available for certain tasks, making the most use of your available resources. You can also have Jenkins create Cloud server instances – Amazon EC2 for example – when certain thresholds are reached, and stop them when they are no longer required.

This post focuses on a pretty manual approach to the creation of Jenkins Agent Nodes with the intention of explaining them well enough to allow you to create them on any platform that can run a modern version of Java – there are probably simpler solutions depending on your needs and setup. A later post will touch on a few of the many possible uses for these nodes.

So, how do you create one?

There are several different ways to go about setting up an Agent, and the “best” approach depends on your situation, needs and environment(s) – for a simple Linux setup letting Jenkins do all the work for you makes life really easy, you can just select that option in your new Jenkins Agent Node and complete this screen to have Jenkins set it up for you:

Where the Username and Password are the credentials you want Jenkins to use to connect and start the Agent process on the remote server. This simple approach also allows the Master instance to initiate the JNLP connection and bring your agents online when required, avoiding any need to manually visit each agent node.

This keeps things nice and simple and reduces the admin overhead too,  but sometimes this type of approach can’t be used (on different OS’s like OVMS, iSeries, Windows etc) and I’m going to go on to outline what I think is the most “versatile” method – defining the Node on the Master instance, and manually setting up and starting the corresponding Agent/Client Node on the remote host – going through these steps should provide enough detail on how Agent Nodes work and connect to get one up and running on anything that can run a JVM.

1. On the Master/Server

Define the host: navigate to Jenkins > Manage Jenkins > Manage Nodes > New Node
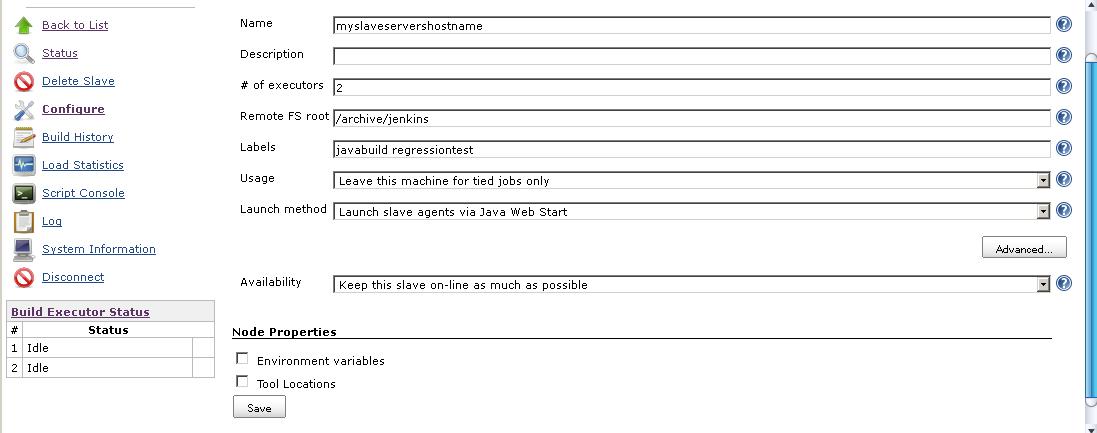
Enter a suitable Node Name (I’d recommend something descriptive, and usually including the host name or part of it) then either select to create a “Dumb Agent” or copy an existing Node if you have one, then complete the configuration page similar to this:


where you specify the requested properties – path, labels, usage, executors etc. These are explained in more detail in the “?” for each item if required.

Here you can also state if you want to keep your Jenkins Agent for tied jobs only, or if it is to be utilized as much as possible – this obviously depends on your requirements. You can also specify the Launch method that best applies to your needs & requirements.

2. On the Agent/Client host

You don’t need to do very much to create a new agent node – typically if I’m setting up a few *NIX and Windows hosts I would archive a simple shell/DOS script that starts and manages the process along with the slave.jar file from the Master Jenkins instance. There are alternative methods that may suit your needs – you can start agents via SSH from the Master server for example and there’s a comparable method for Windows – but this simple approach should help you understand the underlying idea that applies to them all.

You can “wget” (or use a Browser on Windows) the slave.jar file directly from the Master Jenkins instance using the URL

http://[your jenkins host]:[port number]/jnlpJars/slave.jar

If you let JNLP initiate the process, the slave.jar will be downloaded from Jenkins automatically.

Note that Jenkins will inherit the effective permissions of the user that starts the process – this is to be expected, but it’s often worth having a think about the security aspects of this, along with the access requirements for the types of things you want your agent to be able to do… or not do.

On Windows hosts, you can use the jenkins-agent.exe to easily install Jenkins as a Windows Service, which can then be started at boot time and run under whatever user/permissions you wish set via the Services panel.

My *NIX “startagent.sh” script does a few environment/sanity checks, then kicks of the agent process something like so:

${NOHUP} ${JAVA} -jar slave.jar -jnlpUrl http://SERVERNAME:PORT/computer/USER__NODENAME/slave-agent.jnlp &

The HTTP URL there should match the one provided by the Jenkins page when you were defining the Node. If all goes well you should see the node state changed to Connected on the Master Hudson instance, and if not, then nohup.out should provide some pretty obvious pointers on the problem.

Some common causes are:

Jenkins host, port or node name wrong
Java version not found/wrong
Lack of write permissions to the file system
Lack of space (check /tmp too)
Port already in use
Errors in the jenkins-slave.xml file if you’ve tweaked it
Firewalls…

Jenkins also provides some health monitoring of the connected Node which you can see in the Jenkins > Nodes page:
Disk Space, Free Temp Space, Clock time/sync, Response Time and Free Swap are monitored
and you can have your Node taken off line if any of these passes a set threshold.

This should hopefully be enough info to provide an overview of what Jenkins Agents are, and enough to get one up and running on your chosen platform. Where possible it’s best to keep things simple – use SSH and let the Master instance manage things for you if you can – but when that’s not possible there are alternatives.

When I get the chance I will add some information on the next steps – creating and delegating jobs on Jenkins Agent Nodes, and some thoughts and suggestions for just a few of the many uses for this sort of distributed Build and Deployment system.

Related Posts and Links:

Monitoring Jenkins Slave Nodes with Groovy
– how to keep an  eye on your Jenkins Slaves

Jenkins Slave Nodes – using the Swarm Plugin
– automatically connect new Slave Nodes to create a “Swarm”

Getting the current user in Jenkins
– several approaches

Managing Jenkins as a service and starting at boot time
– on Linux & Windows

Jenkins plugins
– details on some of my most frequently used plugins

Jenkins DIY Information Radiators
– what they are for, and how to make your own

The Jenkins Wiki has more details information on Distributed Builds and different slave-launching strategies.

Feedback, questions and constructive comments are very welcome!

Setting up OpenNebula on Ubuntu

Some very rough notes on installing and configuring OpenNebula on an Ubuntu host.

On the Server host:

apt-get install opennebula

Adding system user `oneadmin’ (UID nnn) …
Adding new user `oneadmin’ (UID nnn) with group `nogroup’ …
The home directory `/var/lib/one’ already exists.  Not copying from `/etc/skel’.
adduser: Warning: The home directory `/var/lib/one’ does not belong to the user you are currently creating.
Generating public/private rsa key pair.
Your identification has been saved in /var/lib/one/.ssh/id_rsa.
Your public key has been saved in /var/lib/one/.ssh/id_rsa.pub.
The key fingerprint is:
(key fingerprint)oneadmin@linux
The key’s randomart image is:
+–[ RSA 2048]—-+
|     .    o..    |
(more random artwork)


test the installation by running the new “onehost” command:


Usage:
onehost [<options>] <command> [<parameters>]

Options:
-l, –list x,y,z                 Selects columns to display with list
command
–list-columns               Information about the columns available
to display, order or filter
-o, –order x,y,z                Order by these columns, column starting
with – means decreasing order
-f, –filter x,y,z               Filter data. An array is specified
with column=value pairs.
-d, –delay seconds              Sets the delay in seconds for top
command
-v, –verbose                    Tells more information if the command
is successful
-h, –help                       Shows this help message
–version                    Shows version and copyright information

Commands:

* create (Adds a new machine to the pool)
onehost create <hostname> <im_mad> <vmm_mad> <tm_mad>

* show (Gets info from a host)
onehost show <host_id>

* delete (Removes a machine from the pool)
onehost delete <host_id>

* list (Lists machines in the pool)
onehost list

* enable (Enables host)
onehost enable <host_id>

* disable (Disables host)
onehost disable <host_id>

* top (Lists hosts continuously)
onehost top


So far so simple, so it’s time to set up a new host and install the client…


This is done by installing the node package like so:

sudo apt-get install opennebula-node

then starting defining and adding the node to the Master instance via the onehost command.

After that’s done, you can move on to set up a private network for your cloud, create you own KVM images, and start firing up VM’s in your own personal cloud.

More detail coming soon…

Mount Windows share on Ubuntu

Some notes on setting up and auto mounting a Windows Share on an Ubuntu host.

I’ve had to Google the details for this more than once, so thought I’d write up the steps here for next time…

First, if it’s not there already, add the Windows IP address and HostName  to the Ubuntu /etc/hosts file:

vim /etc/hosts, then add something like:
192.168.0.123 MyWindowsHostName


Now install the smbfs packages if you don’t already have them:

sudo apt-get install smbfs
sudo apt-get install smbclient


Once that’s complete, and assuming the windows shares are set up ok (and there are no firewall issues, and you can ping the host etc), check that we can view the host and its shares with smbclient:

root@linux:/mnt# smbclient -L MyWindowsHostName
Enter root’s password:
Domain=[LIMBO] OS=[Windows 5.1] Server=[Windows 2000 LAN Manager]

Sharename       Type      Comment
———                —-         ——-
Video                 Disk
IPC$                   IPC       Remote IPC
Music                 Disk

Domain=[LIMBO] OS=[Windows 5.1] Server=[Windows 2000 LAN Manager]


If that gives you back something that looks like your Windows hosts and its share(s), things are looking good 🙂

Further information on using smbclient can be found here if you have any problems.


Now it’s time to make a local mount point, so as root or via sudo;
mkdir /mnt/Video

Then as root create a password file /etc/cifspw with the login credentials for your Windows account.

username=WINDOWSUSERNAME
password=WINDOWSPASSWORD

it would be good practice to secure that file so that only the owner (root) has read/write access to it:
$ sudo chmod 600 /etc/cifspw

Then vim /etc/fstab and add a line for the mount:
//MyWindowsHostName/Video                                  /mnt/Video      cifs exec,credentials=/etc/cifspw 0 0

If all goes well, the Windows share should now automatially mount to /mnt/Video at boot time.

If you can’t wait to test it, you can do:

sudo mount -a

and check /mnt/Video to see your data… hopefully!

Cheers,

Don


Some Useful Solaris Commands

Here are a few (mostly) Solaris tips and tricks I have found useful and wanted to keep a note of.


prstat

This provides similar info to top on Linux boxes – you can run it as plain old prstat, or give it some options. I like prstat -a as it reports on both processes and users. As with all of these commands, the man pages have further details.


xargs

Not just a Solaris command, but this is very useful on any *NIX box – I frequently use it to translate the output from the previous command in to something that can be undertood by the next one, for example:

find . -type f -name *.txt | xargs ls -alrt

Will translate and pass the output of the “find” command to ls in a way that ls understands.


pargs

I use the pargs command when I need to get more information on a running process than the Solaris ps utility will give (there’s no -v option) if they have a lot of arguments.

Call pargs with the PID of your choice, and it will display a nice list of each argument that the process was started with, for example:

> pargs 16446
16446:  /usr/jdk/jdk1.6.0/jre/bin/java com.MyJavaProgram
argv[0]: /usr/jdk/jdk1.6/jre/bin/java
argv[1]: com.MyJavaProgram
argv[2]: MyFirstArgument.ini
argv[3]: SomeOtherArg.txt
argv[4]: AndAnotherArg

pargs can also display all of this info on one line with the -l option (useful for scripting), and if you call it with -e it also displays all of the Environment variables too.


pwdx

Simply pass it a PID and it will tell you the current working directory for that process.


[g]rep

When writing a shell script that queries running processes, I often find my own script showing up in the results – for instance a script that does a “ps -eaf | grep MyProcessName” may pick up the java process I’m after (the running instance of “./MyProcessName“) and the grep process-check itself (as in the “ps -eaf | grep MyProcessname“).

A handy way to avoid this is by changing your search criteria to “grep [M]yProcessName” instead. Grep interprets (and effectively ignores) the square brackets, with the result that your grep query no longer matches its own search 🙂


I will add more when I think of them, if you have any good ones then please post them!

Persisting file permissions in a tar.gz file with Ant & tar

Discovered an interesting issue recently where file permissions were not being preserved when Taring up a build with Ant.

The existing approach was to chmod the files as desired then simply tar them all up and hope for the best:

<tar destfile=”dist/${hudson.build.tag}.tar.gz” basedir=”dist/” compression=”gzip” />

This doesn’t work,  but if you use tarfileset and set the filemode you can explicitly set things as required like this:

<tar destfile=”dist/${hudson.build.tag}.tar.gz” longfile=”gnu” compression=”gzip”>

<tarfileset dir=”dist/” filemode=”755″>

<include name=”**/*scripts/*.sh” />

<include name=”**/somescript.ext” />

</tarfileset>

<tarfileset dir=”dist/”>

<include name=”**/*” />

<exclude name=”**/*scripts/*.sh” />

<exclude name=”**/somescript.ext” />

</tarfileset>

</tar>

Here I am adding the first two scripts with chmod 755, then adding everything else which will get the default/umask permissions. I exclude the previous files – not sure if that’s required or not but I don’t want to risk overwriting them.

Now when you gunzip and tar xvf the resulting build, you get the required permissions.

There’s more info and further examples in the Apache Ant Manual.

Cheers,

Don

Using lock files in a bash shell script

This post is old (2011), there are many better ways to do this.
See https://www.unix.com/man-page/linux/1/flock/ for one example.
Also pgrep and lsof examples here:
https://www.baeldung.com/linux/bash-ensure-instance-running

Wrote this script recently – I had written a simple shell script that updated an HTML page with its output, then realised it would be all too easy for simultaneous writes to clobber the file.

This kind of concurrency can & should really be solved properly by using a database obviously, but it got me thinking and playing around and I ended up with the below – it’s clearly very “happy path” with loads of room for improvements – please feel free to suggest some or add to it 🙂


#!/bin/bash

#
# Example script that uses lock files to avoid concurrent writes
# TODO: loads more validation and error handling!
#
# www.DonaldSimpson.co.uk
# 25th May 2011

setup_lockfile(){
# set name of this program’s lockfile:
MY_NAME=`basename $0`
LOCKFILE=/tmp/lock.${MY_NAME}.$$
# MAX_AGE is how long to wait until we assume a lock file is defunct
# scary stuff, with loads of scope for improvement…
# could use fuser and see if there is a process attached/not?
# maybe check with lsof? or just bail out?
MAX_AGE=5
echo “My lockfile name is ${LOCKFILE}”
sleep 1
}

check_lock(){
# Check for an existing lock file
while [ -f /tmp/lock.${MY_NAME}* ]
do
# A lock file is present
if [[ `find /tmp/lock.* -mmin +${MAX_AGE}` > “0” ]]; then
echo “WARNING: found and removing old lock file…`ls /tmp/lock.${MY_NAME}*`”
rm -f /tmp/lock.${MY_NAME}*
else
echo “A recent lock file already exists : `ls /tmp/lock.${MY_NAME}* | awk -F. {‘print $2″.”$3″, with PID: ” $4’}`”
echo “Will wait until the lock file is over ${MAX_AGE} minutes old then remove it…”
fi
sleep 5
done
}

create_lock(){
# ok to carry on… create a lock file – quickly 😉
touch ${LOCKFILE}
# check we managed to make it ok…
if [ ! -f ${LOCKFILE} ]; then
echo “Unable to create lockfile ${LOCKFILE}!”
exit 1
fi
echo “Created lockfile ${LOCKFILE}”
}

cleanup_lock(){
echo “Cleaning up… ”
rm -f ${LOCKFILE}
if [ -f ${LOCKFILE} ]; then
echo “Unable to delete lockfile ${LOCKFILE}!”
exit 1
fi
echo “Ok, lock file ${LOCKFILE} removed.”
}

setup_lockfile
check_lock
create_lock

# Any calls to exit() from here on should first call cleaup_lock
# Do main processing tasks here…
sleep 20


# All Done.
cleanup_lock

Updated to latest Jenkins

Finally got around to trying out “Jenkins”, the latest incarnation of the forked “Hudson” project, and one of my favourite tools. Jenkins looks and works very much like the latest Hudson, but as it had been a while since I last browsed the plugins there were a few nice additions.

When I first started using Hudson there were about 5 basic plugins, and the amount and quality available in the latest version of Jenkins is really impressive – obviously it depends on what sort of tasks and tools you use, but there’s something for everyone – here is a list of the ones I found most useful and interesting:

Hudson Google Calendar plugin

This plugin publishes the job status to Google Calendar.

I think this has maybe been around for a while but I hadn’t used it before – it simply publishes build info to your Google Calendar, which can be a nice way to view a summary for some jobs.

Hudson iPhoneView plugin

This plugin allows you to view the status of your jobs via iPhone or iPod touch.

Haven’t tried this out yet but it’s on my todo list!

Hudson SCP publisher plugin

This plugin uploads build artifacts to repository sites using SCP (SSH) protocol.

This is a plugin for something I would usually script in Ant or shell script – will try this instead as it should make things simpler and cleaner.

Security Realm with no CAPTCHA

Brilliant – the Hudson/Jenkins Captcha can be really tough, being able to remove it is very nice.

Jenkins SSH plugin

This plugin executes shell commands remotely using SSH protocol.

Much like the SVN plugins, this is something I would normally write by hand – this plugin lets you define hosts (with user and passwords) then select them and the task you want to run from within a job, very handy and again much less clutter – another essential.

Startup Trigger

This plugin allows you to trigger a Jenkins build when Jenkins first starts up.

Simple but useful – I have used this one on a server that is restarted nightly; it kicks off some housekeeping jobs and mails me the outcome every morning.

Hudson Subversion Tagging Plugin

This plugin automatically performs Subversion tagging (or copy) on successful build.

Another useful Subversion integration plugin – I have recently been using this in conjunction with another plugin that dynamically generates a drop-down of all available tags in a given SVN location at build time. This allows users to select the tag they want to deploy, a very powerful and useful combination.

Cheers,

Don

Using Postfix for WordPress email notifications

Here are my notes on installing and configuring Postfix on an Ubuntu host for WordPress.

By default, my WordPress and Ubuntu installation wasn’t able to send out emails to do things like set up new users, notify me about new posts, reset forgotten passwords etc etc.  Getting Postfix working is not very difficult once you’ve figured out what settings to use in the main.cf file.

First, install Postfix:

apt-get install postfix

and copy over the example config file/template:

cp /usr/share/postfix/main.cf.debian /etc/postfix/main.cf

I then realised I’d already installed Sendmail on this box (doh!) so that needed killed and cleaned up:

ps -eaf | grep [s]endmail

kill -9 {the pid}

apt-get uninstall sendmail

Now I could start up postfix:

/usr/sbin/postfix start

I’d gone with the default options during the initial install, but it looks like they need a bit of a rethink…

dpkg-reconfigure postfix

then backup and tweak this file to suit:

vi /etc/postfix/main.cf

after which you may need to do “postfix reload”

Once that looked reasonably ok I wanted to test sending mail from the command line – there was no mailx/mail tool present but the mailutils package looked worth a try:

apt-get install mailutils

this gave me a “mail” command, so the next step was to test sending myself an internal mail

echo testinternal | mail -s “test mail sent to local user” don

then an external one

echo testexternal | mail -s “test mail sent to external” myaddress@gmail.com

and all worked well – WordPress can now send out new registration details and reset passwords etc.

If you have any issues these files are worth checking:

tail -1000f /var/log/mail.warn

tail -1000f /var/log/mail.err

vi /etc/postfix/main.cf

apt-get install telnet

telnet localhost 25


Hope this helps – if you have any feedback or updates please add a comment below 🙂

Cheers,

Don


Pin It on Pinterest

%d bloggers like this: