

Update: there’s a new & improved solution here too.
Intro
After switching to a 4G broadband provider, who shall (pretty much) remain nameless, I discovered they were using Carrier-Grade NAT (aka CGNAT) on me.
There are more details on that here and here but in short, the ISP is ‘saving’ IPv4 addresses by sharing them out amongst several users and NAT’ing their connections – in much the same way as you do at home, when you port forward multiple devices using one external IP address: my home network is just one ‘device’ in a pool of their users, who are all sharing the same external IP address.
The impact of this for me is that I can no longer NAT my internal network services, as I have been given a shared pubic-facing IPv4 address. This approach may be practical for a bunch of mobile phone users wanting to check Twitter and Facebook, but it sucks big time for gamers or anyone else wanting to connect things from their home network to the internet. So, rather than having “Everything Everywhere” through my very expensive new 4G connection – with 12 months contract – it turns out I get “not much to anywhere“.
The Aim
Point being; I would like to be able to check my internal servers and websites when I’m away – especially my ZoneMinder CCTV setup – but my home broadband no longer has its own internet address. So an alternative solution had to be found…
The “TL; DR” summary
I basically use 2 servers, the one at home (unhelpfully now stuck behind my ISPs CGNAT) and one in the Amazon Cloud (my public facing AWS web server with DNS), and create a reverse SSH Tunnel between them. Plus a couple of essential tweaks you wont find out about if you don’t read any further 🙂
The Steps
Step 1 – create the reverse SSH tunnel:
This is initiated on the internal/home server, and connects outwards to the AWS host on the internet, like so.
ssh -N -R 8888:localhost:80 -i /home/don/DonKey.pem awsuser@ec2-xx-xx-xx-xx.compute-x.amazonaws.com
Here is an explanation of each part of this command:
-N (from the SSH man page) “Do not execute a remote command. This is useful for just forwarding ports.”
-R (from the SSH man page) “Specifies that connections to the given TCP port or Unix socket on the remote (server) host are to be forwarded to the given host and port, or Unix socket, on the local side.”
8888:localhost:80 – means, create the reverse tunnel from localhost port 80 (my ZoneMinder web app) to port 8888 on the destination host. This doesn’t look right to me, but it’s what’s needed for a reverse tunnel
the -i and everything after it is just me connecting to my AWS host as my user with an identity file. YMMV, whatever you nornally do should be fine.
When you run this command you should not see any issues or warnings. You need to leave it running using whatever method you like – personally I like screen for this kind of thing, and will also be setting up Jenkins jobs later (below).
Step 2 – check on the AWS host
With that SSH command still running on your local server you should now be able to connect to the web app from your remote AWS Web Server, by reading from port 8888 with curl or wget.
This is a worthwhile check to perform at this point, before moving on to the next 2 steps – for example:
don@MyAWSHost:~$ wget -q -O- localhost:8888/zm | grep -i ZoneMinder
      <h1>ZoneMinder Login</h1>
don@MyAWSHost:~$
This shows that port 8888 on my AWS server is currently connected to the ZoneMinder application that’s running on port 80 of my home web server. A good sign.
Step 3 – configure AWS Security & Ports
Progress is being made, but in order to be able to hit that port with a browser and have things work as I’d like, I still need to configure AWS to allow incomming connections to the newly chosen port 8888.
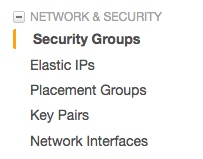
This is done through the Amazon EC2 Management Console using the left hand menu item “Network & Security” then “Security Groups”:
 This should load your current Security Groups, which you can click on to Edit. You may have a few to check.
Now select Add and configure a new Inbound rule something like so:
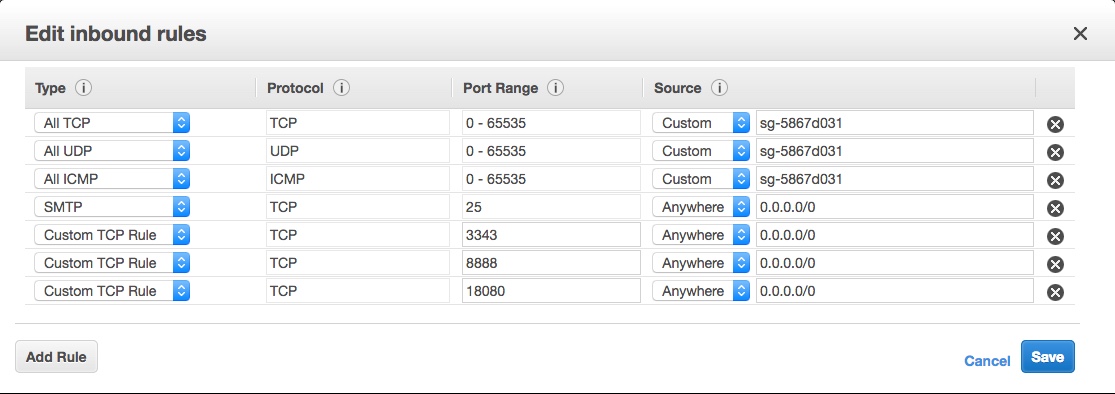 It’s the “Custom TCP Rule” second from the bottom, with port 8888 and “Anywhere” and “0.0.0.0/0” as the source in my picture. Don’t go for the HTTP option – unless you’re sure that’s what you want 🙂
Step 4 – configure SSH on AWS host
At this point I thought I was done… but it didn’t work and I couldn’t immediately see why, as the wget check was all good.
Some head scratching and checking of firewalls later, I realised it was most likely to be permissions on the port I was tunneling – it’s not very likely to be exposed and world readable by default, is it? Doh.
After a quick google I found a site that explained the changes I needed to make to my sshd_config file, so:
vim /etc/ssh/sshd_config
and add a new line that says:
GatewayPorts yes
to that file, checking that there’s no existing reference to GatewayPorts – edit this file carefully and at your own risk.
As I understand it – which may best be described as ‘loosely’ – the reason this worked when I tested with wget earlier is because I was connecting to the loopback interface; this change to sshd binds the port to all interfaces. See the detailed answer on this post for further detail, including ways to limit this to specific users.
Once that’s done, restart sshd with
service ssh restart
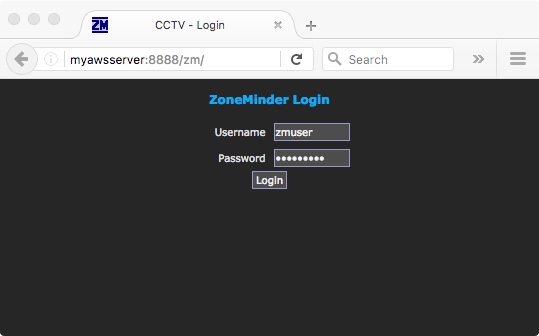
and you should now be able to connect by pointing a web browser at port 8888 (or whatever you set) of your AWS web server and see your app responding from the other end:
Step 5 – automate it with Jenkins
The final step for me is to wrap this (the ssh tunnel creation part) up in a Jenkins job running on my home server.
This is useful for a number of reasons, such as avoiding and resetting defunct/stale connections and enabling scheduling – i.e. I can have the port forwarded when I want it, and have it shutdown during the hours I don’t.
Discover more from Don's Blog
Subscribe to get the latest posts sent to your email.
According to the EE website, this major issue is marked as “solved”… by simply connecting your EE host to another EE server!
https://community.ee.co.uk/t5/4G-and-mobile-data/4GEE-port-unblock/m-p/254518#M27625
That’s obviously not actually “solving” anything for most users – i.e. ones that want to connect to/from a non-EE host.
Thank you for this article. Instructions were followed and everything works like you write.
SSH Tunneling is extremely valuable stuff. Kudos.
That’s great to hear, thank you very much for the feedback!
Don