Introduction
This is Step 3 in my recent series of Kubernetes blog posts.
Step 1 covers the initial host creation and basic provisioning with Ansible: https://www.donaldsimpson.co.uk/2019/01/03/kubernetes-setting-up-the-hosts/
Step 2 details the Kubernetes install and putting the cluster together, as well as reprovisioning it: https://www.donaldsimpson.co.uk/2018/12/29/kubernetes-from-cluster-reset-to-up-and-running/
Caveat
My aim here is to create a Kubernetes environment on my home lab that allows me to play with k8s and related technologies, then quickly and easily rebuild the cluster and start over.
The focus here in on trying out new technologies and solutions and in automating processes, so in this particular context I am not at all bothered with security, High Availability, redundancy or any of the usual considerations.
Helm and Tiller
The quick start guide is very good: https://docs.helm.sh/using_helm/ and I used this as I went through the process of installing Helm, initializing Tiller and deploying it to my Kubernetes cluster, then deploying a first example Chart to the Cluster. The following are my notes from doing this, as I plan to repeat then automate the entire process and am bound to forget something later 🙂
From the Helm home page, Helm describes itself as
The package manager for Kubernetes
and states that
Helm is the best way to find, share, and use software built for Kubernetes.
I have been following this project for a while and it looks to live up to the hype – there’s a rapidly growing and pretty mature collection of Helm Charts available here: https://github.com/helm/charts/tree/master/stable which as you can see covers an impressive amount of things you may want to use in your own Kubernetes cluster.
Get the Helm and Tiller binaries
This is as easy as described – for my architecture it meant simply
wget https://storage.googleapis.com/kubernetes-helm/helm-v2.12.1-linux-amd64.tar.gz
and extract and copy the 2 binaries (helm & tiller) to somewhere in your path
I usually do a quick sanity test or 2 – e.g. running “which helm” as a non-root user and maybe check “helm –help” and “helm version” all say something sensible too.
Install Tiller
Helm is the Client side app that directs Tiller, which is the Server side part. Just like steering a ship… and stretching the Kubernetes nautical metaphors to the max.
Tiller can be installed to your k8s Cluster simply by running “helm init“, which should produce output like the following:
ansible@umaster:~/helm$ helm init
Creating /home/ansible/.helm
Creating /home/ansible/.helm/repository
Creating /home/ansible/.helm/repository/cache
Creating /home/ansible/.helm/repository/local
Creating /home/ansible/.helm/plugins
Creating /home/ansible/.helm/starters
Creating /home/ansible/.helm/cache/archive
Creating /home/ansible/.helm/repository/repositories.yaml
Adding stable repo with URL: https://kubernetes-charts.storage.googleapis.com
Adding local repo with URL: http://127.0.0.1:8879/charts
$HELM_HOME has been configured at /home/ansible/.helm.
Tiller (the Helm server-side component) has been installed into your Kubernetes Cluster
Please note: by default, Tiller is deployed with an insecure 'allow unauthenticated users' policy.
To prevent this, run `helm init` with the --tiller-tls-verify flag.
For more information on securing your installation see: https://docs.helm.sh/using_helm/#securing-your-helm-installation
Happy Helming

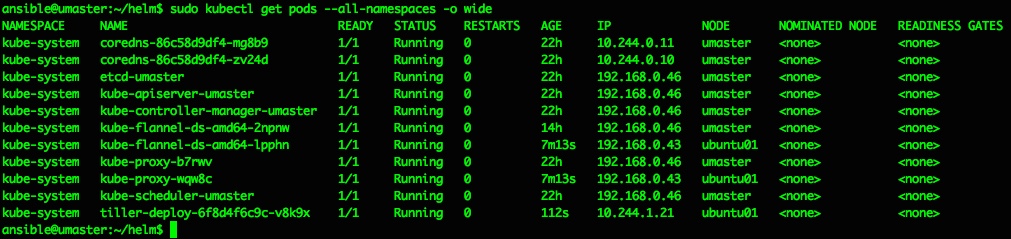
That should do it, and a quick check of running pods confirms we now have a tiller pod running inside the kubernetes cluster in the kube-system namespace:
ansible@umaster:~/helm$ sudo kubectl get pods --all-namespaces -o wide
NAMESPACE      NAME                              READY   STATUS    RESTARTS   AGE      IP             NODE       NOMINATED NODE   READINESS GATES
kube-system    coredns-86c58d9df4-mg8b9          1/1     Running   0          22h      10.244.0.11    umaster    <none>           <none>
kube-system    coredns-86c58d9df4-zv24d          1/1     Running   0          22h      10.244.0.10    umaster    <none>           <none>
kube-system    etcd-umaster                      1/1     Running   0          22h      192.168.0.46   umaster    <none>           <none>
kube-system    kube-apiserver-umaster            1/1     Running   0          22h      192.168.0.46   umaster    <none>           <none>
kube-system    kube-controller-manager-umaster   1/1     Running   0          22h      192.168.0.46   umaster    <none>           <none>
kube-system    kube-flannel-ds-amd64-2npnw       1/1     Running   0          14h      192.168.0.46   umaster    <none>           <none>
kube-system    kube-flannel-ds-amd64-lpphn       1/1     Running   0          7m13s    192.168.0.43   ubuntu01   <none>           <none>
kube-system    kube-proxy-b7rwv                  1/1     Running   0          22h      192.168.0.46   umaster    <none>           <none>
kube-system    kube-proxy-wqw8c                  1/1     Running   0          7m13s    192.168.0.43   ubuntu01   <none>           <none>
kube-system    kube-scheduler-umaster            1/1     Running   0          22h      192.168.0.46   umaster    <none>           <none>
kube-system    tiller-deploy-6f8d4f6c9c-v8k9x    1/1     Running   0          112s     10.244.1.21    ubuntu01   <none>           <none>
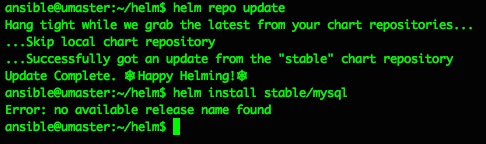
So far so nice and easy, and as per the docs the next steps are to do a repo update and a test chart install…
ansible@umaster:~/helm$ helm repo update
 Hang tight while we grab the latest from your chart repositories…
 …Skip local chart repository
 …Successfully got an update from the "stable" chart repository
 Update Complete. ⎈ Happy Helming!⎈
 ansible@umaster:~/helm$ helm install stable/mysql
 Error: no available release name found
 ansible@umaster:~/helm$
Doh. A quick google makes that “Error: no available release name found” look like a k8s/helm version conflict, but the fix is pretty easy and detailed here: https://github.com/helm/helm/issues/3055
So I did as suggested, creating a service account cluster role binding and patch to deploy them to the kube-system namespace:
kubectl create serviceaccount --namespace kube-system tiller
kubectl create clusterrolebinding tiller-cluster-rule --clusterrole=cluster-admin --serviceaccount=kube-system:tiller
kubectl patch deploy --namespace kube-system tiller-deploy -p '{"spec":{"template":{"spec":{"serviceAccount":"tiller"}}}}'
and all then went ok:
ansible@umaster:~/helm$ kubectl create serviceaccount --namespace kube-system tillerserviceaccount/tiller created

ansible@umaster:~/helm$ kubectl create clusterrolebinding tiller-cluster-rule --clusterrole=cluster-admin --serviceaccount=kube-system:tillerclusterrolebinding.rbac.authorization.k8s.io/tiller-cluster-rule created

ansible@umaster:~/helm$ kubectl patch deploy --namespace kube-system tiller-deploy -p '{"spec":{"template":{"spec":{"serviceAccount":"tiller"}}}}'deployment.extensions/tiller-deploy patchedansible@umaster:~/helm$
From then on everything went perfectly and as described:
try the example mysql chart from here https://docs.helm.sh/using_helm/
like this:
helm install stable/mysql
and check with "helm ls"helm lsansible@umaster:~/helm$ helm ls
NAME REVISION UPDATED STATUS CHART APP VERSION NAMESPACEdunking-squirrel 1 Thu Jan 3 15:38:37 2019 DEPLOYED mysql-0.12.0 5.7.14 defaultansible@umaster:~/helm$
and all is groovylist pods with ansible@umaster:~/helm$ sudo kubectl get pods --all-namespaces -o wide
NAMESPACE NAME READY STATUS RESTARTS AGE IP NODE NOMINATED NODE READINESS GATES
default dunking-squirrel-mysql-bb478fc54-4c69r 0/1 Pending 0 105skube-system coredns-86c58d9df4-mg8b9 1/1 Running 0 22h 10.244.0.11 umaster kube-system coredns-86c58d9df4-zv24d 1/1 Running 0 22h 10.244.0.10 umaster kube-system etcd-umaster 1/1 Running 0 22h 192.168.0.46 umaster kube-system kube-apiserver-umaster 1/1 Running 0 22h 192.168.0.46 umaster kube-system kube-controller-manager-umaster 1/1 Running 0 22h 192.168.0.46 umaster kube-system kube-flannel-ds-amd64-2npnw 1/1 Running 0 15h 192.168.0.46 umaster kube-system kube-flannel-ds-amd64-lpphn 1/1 Running 0 45m 192.168.0.43 ubuntu01 kube-system kube-proxy-b7rwv 1/1 Running 0 22h 192.168.0.46 umaster kube-system kube-proxy-wqw8c 1/1 Running 0 45m 192.168.0.43 ubuntu01 kube-system kube-scheduler-umaster 1/1 Running 0 22h 192.168.0.46 umaster kube-system tiller-deploy-8485766469-62c22 1/1 Running 0 2m17s 10.244.1.22 ubuntu01 ansible@umaster:~/helm$
The MySQL pod is failing to start as it has persistent volume claims defined, and I’ve not set up default storage for that yet – that’s covered in the next step/post 🙂

If you want to use or delete that MySQL deployment all the details are in the rest of the getting started guide – for the above it would mean doing a ‘helm ls‘ then a ‘ helm delete <release-name> ‘ where <release-name> is ‘dunking-squirrel’ or whatever you have.
A little more on Helm
Just running out of the box Helm Charts is great, but obviously there’s a lot more you can do with Helm, from customising the existing Stable Charts to suit your needs, to writing and deploying your own Charts from scratch. I plan to expand on this in more detail later on, but will add and update some notes and examples here as I do:
You can clone the Helm github repo locally:
git clone https://github.com/kubernetes/charts.git
and edit the values for a given Chart:
vi charts/stable/mysql/values.yaml
then use your settings to override the defaults:
helm install --name=donmysql -f charts/stable/mysql/values.yaml stable/mysql
using a specified name makes installing and deleting much easier to automate:
helm del donmysql
and the Helm ‘release’ lifecycle is quite docker-like:
helm ls -a
helm del --purge donmysql
There are some Helm tips & tricks here that I’m working my way through:
https://github.com/helm/helm/blob/master/docs/charts_tips_and_tricks.md
in conjunction with this Bitnami doc:
https://docs.bitnami.com/kubernetes/how-to/create-your-first-helm-chart/
Conclusion
For me and for now, I’m just happy that Helm, Tiller and Charts are working, and I can move on to automating these setup steps and some testing to my overall pipelines. And sorting out the persistent volumes too. After that’s all done I plan to start playing around with some of the stable (and perhaps not so stable) Helm charts.
As they said, this could well be “the best way to find, share, and use software built for Kubernetes” – it’s very slick!