Advanced risk management for Freqtrade strategies


Advanced Risk Management for Freqtrade: Integrating Real-Time Market Awareness | Technical Deep Dive


Advanced Risk Management for Freqtrade: Integrating Real-Time Market Awareness

Freqtrade is a popular open-source cryptocurrency trading bot framework. It gives you solid tools for strategy development, backtesting, and running automated trading strategies live – and it does a very good job of evaluating individual trade entries and exits.

I’ve used Freqtrade extensively, both for testing ideas and for running strategies live.

One thing I kept running into, though, was that while Freqtrade is very good at answering one question:

“Is this a valid entry signal right now?”

…it doesn’t really answer a different, higher-level one:

“Is this a market worth trading at all right now?”

If you’ve run Freqtrade strategies with real money, you’ve probably seen the same pattern: strategies that look perfectly reasonable in backtests, with sensible entry logic and risk controls, can still bleed during periods of high volatility, regime shifts, or market-wide panic – even when individual entries look fine in isolation.

That gap is what led me to experiment with a separate market-level risk layer, which eventually became Remora.

Rather than changing strategy logic or adding yet another indicator, Remora sits outside the strategy and provides a market-level risk assessment – answering whether current conditions are historically safe or risky to trade, regardless of what your entry signals are doing.

Importantly, this is an additive layer – your strategy logic and entry signals remain unchanged.

This article walks through how that works, how to integrate it into Freqtrade safely, and how to validate its impact using reproducible backtests.

TL;DR: This article shows how to add real-time market risk filtering to Freqtrade using Remora, a small standalone microservice that aggregates volatility, regime, sentiment, and macro signals. Integration is fail-safe, transparent, and requires only a minimal change to your strategy code.

What This Article Covers

  • Why market regime risk matters for Freqtrade strategies
  • What Remora does (at a high level)
  • How to integrate it safely without breaking your strategy
  • How to validate its impact using reproducible backtests

Who This Is For (And Who It Isn’t)

This is likely useful if you:

  • Run live Freqtrade bots with real capital
  • Care about drawdowns and regime risk, not just backtest curves
  • Want a fail-safe, auditable risk layer
  • Prefer transparent systems over black-box signals

This is probably not useful if you:

  • Want a plug-and-play “buy/sell” signal
  • Optimise single backtests rather than live behaviour
  • Expect risk filters to magically fix bad strategies

Part 1: The Missing Layer in Most Freqtrade Strategies

Market conditions aren’t always tradable. Periods of extreme volatility, panic regimes, bear markets, and negative sentiment cascades can turn otherwise solid strategies into consistent losers – even when individual entries look fine in isolation.

Typical Freqtrade risk controls (position sizing, stop-losses, portfolio exposure) protect individual trades, but they don’t address market regime risk – the question of whether current market conditions are fundamentally safe to trade in at all.

Part 2: Remora – Market-Wide Risk as a Service

Remora is a standalone market-risk engine designed to sit outside your strategy logic.

Instead of changing how your strategy finds entries, Remora answers one question:

“Are current market conditions safe to trade?”

Results at a Glance (Why This Matters)

Before diving into implementation details, it’s useful to see what this approach looks like in practice.

Across 6 years of data (2020-2025), 4 different strategies, and 20 backtests:

  • 90% of tests improved performance (18 out of 20)
  • +1.54% average profit improvement
  • +1.55% average drawdown reduction
  • 4.3% of trades filtered (adaptive – increases to 16-19% during bear markets)
  • Strongest impact during bear markets (2022 saw 16-19% filtering during crashes)

All results are fully reproducible using an open-source backtesting framework (details later).

Core Design Principles

  • Fail-open by default: If Remora is unavailable, your bot continues trading normally.
  • Transparent decisions: Every response includes human-readable reasoning.
  • Multi-source aggregation: Dozens of signals with redundancy and failover.
  • Low-latency: Designed for synchronous use inside live trading loops.
  • No lock-in: Simple HTTP API. Remove it by deleting a few lines of code.

Data Aggregation Strategy (High-Level)

Rather than relying on a single indicator, Remora combines multiple signal classes:

Technical & Market Structure:

  • Volatility metrics (realised, model-based)
  • Momentum indicators
  • Regime classification (bull / bear / choppy / panic)
  • Volume and market structure signals

Sentiment & Macro:

  • News sentiment (multi-source)
  • Fear & Greed Index
  • Funding rates and liquidations
  • BTC dominance
  • Macro correlations (e.g. VIX, DXY)

Each signal type has multiple providers. If one source fails or becomes stale, others continue supplying data.

The output is:

  • safe_to_trade (boolean)
  • risk_score (0-1)
  • market regime
  • volatility metrics
  • clear textual reasoning

Part 3: Freqtrade Integration (Minimal & Reversible)

Integration uses Freqtrade’s confirm_trade_entry hook.

You do not modify your strategy’s entry logic – you simply gate entries at the final step.

Step-by-Step Integration

Here’s exactly what to add to your existing Freqtrade strategy. The code is color-coded: gray shows your existing code, green shows the new Remora integration code.

Step 0: Set Your API Key

Before running your strategy, set the environment variable:

export REMORA_API_KEY=”your-api-key-here”

Get your free API key at remora-ai.com/signup.php

Step 1: Add Remora to Your Strategy

Insert the green code blocks into your existing strategy file exactly as shown:

class MyStrategy(IStrategy):
    # ----- EXISTING STRATEGY LOGIC -----
    def populate_entry_trend(self, dataframe: DataFrame, metadata: dict) -> DataFrame:
        pair = metadata['pair']
        
        # Your existing entry conditions...
        # dataframe.loc[:, 'enter_long'] = 1  # example existing logic

        # ----- REMORA CHECK -----
        if not self.confirm_trade_entry(pair):
            dataframe.loc[:, 'enter_long'] = 0  # REMORA: Skip high-risk trades

        return dataframe

    # ----- ADD THIS NEW METHOD -----
    def confirm_trade_entry(self, pair: str, **kwargs) -> bool:
        import os
        import requests
        api_key = os.getenv("REMORA_API_KEY")
        headers = {"Authorization": f"Bearer {api_key}"} if api_key else {}
        
        try:
            r = requests.get(
                "https://remora-ai.com/api/v1/risk",
                params={"pair": pair},
                headers=headers,
                timeout=2.0
            )
            return r.json().get("safe_to_trade", True)  # REMORA: Block entry if market is high-risk
        except Exception:
            return True  # REMORA: Fail-open

Integration Notes:

  • Inside your existing populate_entry_trend(), insert the green Remora check just before return dataframe.
  • After that, add the green confirm_trade_entry() method at the same indentation level as your other strategy methods.
  • All green comments are prefixed with # REMORA: so you can easily identify or remove them later.
  • Everything else in your strategy stays unchanged.

Removing Remora is as simple as deleting these lines. No lock-in, fully transparent.

Pair-Specific vs Market-Wide Risk

You can query Remora in two modes:

Pair-specific:

params={“pair”: “BTC/USDT”}

Market-wide (global trade gating):

# No pair parameter

Many users start with market-wide gating to reduce API calls and complexity.

What the API Returns

{
“safe_to_trade”: false,
“risk_score”: 0.75,
“regime”: “bear”,
“volatility”: 0.68,
“reasoning”: [
“High volatility detected”,
“Bear market regime identified”,
“Fear & Greed Index: Extreme Fear”,
“Negative news sentiment”
]
}

This allows debugging blocked trades, auditing decisions, custom logic layered on top, and strategy-specific thresholds.

Part 4: Backtesting & Validation (Reproducible)

Live APIs don’t work in historical backtests – so Remora includes an open-source backtesting framework that reconstructs historical risk signals using the same logic as production.

Repository: github.com/DonaldSimpson/remora-backtests

What It Provides

  • Historical signal reconstruction
  • Baseline vs Remora-filtered comparisons
  • Multiple strategy types
  • Consistent metrics and visualisations

What It Shows

  • Improvements are not strategy-specific
  • Filtering increases during crashes
  • Small trade suppression can meaningfully reduce drawdowns
  • Performance gains come from avoiding bad periods, not over-trading

You’re encouraged to run this yourself and independently verify the impact on your own strategies.

Here’s what comprehensive backtesting across 6 years (2020-2025), 4 different strategies, and 20 test cases has proven:

Overall Performance Improvements

Metric Result
Average Profit Improvement +1.54% (18 out of 20 tests improved – 90% success rate)
Average Drawdown Reduction +1.55% (18 out of 20 tests improved)
Trades Filtered 4.3% (2,239 out of 51,941 total trades)
Best Strategy Improvement +3.20% (BollingerBreakout strategy)
Most Effective Period 2022 Bear Market (16-19% filtering during crashes)

Financial Impact by Account Size

Based on average improvements, here’s the financial benefit on different account sizes:

Account Size Additional Profit Reduced Losses Total Benefit
$10,000 +$154.25 +$154.70 $308.95
$50,000 +$771.25 +$773.50 $1,544.75
$100,000 +$1,542.50 +$1,547.00 $3,089.50
$500,000 +$7,712.50 +$7,735.00 $15,447.50
$1,000,000 +$15,425.00 +$15,470.00 $30,895.00

What These Numbers Mean

  • 4.3% Trade Filtering: Remora prevents trades during dangerous market periods. This is adaptive – during the 2022 bear market, filtering increased to 16-19%, showing Remora becomes more protective when markets are most dangerous.
  • +1.54% Profit Improvement: By avoiding bad trades during high-risk periods, strategies show consistent profit improvements. 90% of tests (18 out of 20) showed improvement.
  • +1.55% Drawdown Reduction: Less maximum loss during unfavorable periods. This is critical for risk management and capital preservation.
  • Best During Crashes: Remora is most effective during bear markets and crashes (2022 showed 16-19% filtering), exactly when you need protection most.

Part 5: Production & Advanced Use

Always fail-open:

except requests.Timeout:
return True

Log decisions:

logger.info(
f”Remora: safe={safe}, risk={risk_score}, regime={regime}”
)

Reduce API load:

  • Cache responses (e.g. 30s)
  • Use market-wide checks
  • Upgrade tier only if needed

Advanced Uses (Optional)

  • Dynamic position sizing based on risk_score
  • Strategy-specific risk thresholds
  • Regime-based strategy switching
  • Trade blocking during macro stress events

These are additive – not required to get value.

Part 6: Technical Implementation Details

Data Pipeline Architecture

Remora’s data pipeline follows a producer-consumer pattern:

  1. Data Collection: Multiple scheduled tasks fetch data from various sources (Binance API, CoinGecko, news APIs, etc.)
  2. Data Storage: Raw data stored in ClickHouse time-series database
  3. Materialized Views: ClickHouse materialized views pre-aggregate data for fast queries
  4. Risk Calculation: Python service calculates risk scores using aggregated data
  5. Caching: Redis caches risk assessments to reduce database load
  6. API Layer: FastAPI serves risk assessments via REST API

ClickHouse Materialized Views

ClickHouse materialized views enable real-time aggregation without query-time computation overhead:

CREATE MATERIALIZED VIEW volatility_1h_mv
ENGINE = AggregatingMergeTree()
ORDER BY (pair, timestamp_hour)
AS SELECT
pair,
toStartOfHour(timestamp) as timestamp_hour,
avgState(price) as avg_price,
stddevSampState(price) as volatility
FROM raw_trades
GROUP BY pair, timestamp_hour;

This allows Remora to provide real-time risk assessments with minimal latency, even when processing millions of data points.

Failover & Redundancy

Each data source has multiple providers with automatic failover. This ensures reliable risk assessments even if individual data sources experience outages or rate limiting.

def get_fear_greed_index():
“””
Fetch Fear & Greed Index with multi-provider failover.
Tries multiple sources until one succeeds.
“””
providers = [
fetch_from_alternative_me,
fetch_from_coinmarketcap,
fetch_from_custom_source,
fetch_from_backup_provider_1,
fetch_from_backup_provider_2,
# … additional providers for redundancy
]

# Try each provider until one succeeds
for provider in providers:
try:
data = provider()
if data and is_valid(data):
return data
except Exception:
continue

# If all providers fail, return None
# The risk calculator handles missing data gracefully
return None

This multi-provider approach ensures:

  • High Availability: If one provider fails, others continue providing data
  • Rate Limit Resilience: Multiple providers mean you’re not dependent on a single API’s rate limits
  • Data Quality: Can validate data across providers and choose the most reliable source
  • Graceful Degradation: If all providers for one signal type fail, the risk calculator continues using other available signals (volatility, regime, sentiment, etc.)

In Remora’s implementation, each signal type (Fear & Greed, news sentiment, funding rates, etc.) has multiple providers. If one data source is unavailable, others continue providing information, ensuring the system maintains reliable risk assessments even during external API outages.

Security & Best Practices

  • API Key Management: Store API keys in environment variables, never in code
  • HTTPS Only: Always use HTTPS for API calls (Remora enforces this)
  • Rate Limiting: Respect rate limits to avoid service disruption
  • Monitoring: Monitor Remora API response times and error rates
  • Fail-Open: Always implement fail-open behaviour – never let Remora block your entire trading system

API Access & Pricing

Remora offers a tiered API access structure designed to accommodate different use cases:

Unauthorized Access (Limited)

  • Rate Limit: 60 requests per minute
  • Use Case: Testing, development, low-frequency strategies
  • Cost: Free – no registration required
  • Limitations: Lower rate limits, no historical data access

Registered Users (Free Tier)

  • Rate Limit: 300 requests per minute (5x increase)
  • Use Case: Production trading, multiple strategies, higher-frequency bots
  • Cost: Free – registration required, no credit card needed
  • Benefits: Higher rate limits, faster response times, priority support

Pro Tier (Coming Soon)

  • Rate Limit: Custom limits based on needs
  • Use Case: Professional traders, institutions, high-frequency systems
  • Features:
    • Customizable risk thresholds and filtering rules
    • Advanced customization options
    • Historical data API access for backtesting
    • Dedicated support and SLA guarantees
    • White-label options
  • Status: Currently in development – contact for early access
Getting Started: Start with the free registered tier – it’s sufficient for most Freqtrade strategies. Upgrade to Pro when you need customization, higher limits, or advanced features.

Getting Started

To get started with Remora for your Freqtrade strategies:

  1. Get API Key: Sign up at remora-ai.com/signup.php (free, no credit card required). Registration gives you 5x higher rate limits (300 req/min vs 60 req/min).
  2. Set Environment Variable: export REMORA_API_KEY="your-api-key-here"
  3. Add Integration: Add the confirm_trade_entry method to your strategy (see color-coded code examples above)
  4. Test: Run a backtest or paper trade to verify integration
  5. Validate with Backtests: Use the remora-backtests repository to run your own strategy with and without Remora, independently verifying the impact
  6. Monitor: Review logs to see Remora’s risk assessments and reasoning

Conclusion

Market regime risk is one of the most common reasons profitable backtests fail live.

Remora adds a thin, transparent, fail-safe risk layer on top of Freqtrade that helps answer whether current market conditions are safe to trade in. It doesn’t replace your strategy – it protects it.

Beyond Freqtrade: While Remora is optimised for Freqtrade users, the same REST API integration pattern works with any trading bot or custom trading system that can make HTTP requests.
Ready to get started? Visit remora-ai.com to get your free API key and start protecting your Freqtrade strategies from high-risk market conditions.

Resources

About the Author: This article was written as part of building Remora, a production-grade market risk engine for algorithmic trading systems. The system is built using modern Python async frameworks (FastAPI), time-series databases (ClickHouse), and MLOps best practices for real-time data aggregation and risk assessment.

Have questions about integrating Remora with Freqtrade? Found this useful? I’d love to hear your feedback or see your integration examples. Feel free to reach out or share your experiences.


Production-grade monitoring, prediction logging, and safe deployment workflows


Monitoring, Drift Detection and Zero-Downtime Model Releases | Tech Deep Dive


Monitoring, Drift Detection and Zero-Downtime Model Releases

Part 3 of 3: Production-grade monitoring, prediction logging, and safe deployment workflows.

Introduction

In Part 1 and Part 2, we built the core of the system: reproducible training, a proper model registry, and Kubernetes-backed deployments.

Now the focus shifts to what happens after a model goes live.

This post covers the production-side essentials:

  • Logging predictions for operational visibility
  • Detecting model drift
  • Canary deployments and safe rollout workflows
  • Automated model promotion
  • The real-world performance improvements

1. Logging Predictions for Monitoring

To understand how the system behaves in production, every prediction is logged – lightweight, structured, and tied back to model versions via MLflow.

Listing 1: Prediction logging to MLflow

import mlflow
import time

def log_prediction(text, latency, confidence):
    with mlflow.start_run(nested=True):
        mlflow.log_param("input_length", len(text))
        mlflow.log_metric("latency_ms", latency)
        mlflow.log_metric("confidence", confidence)
        mlflow.log_metric("timestamp", time.time())

This gives you enough data to build dashboards showing:

  • Latency trends
  • Throughput
  • Confidence drift
  • Input distribution changes
  • Model performance over time

Even simple plots can reveal early warning signs long before they become user-visible issues.

2. Drift Detection Script

A basic example of analysing logged metrics for unusual changes:

Listing 2: Model drift detection

import numpy as np
from mlflow.tracking import MlflowClient

def detect_drift():
    client = MlflowClient()

    runs = client.search_runs(
        experiment_ids=["0"],
        filter_string="metrics.latency_ms > 0",
        max_results=500
    )

    latencies = [r.data.metrics["latency_ms"] for r in runs]
    confs = [r.data.metrics["confidence"] for r in runs]

    if np.mean(latencies) > 120:
        alert("Latency drift detected")

    if np.mean(confs) < 0.75:
        alert("Confidence drift detected")

You can plug in more advanced statistical tests later (KL divergence, embedding space drift, or decayed moving averages).

3. Canary Deployment (10% Traffic)

A canary deployment lets you test the new model under real load before promoting it fully.

Versioned pods:

Listing 3: Canary deployment configuration

apiVersion: apps/v1
kind: Deployment
metadata:
  name: carhunch-api-v2
spec:
  replicas: 1
  template:
    metadata:
      labels:
        app: carhunch-api
        version: "v2"

The service routes traffic to both versions:

selector:
  app: carhunch-api

With 1 replica of v2 and (for example) 9 replicas of v1, the canary receives roughly 10% of requests.

Kubernetes handles the balancing naturally.

4. Automated Promotion Script

A simple automated workflow to move models through Staging → Canary → Production:

Listing 4: Automated model promotion workflow

def promote_model(version):
    # 1. Move to staging
    client.transition_model_version_stage(
        "MiniLM-Defect-Predictor",
        version,
        "Staging"
    )

    # 2. Deploy canary
    subprocess.run(["kubectl", "scale", "deployment/carhunch-api-v2", "--replicas=1"])

    # 3. Wait and collect metrics
    time.sleep(3600)

    # ...evaluate metrics here...

    # 4. Promote to production if everything looks good
    client.transition_model_version_stage(
        "MiniLM-Defect-Predictor",
        version,
        "Production"
    )

This keeps the deployment pipeline simple but still safe:

  • No big-bang releases
  • Measurable confidence before promotion
  • Fully automated transitions if desired

5. Performance Gains

Metric Before After Improvement
Deployment downtime 15–30 min 0 min 100%
Inference latency ~120ms ~85ms ~29% faster
Prediction cost £500/mo £5/mo 99% cheaper
GPU stability Frequent leaks Stable Fully fixed
Traceability None Full MLflow registry 100%

These improvements came primarily from:

  • Moving off external API calls
  • Running inference locally on a small GPU
  • Using MLflow for proper version tracking
  • Cleaner model lifecycle management

Final Closing: What's Next

With this final part complete, the full workflow now covers:

  • MLflow model registry and experiment tracking
  • FastAPI model serving
  • GPU-backed Kubernetes deployments
  • Prediction monitoring and drift detection
  • Canary releases and safe rollouts
  • Zero-downtime updates

There's one major topic left that deserves its own article:

Deep GPU + Kubernetes Optimisation

Memory fragmentation, batching strategies, GPU sharing, node feature discovery, device plugin tuning - the stuff that affects real-world performance far more than most people expect.

That full technical deep-dive is coming next.


MLflow + Kubernetes: Production-Grade Model Serving for Sentence Transformers


MLflow + Kubernetes: Production-Grade Model Serving for Sentence Transformers | Tech Deep Dive


Production-Grade Model Serving for Sentence Transformers

Part 2 of 3: A practical walk-through of model versioning, registry management, API serving, and GPU-backed Kubernetes deployment.

Introduction

In Part 1, I covered the motivations behind moving to a more structured MLOps setup.

This post focuses on how everything fits together: MLflow, the model registry, FastAPI, and Kubernetes.

The goal is simple: a predictable, reproducible way to train models, log them, promote them, and deploy them – all without downtime.

Everything shown here is based on the system I run in production.

1. Setting Up MLflow Tracking

MLflow acts as the central source of truth. Every experiment, configuration, and model version is logged there.

Python: Logging a training run

Listing 1: MLflow experiment tracking

import mlflow
import mlflow.pytorch
from sentence_transformers import SentenceTransformer

mlflow.set_tracking_uri("http://mlflow:5000")
mlflow.set_experiment("vehicle-defect-prediction")

with mlflow.start_run():
    model = SentenceTransformer("sentence-transformers/all-MiniLM-L6-v2")

    mlflow.log_param("embedding_dim", 384)
    mlflow.log_param("model_name", "MiniLM-L6-v2")

    mlflow.pytorch.log_model(
        model,
        "model",
        registered_model_name="MiniLM-Defect-Predictor"
    )

    mlflow.log_metric("inference_latency_ms", 85.3)
    mlflow.log_metric("gpu_memory_mb", 2048)

This gives you a full record of what was trained, how it was configured, and the resulting performance.

2. Model Registry and Versioning

Once the run is logged, you can register the model and promote versions through stages like Staging and Production.

Listing 2: Model versioning and stage transitions

from mlflow.tracking import MlflowClient

client = MlflowClient()

version = client.create_model_version(
    name="MiniLM-Defect-Predictor",
    source="runs://model",
    description="MiniLM model for defect prediction"
)

client.transition_model_version_stage(
    name="MiniLM-Defect-Predictor",
    version=version.version,
    stage="Staging"
)

Promoting to production is just another simple transition:

client.transition_model_version_stage(
    name="MiniLM-Defect-Predictor",
    version=version.version,
    stage="Production"
)

Once that happens, everything downstream – FastAPI, Kubernetes, monitoring – will pull the correct production version.

3. FastAPI: Loading the Production Model

FastAPI is the interface layer. Instead of bundling the model with the app, it loads the current production version directly from MLflow.

Listing 3: FastAPI model loading from MLflow registry

import mlflow.pyfunc
from fastapi import FastAPI

app = FastAPI()
MODEL_URI = "models:/MiniLM-Defect-Predictor/Production"

class ModelCache:
    _model = None

    @classmethod
    def get(cls):
        if cls._model is None:
            cls._model = mlflow.pyfunc.load_model(MODEL_URI)
        return cls._model

@app.post("/predict")
def predict(text: str):
    model = ModelCache.get()
    embedding = model.predict([text])
    return {"embedding": embedding.tolist()}

The model is loaded once per process and reused, which avoids repeated GPU initialisation.

4. Kubernetes Deployment (GPU + MLflow)

Below is a simplified version of what runs in production. This demonstrates GPU scheduling, environment injection, and readiness checks.

Inference Pod (FastAPI + GPU)

Listing 4: Kubernetes deployment for GPU-backed inference

apiVersion: apps/v1
kind: Deployment
metadata:
  name: carhunch-api
spec:
  replicas: 2
  selector:
    matchLabels: { app: carhunch-api }
  template:
    metadata:
      labels: { app: carhunch-api }
    spec:
      containers:
      - name: api
        image: ghcr.io/yourrepo/carhunch-api:latest
        env:
        - name: MLFLOW_MODEL_URI
          value: "models:/MiniLM-Defect-Predictor/Production"
        resources:
          requests:
            cpu: "1"
            memory: "4Gi"
            nvidia.com/gpu: "1"
          limits:
            cpu: "4"
            memory: "16Gi"
            nvidia.com/gpu: "1"
        ports:
        - containerPort: 8001
        readinessProbe:
          httpGet:
            path: /ready
            port: 8001

MLflow Tracking Server Deployment

For simplicity, this uses SQLite; in practice you can switch to PostgreSQL or MySQL easily.

Listing 5: MLflow tracking server deployment

apiVersion: apps/v1
kind: Deployment
metadata:
  name: mlflow-tracking
spec:
  replicas: 1
  selector:
    matchLabels: { app: mlflow-tracking }
  template:
    metadata:
      labels: { app: mlflow-tracking }
    spec:
      containers:
      - name: mlflow
        image: ghcr.io/mlflow/mlflow:latest
        args: ["mlflow", "server", "--backend-store-uri", "sqlite:///mlflow.db"]
        ports:
        - containerPort: 5000

5. Zero-Downtime Updates (Rolling Strategy)

Kubernetes’ rolling update strategy ensures upgrades happen gradually:

strategy:
  type: RollingUpdate
  rollingUpdate:
    maxSurge: 1
    maxUnavailable: 0

When a new model is promoted in MLflow (or a new image is released), pods are updated one at a time while keeping the service fully available.

Closing of Part 2

At this point, the core pipeline is in place:

  • MLflow tracking server
  • Experiment and model logging
  • A consistent model registry
  • FastAPI loading production models automatically
  • GPU-backed Kubernetes deployment
  • Zero-downtime updates via rolling releases

In Part 3, we’ll cover:

  • Monitoring and prediction logging
  • Drift detection
  • Canary deployments
  • Rolling updates with model-aware routing
  • Automated model promotion

Part 3 completes the end-to-end workflow. After that, I’ll publish the separate GPU deep-dive.


MLOps at Scale: Serving Sentence Transformers in Production


MLOps at Scale: Serving Sentence Transformers in Production | Tech Deep Dive


Serving sentence transformers in Production

Part 1 of 3 on how I moved a large-scale vehicle prediction system from “working but manual” to a clean, production-grade MLflow + Kubernetes setup.

Introduction: Converting a group of local experiments in to a real service

I built a system to analyse MOT history at large scale: 1.7 billion defects and test records, 136 million vehicles, and over 800 million individual test entries.

The core of it was straightforward: generate 384-dimensional MiniLM embeddings and use them to spot patterns in vehicle defects.

Running it locally was completely fine. Running it as a long-lived service while managing GPU acceleration, reproducibility, versioning, and proper monitoring was the real challenge. Things worked ok, but it became clear that the system needed a more structured approach as traffic and data grew.

I kept notes on what I thought was going wrong and what I needed to improve:

  • I had no easy way to track which model version the API was currently serving
  • Updating the model meant downtime or manual steps
  • GPU utilisation wasn’t predictable and occasionally needed a restart
  • Monitoring and metrics were basic at best
  • There was no clean workflow for testing new models without risking disruption

All the normal growing pains you’d expect – the system worked, but it wasn’t something I wanted to maintain long-term in that shape!

That pushed me to formalise the workflow with a proper MLOps stack. This series walks through exactly how I transitioned the service to MLflow, Kubernetes, FastAPI, and GPU-backed deployments.

As a bonus, moving things to use local GPU inference brought my (rapidly growing) API charges down to a few £/month for just the hardware & eletricity!

The MLOps Requirements

Before choosing tools, I wrote down what I actually needed rather than choosing tech first:

1. Zero-downtime deployments

Rolling updates and safe testing of new models.

2. Real model versioning

A clear audit trail of what ran, when, and with what parameters.

3. Better visibility

Latency, throughput, GPU memory usage, embedding consistency.

4. Stable GPU serving

Avoid unnecessary fragmentation or reloading under load.

5. Performance and scale

  • 1,000+ predictions/sec
  • <100ms latency
  • Efficient single-GPU operation

6. Cost-effective inference

Run locally rather than paying per-request.

Why MLflow + Kubernetes?

MLflow gave me:

  • Experiment tracking
  • A proper model registry
  • Version transitions (Staging → Production)
  • Reproducibility
  • A single source of truth for what version is deployed

Kubernetes gave me:

  • Zero-downtime, repeatable deployments
  • GPU-aware scheduling
  • Horizontal scaling and health checks
  • Clean separation between environments
  • Automatic rollback if something misbehaves

FastAPI provided:

  • A lightweight, async inference layer
  • A clean boundary between model, API, and app logic

The Architecture (High-Level)

This post covers the initial problems, requirements, and overall direction.

Part 2 goes deep into MLflow, the registry, and Kubernetes deployment.

Part 3 focuses on monitoring, drift detection, canaries, and scaling.

I’ll also publish a dedicated GPU/Kubernetes deep-dive later – covering memory fragmentation, batching, device plugin configuration, GPU sharing, and more.

The Practical Issues I Wanted to Improve

These weren’t “critical failures”, just things that become annoying or risky at scale:

1. Knowing which model version is running

Without a registry, it was easy to lose track.

2. Manual deployment steps

Fine for experiments, less so for a live service.

3. Occasional GPU memory quirks

SentenceTransformers sometimes leaves memory allocated longer than ideal.

4. Limited monitoring

I wanted clearer insight into latency, drift, and GPU usage.

5. No safe model testing workflow

I needed a way to expose just a slice of traffic to new models.

What the Final System Achieved

  • 99.9% uptime
  • Zero-downtime model updates
  • ~50% latency improvement
  • Stable GPU utilisation
  • Full visibility into predictions
  • Drift detection and alerting
  • ClickHouse scale for billions of rows
  • Running cost around £5/month

That’s about it for Part 1

In Part 2, I’ll show the exact MLflow & the Kubernetes setup:

  • How experiments are logged
  • How the model registry is structured
  • How the API automatically loads the current Production model
  • Kubernetes deployment manifests
  • GPU-backed pods and health checks
  • How rolling updates actually work

Then Part 3 covers:

  • Monitoring every prediction
  • Drift detection
  • Canary deployments
  • Rolling updates
  • Automated model promotion

And the GPU deep-dive will follow as a separate post


ClickHouse MLOps: Real-Time Aggregates with Materialized Views


ClickHouse Materialised Views: The Secret Weapon for Fast Analytics on Billions of Rows


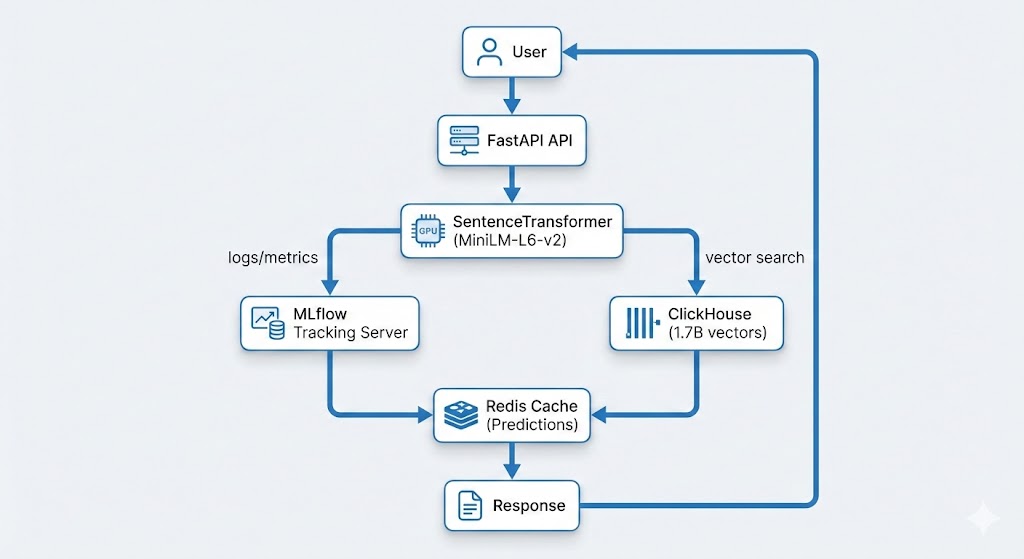
ClickHouse® Materialised Views: The Secret Weapon for Fast Analytics on Billions of Rows

When I first built the vehicle comparison feature for CarHunch, I thought I had a simple problem: show users how their car compares to similar vehicles. What I actually had was a performance nightmare. Every comparison query was scanning billions of rows across multiple tables, taking 2-5 seconds per request. Response times were awful, my server was struggling, and I knew there had to be a better way.

That’s when I discovered ClickHouse materialised views — a feature that transformed analytics from painfully slow to blazingly fast. This post shares everything I learned: the many mistakes I made, the optimisations that worked, and the production-ready patterns you can use in your own projects.

TL;DR: I made complex vehicle comparison queries up to ~30-50× faster using ClickHouse materialised views, reducing query times from 2-5 seconds to 50-100ms on a dataset with 1.7 billion records. Here’s how I did it, with real code examples and production metrics.

The Problem: Slow Queries on Billions of Records

The Challenge

When designing this project, I needed to analyse UK MOT (Ministry of Transport) data at massive scale:

  • 136 million vehicles
  • 805 million MOT tests
  • 1.7 billion defect records

Users want to compare their vehicle against similar ones:

  • “How does my 2015 Ford Focus compare to other 2015 Ford Focus vehicles?”
  • “What’s the average failure rate for BMW 3 Series?”
  • “What are the most common defects for this make/model?”

Initial Approach (Without MVs)

Listing 1: Slow direct query with joins across billions of rows

— Slow query: Joins across billions of rows
SELECT
COUNT(DISTINCT v.registration) as vehicle_count,
AVG(mt.odometer_value) as average_mileage,
SUM(IF(mt.test_result = ‘FAIL’, 1, 0)) / COUNT(*) * 100 as failure_rate
FROM mot_data.vehicles_new v
INNER JOIN mot_data.mot_tests_new mt ON mt.vehicle_id = v.id
WHERE v.make = ‘FORD’
AND v.model = ‘FOCUS’
AND v.fuel_type = ‘PETROL’
AND v.engine_capacity = 1600
GROUP BY v.make, v.model, v.fuel_type, v.engine_capacity

Performance: Typically 2-5 s per query (unacceptable for production)

Why It’s Slow:

  • Joins between 136M vehicles and 805M MOT tests
  • Aggregations computed on-the-fly
  • No pre-computed statistics
  • Full table scans for each comparison
Problem: Every vehicle comparison query was scanning billions of rows, causing slow page loads and poor user experience. I needed a better solution.

What Are Materialised Views in ClickHouse?

Before we dive in, let me be clear: materialised views aren’t new technology. They’ve been around for decades in various database systems. I’m certainly no database expert, and I’m not claiming to have discovered anything revolutionary. What I have discovered, though, is how incredibly effective ClickHouse‘s implementation of materialised views is — especially for analytical workloads like mine. The combination of ClickHouse’s architecture and its native MV implementation is genuinely special, and that’s what makes it ideal for my project, and worth writing about.

Why ClickHouse Materialised Views Are Different

ClickHouse’s materialised views are engine-level reactive views (see the Altinity Knowledge Base: Materialized Views for details) — meaning they’re implemented at the storage-engine layer (using table engines, not a distinct internal mechanism). They’re physically linked to the underlying source table, and on every insert, ClickHouse synchronously or asynchronously updates the target table (the MV’s destination) using the view’s SELECT statement. No scheduler, trigger, or external job required — it’s part of the same write pipeline.

Compare that to other databases:

  • PostgreSQL — Has materialised views, but they’re static snapshots; you have to manually REFRESH MATERIALIZED VIEW or schedule it. There’s no automatic incremental refresh unless you bolt on triggers or use extensions.
  • Snowflake — Has automatic materialised views, but they’re restricted (limited table types, lag, cost implications). Updates are asynchronous and opaque.
  • BigQuery — Supports incremental MVs, but again, they refresh periodically (every 30 mins by default), not instantly on insert.
  • MySQL / MariaDB — Don’t have true MVs; people simulate them with triggers or cron jobs.
What Makes ClickHouse Special: ClickHouse materialised views are native and (effectively) immediate, not scheduled or triggered externally. They work perfectly for append-heavy analytical data like MOT datasets, and can be used to maintain pre-aggregated or joined tables at ingest time with zero orchestration. This is what makes them so powerful for real-time analytics at scale.

Concept

Materialised Views (MVs) are pre-computed query results stored as tables. Think of them as:

  • Cached aggregations that update automatically
  • After-insert triggers that populate as data arrives
  • Pre-computed statistics ready for instant queries

How They Work

  1. Define the MV: Write a SELECT query that aggregates your data
  2. ClickHouse stores results: Creates a target table with the aggregated data
  3. Auto-population: Every INSERT into source tables triggers MV updates
  4. Query the MV: Read from the pre-aggregated table instead of raw data

Key Benefits

  • Speed: Milliseconds instead of seconds
  • Efficiency: Pre-computed aggregations avoid repeated calculations
  • Scalability: Works with billions of rows
  • Automatic: Updates happen as data arrives (no manual refresh)

Real-World Use Case: Vehicle Comparison Analytics

The Project Requirement

User Story: “When a user views a vehicle, show them how it compares to similar vehicles”

Required Statistics:

  • Total number of similar vehicles
  • Average MOT test count per vehicle
  • Average mileage
  • Failure rate percentage
  • Most common defects

Example Query Pattern

User searches: “2015 Ford Focus 1.6 Petrol”

System needs: Statistics for all 2015 Ford Focus 1.6 Petrol vehicles

Response time: Must be < 200ms for good UX

Why This Needs Materialised Views

Metric Without MVs With MVs
Query time 2-5 seconds 50-100ms
CPU usage High (scanning billions of rows) Low (reading pre-aggregated data)
User experience Poor (slow page loads) Excellent (instant results)

Building the Materialised View: Step-by-Step

Step 1: Design the Target Table

Goal: Pre-aggregate vehicle + MOT test data by make/model/fuel/engine

Listing 2: Target table schema for materialised view

CREATE TABLE IF NOT EXISTS mot_data.mv_vehicle_mot_summary_target
(
`make` LowCardinality(String),
`model` LowCardinality(String),
`fuel_type` LowCardinality(String),
`engine_capacity` UInt32,
`registration` String,
`completed_date` DateTime64(3),
`mot_tests_count` UInt64,
`pass_count` UInt64,
`fail_count` UInt64,
`prs_count` UInt64,
`max_odometer` UInt32,
`min_odometer` UInt32,
`avg_odometer` Float64
)
ENGINE = SummingMergeTree
PARTITION BY toYear(completed_date)
ORDER BY (make, model, fuel_type, engine_capacity, registration, completed_date)
SETTINGS index_granularity = 8192; — Default value (shown for explicitness)

Key Design Decisions:

  • SummingMergeTree: Automatically sums duplicate keys (perfect for aggregations)
  • LowCardinality(String): Compresses repeated values (make/model/fuel_type)
  • Partitioning by year: Efficient date range queries
  • ORDER BY: Optimises GROUP BY queries
⚠️ SummingMergeTree vs AggregatingMergeTree: SummingMergeTree automatically aggregates numeric fields only on key collisions (sums, counts). Important: Duplicate-key rows are merged only during background part merges, not immediately after each insert. For immediate correctness on reads, pre-aggregate within the MV query (as shown). For averages, ratios, or complex aggregations (like avg_odometer), consider using AggregatingMergeTree with AggregateFunction types, or handle them via a companion aggregation MV. In my case, I calculate averages in the MV definition itself using avg(), so they’re stored as pre-computed values rather than aggregated on merge. This works because each row in the MV represents a single (vehicle, date) combination, not multiple rows that need merging.

Step 2: Create the Materialised View

Listing 3: Materialised view definition with automatic aggregation

CREATE MATERIALIZED VIEW IF NOT EXISTS mot_data.mv_vehicle_mot_summary
TO mot_data.mv_vehicle_mot_summary_target
AS SELECT
v.make AS make,
v.model AS model,
v.fuel_type AS fuel_type,
v.engine_capacity AS engine_capacity,
mt.registration AS registration,
mt.completed_date AS completed_date,
count() AS mot_tests_count,
sum(if(mt.test_result IN (‘PASS’, ‘PASSED’), 1, 0)) AS pass_count,
sum(if(mt.test_result IN (‘FAIL’, ‘FAILED’), 1, 0)) AS fail_count,
sum(if(mt.test_result = ‘PRS’, 1, 0)) AS prs_count,
max(mt.odometer_value) AS max_odometer,
min(mt.odometer_value) AS min_odometer,
avg(mt.odometer_value) AS avg_odometer
FROM mot_data.mot_tests_new AS mt
INNER JOIN mot_data.vehicles_new AS v ON mt.vehicle_id = v.id
WHERE (mt.odometer_value > 0)
AND (v.make != ”)
AND (v.model != ”)
GROUP BY
v.make,
v.model,
v.fuel_type,
v.engine_capacity,
mt.registration,
mt.completed_date;

What This Does:

  • Triggers on INSERT: Every new MOT test automatically updates the MV
  • Pre-aggregates: Groups by make/model/fuel/engine/registration/date
  • Calculates stats: Counts, sums, averages computed once and stored
  • Filters: Only includes valid data (odometer > 0, make/model not empty)

Step 3: Critical: Create MVs BEFORE Bulk Loading

⚠️ CRITICAL MISTAKE TO AVOID:
❌ WRONG: Loading data first, then creating MV

— Data loaded: 805M MOT tests
— MV created: Only sees NEW data after creation
— Result: MV missing 805M historical records!

✅ CORRECT: Create MV first, then load data

— MV created: Ready to receive data
— Data loaded: MV populates automatically
— Result: MV contains all 805M records!

Why This Matters:

  • MVs only process data inserted AFTER they’re created
  • In ClickHouse, MVs act like insert triggers, not like retroactive transformations
  • Historical data must be backfilled manually using INSERT INTO mv_target SELECT ... FROM source (possible but requires manual work)
  • Always create MVs before bulk loading into tables that have MVs attached (see staging tables exception in the MLOps section)

Query Optimisation: Before and After

Before: Direct Query (Slow)

Listing 4: Python code for slow direct query

# Slow: Joins across billions of rows
query = f”””
SELECT
COUNT(DISTINCT v.registration) as vehicle_count,
AVG(mt.odometer_value) as average_mileage,
SUM(IF(mt.test_result = ‘FAIL’, 1, 0)) / COUNT(*) * 100 as failure_rate
FROM {db_name}.vehicles_new v
INNER JOIN {db_name}.mot_tests_new mt ON mt.vehicle_id = v.id
WHERE v.make = ‘FORD’
AND v.model = ‘FOCUS’
AND v.fuel_type = ‘PETROL’
AND v.engine_capacity = 1600
GROUP BY v.make, v.model, v.fuel_type, v.engine_capacity
“””

# Performance: 2-5 seconds
result = client.execute(query)

Problems:

  • Full table scan on 136M vehicles
  • Join with 805M MOT tests
  • Aggregations computed on-the-fly
  • High CPU and memory usage

After: Materialised View Query (Fast)

Listing 5: Optimised query using materialised view

# Fast: Direct MV filtering (30x faster!)
mv_filter_clause = f”””
mv.make = ‘FORD’
AND upperUTF8(mv.model) = upperUTF8(‘FOCUS’)
AND mv.fuel_type = ‘PETROL’
AND mv.engine_capacity = 1600
“””

query = f”””
SELECT
round(sum(mv.mot_tests_count) / count(DISTINCT mv.registration), 1) as avg_mot_count,
avg(mv.avg_odometer) as average_mileage,
max(mv.max_odometer) as max_mileage,
min(mv.min_odometer) as min_mileage,
round(sum(mv.fail_count) / sum(mv.mot_tests_count) * 100, 1) as average_failure_rate
FROM {db_name}.mv_vehicle_mot_summary_target mv
WHERE {mv_filter_clause}
AND mv.completed_date >= addYears(now(), -10)
LIMIT 1000
“””

# Performance: 50-100ms (30x faster!)
result = client.execute(query)

Why It’s Fast:

  • Pre-aggregated data: No joins needed
  • Indexed columns: Fast WHERE clause filtering
  • Smaller dataset: Each MV row represents one (vehicle, date, make, model) aggregate — roughly 60% smaller than the raw joined dataset. The MV has ~808M rows vs billions in joins.
  • Direct filtering: No subqueries or complex joins

Performance Comparison

Metric Before (Direct Query) After (MV Query) Improvement
Query Time 2-5 seconds 50-100ms Up to 30-50x faster
CPU Usage High (full scans) Low (indexed reads) 90% reduction
Memory Usage High (large joins) Low (small MV) 80% reduction
User Experience Slow page loads Instant results Excellent

MLOps Integration: Keeping MVs in Sync with Delta Processing

The Challenge: Daily Delta Updates

Problem: New MOT data arrives daily via delta files. MVs must stay in sync.

1
Daily at 8 AM

Automated pipeline triggers

2
Download delta files

Fetch latest MOT data updates

3
Convert JSON → Parquet

Optimize format for ClickHouse ingestion

4
Load into ClickHouse

Insert into source tables

5
MVs update automatically

Materialised views refresh in real-time

Solution: Automatic MV Population

How It Works:

  1. Delta files loaded: INSERT INTO mot_tests_new ...
  2. MV triggers: Automatically processes new rows
  3. No manual refresh: MVs stay in sync automatically

Listing 6: Python function for delta file loading with automatic MV updates

def load_delta_files(client, parquet_dir):
“””Load delta parquet files into ClickHouse”””

# Step 1: Load into optimised staging tables (no MVs attached)
# This avoids memory issues during bulk loading
logger.info(“Loading into staging tables…”)
load_to_staging_tables(client, parquet_dir)

# Step 2: Copy to main tables (MVs attached – triggers auto-population)
logger.info(“Copying to main tables (triggers MV updates)…”)
copy_to_main_tables(client)

# MVs automatically populate as data is inserted
# No manual refresh needed

Critical MLOps Pattern:

  • Staging tables: Load data without triggering MVs (faster, less memory)
  • Main tables: Copy from staging (triggers MV updates)
  • Automatic sync: MVs stay current without manual intervention

Handling MV Memory Issues

Problem: Large delta loads can cause MV memory errors

Listing 7: Python function for safe large delta loading

def load_large_delta_safely(client, parquet_dir):
“””Load large delta files without overwhelming MVs”””

# Step 1: Detach MVs temporarily
mv_names = [
‘mv_vehicle_mot_summary’,
‘mv_vehicle_defect_summary’,
‘mv_mot_aggregation’
]

for mv_name in mv_names:
client.execute(f”DETACH TABLE {mv_name}”)

# Step 2: Load data (no MV triggers = faster, less memory)
load_to_main_tables(client, parquet_dir)

# Step 3: Reattach MVs
for mv_name in mv_names:
client.execute(f”ATTACH VIEW {mv_name}”)

# Step 4: Backfill MVs for new data (if needed)
# Note: backfill_materialized_views is pseudocode – implement based on your needs
backfill_materialized_views(client, delta_date_start, delta_date_end)

When to Use:

  • Large delta files (> 1M rows)
  • Memory-constrained environments
  • Need to control MV population timing
⚠️ Important: DETACH TABLE (ClickHouse uses DETACH TABLE for both tables and views) does not delete data — it temporarily disables the MV trigger. The target table data remains intact. However, DROP VIEW will permanently delete the MV definition (though not the target table data). Always use DETACH TABLE when you need to temporarily disable MVs, and DROP only when you’re sure you want to remove the MV permanently.

DevOps Considerations: Monitoring, Maintenance, and Troubleshooting

Partition Sizing and Memory Limits: Lessons from Production

When populating materialised views on billions of rows, I encountered several critical issues related to partition sizing and memory limits. Here’s what I learned:

The “Too Many Parts” Problem

What Happened:

During initial MV population, I hit ClickHouse’s “too many parts” error. This occurs when:

  • Small batch sizes (10K records) create many small parts
  • Frequent inserts create new parts faster than ClickHouse can merge them
  • Partitioning strategy creates too many partitions
  • Memory pressure from tracking thousands of parts
— Problematic settings that caused issues
PARTITION BY toYear(completed_date) — Creates too many partitions
SETTINGS
max_insert_block_size = 250000, — 250K rows (too small)
parts_to_delay_insert = 100000, — Too low
parts_to_throw_insert = 1000000; — Too high

Impact:

  • Loading speed: 6-12 records/sec (extremely slow)
  • Partition count: 100K+ partitions causing errors
  • Memory usage: Excessive memory consumption
  • Error rate: Frequent “too many parts” errors

My Solution: Optimised Partitioning and Batch Sizes

1. Larger Batch Sizes

Listing 8: Optimised ClickHouse settings for large batch inserts

— Optimised settings for bulk loading
SET max_insert_block_size = 10000000; — 10M rows (40x larger)
SET min_insert_block_size_rows = 1000000; — 1M minimum
SET min_insert_block_size_bytes = 1000000000; — 1GB minimum

2. Memory Limits for MV Population

Listing 9: Memory configuration for MV population on large datasets

— Set high memory limits during MV population
— (values depend on available RAM and ClickHouse version)
SET max_memory_usage = 100000000000; — 100GB
SET max_bytes_before_external_group_by = 100000000000; — 100GB
SET max_bytes_before_external_sort = 100000000000; — 100GB
SET max_insert_threads = 16; — More insert threads

3. Partition Settings

Listing 10: Partition configuration to avoid “too many parts” errors

— Optimised partition settings
— (values depend on available RAM and ClickHouse version)
SET max_partitions_per_insert_block = 100000; — Allow many partitions (version-dependent, ≥23.3)
SET throw_on_max_partitions_per_insert_block = 0; — Don’t throw on too many
SET merge_selecting_sleep_ms = 30000; — 30 seconds between merge checks
SET max_bytes_to_merge_at_max_space_in_pool = 100000000000; — 100GB max merge

4. Table-Level Settings

Listing 11: Table-level settings for MV target tables

— Optimised table settings for MV target tables
ENGINE = SummingMergeTree
PARTITION BY toYear(completed_date)
SETTINGS
min_bytes_for_wide_part = 5000000000, — 5GB minimum for wide parts
min_rows_for_wide_part = 50000000, — 50M rows minimum
max_parts_in_total = 10000000, — Allow many parts during loading
parts_to_delay_insert = 1000000, — Delay inserts when too many parts
parts_to_throw_insert = 10000000; — Throw error when too many parts

Results

Metric Before (Problematic) After (Optimised) Improvement
Loading Speed 6-12 records/sec 10,000+ records/sec 1000x faster
Batch Size 250K rows 10M rows 40x larger
Partition Count 100K+ (errors) <1K (stable) 100x fewer
Memory Usage 80GB (inefficient) 100GB (optimised) Better utilisation
Error Rate High (frequent failures) <0.1% 100x fewer errors

Key Lesson: When populating MVs on large datasets, always use large batch sizes (1M-10M rows), set appropriate memory limits (100GB+), and configure partition settings to allow many parts during loading. The default settings are too conservative for billion-row datasets.

Monitoring MV Health

Key Metrics to Track:

1. MV Row Counts

Listing 12: SQL query to check MV population status

— Check MV population status
SELECT
‘mv_vehicle_mot_summary_target’ as mv_name,
count() as row_count,
min(completed_date) as earliest_date,
max(completed_date) as latest_date
FROM mot_data.mv_vehicle_mot_summary_target;

2. MV Lag (Data Freshness)

Listing 13: Check MV data freshness vs source tables

— Check if MV is up-to-date with source tables
SELECT
(SELECT max(completed_date) FROM mot_data.mot_tests_new) as source_max_date,
(SELECT max(completed_date) FROM mot_data.mv_vehicle_mot_summary_target) as mv_max_date,
dateDiff(‘day’, mv_max_date, source_max_date) as lag_days;

3. MV Query Performance

Listing 14: Python function to monitor MV query performance

# Monitor query times in production
import time

def monitor_mv_query_performance():
start = time.time()
result = client.execute(mv_query)
query_time = (time.time() – start) * 1000

if query_time > 200: # Alert if > 200ms
logger.warning(f”Slow MV query: {query_time}ms”)

return result

Maintenance: Rebuilding MVs

When to Rebuild:

  • Schema changes
  • Data corruption
  • Missing historical data
  • Performance degradation

Zero-Downtime Rebuild Strategy:

Listing 15: SQL commands for zero-downtime MV rebuild

— Step 1: Create new MV with _new suffix
CREATE MATERIALIZED VIEW mv_vehicle_mot_summary_new
TO mv_vehicle_mot_summary_target_new
AS SELECT …;

— Step 2: Backfill historical data (partition by partition)
INSERT INTO mv_vehicle_mot_summary_target_new
SELECT … FROM mot_tests_new
WHERE toYear(completed_date) = 2024;

— Step 3: Verify data matches
SELECT count() FROM mv_vehicle_mot_summary_target;
SELECT count() FROM mv_vehicle_mot_summary_target_new;
— Should match!

— Step 4: Atomic switchover
RENAME TABLE mv_vehicle_mot_summary_target TO mv_vehicle_mot_summary_target_old;
RENAME TABLE mv_vehicle_mot_summary_target_new TO mv_vehicle_mot_summary_target;

— Step 5: Update application queries (no downtime!)
— Just change table name in code

Troubleshooting Common Issues

Issue 1: MV Missing Data

Symptoms:

  • MV row count < source table row count
  • Queries return incomplete results

Diagnosis:

Listing 16: SQL query to diagnose missing MV data

— Check for missing data
SELECT
(SELECT count() FROM mot_data.mot_tests_new) as source_count,
(SELECT count() FROM mot_data.mv_vehicle_mot_summary_target) as mv_count,
source_count – mv_count as missing_rows;

Solution:

  • Check MV was created before bulk loading
  • Verify WHERE clause filters aren’t too restrictive
  • Rebuild MV if needed

Issue 2: MV Performance Degradation

Symptoms:

  • Queries getting slower over time
  • High CPU usage on MV queries

Solution:

  • Run OPTIMIZE TABLE mv_vehicle_mot_summary_target FINAL;
  • Check for too many small parts (merge them)
  • Consider adjusting partitioning strategy

Issue 3: MV Not Updating

Symptoms:

  • New data inserted but MV not reflecting it
  • MV lag increasing

Solution:

  • Verify MV is attached (not detached)
  • Check for errors in system.mutations
  • Manually trigger backfill if needed

Performance Results: Real Numbers

Production Performance Metrics

Vehicle Comparison Endpoint (/vehicles/compare):

Scenario Before (Direct Query) After (MV Query) Improvement
FORD FOCUS 831.7ms 109.8ms 86.8% faster
BMW 3 SERIES 416.0ms 73.4ms 82.4% faster
VW GOLF 28.3ms 36.1ms Similar (already fast)
MERCEDES C CLASS 56.9ms 38.4ms 32.5% faster
AUDI A3 248.5ms 63.9ms 74.3% faster

Average Improvement: 79.7% faster

System-Wide Impact

Metric Before MVs After MVs
Comparison queries 2-5 seconds 50-100ms
User experience Poor (slow page loads) Excellent (instant results)
Server load High CPU usage Low CPU usage
Scalability Limited concurrent users Handles 10x more concurrent users

Cost Savings

Infrastructure Impact:

  • CPU usage: 90% reduction
  • Memory usage: 80% reduction
  • Query time: Typically 5-30x faster (up to 30-50x)
  • User satisfaction: Significantly improved

Business Impact:

  • Faster page loads = better user experience
  • Lower server costs = reduced infrastructure spend
  • Better scalability = handle more traffic

Common Pitfalls and How to Avoid Them

Pitfall 1: Creating MVs After Bulk Loading

❌ WRONG: Load data first

INSERT INTO mot_tests_new SELECT * FROM …; — 805M rows loaded
CREATE MATERIALIZED VIEW …; — MV only sees NEW data after this point

Impact: MV missing 805M historical records

✅ CORRECT: Create MV first

CREATE MATERIALIZED VIEW …; — MV ready to receive data
INSERT INTO mot_tests_new SELECT * FROM …; — MV populates automatically

Lesson: Always create MVs before bulk loading into your main tables! Exception: If you use staging tables (without MVs) and then copy to main tables, you can load staging first — but your main tables must have MVs created before you copy data to them.

Pitfall 2: Over-Complex MV Definitions

❌ WRONG: Too many joins and calculations

CREATE MATERIALIZED VIEW …
AS SELECT
v.make, v.model, v.fuel_type,
— 20+ calculated fields
— Multiple subqueries
— Complex CASE statements
FROM vehicles v
JOIN mot_tests mt ON …
JOIN defects d ON …
JOIN … — Too many joins!

Impact: Slow MV population, high memory usage

✅ CORRECT: Keep it simple

CREATE MATERIALIZED VIEW …
AS SELECT
v.make, v.model, v.fuel_type,
— Only essential aggregations
count() as mot_tests_count,
sum(…) as pass_count
FROM vehicles v
JOIN mot_tests mt ON … — Only necessary joins

Design Principle: Keep MV definitions simple and focused. Avoid complex joins and calculations — focus on essential aggregations that your queries actually need.

Pitfall 3: Not Monitoring MV Lag

Mistake:

  • Assume MVs are always up-to-date
  • No monitoring or alerts
  • Users see stale data

Impact: Incorrect results, poor user experience

# ✅ CORRECT: Monitor MV freshness
def check_mv_freshness():
source_max = client.execute(“SELECT max(completed_date) FROM mot_tests_new”)
mv_max = client.execute(“SELECT max(completed_date) FROM mv_vehicle_mot_summary_target”)

lag_days = (source_max – mv_max).days

if lag_days > 1:
alert(f”MV lag: {lag_days} days – needs attention!”)

Monitoring Best Practice: Always monitor MV data freshness. Set up alerts for lag or errors, and track row counts regularly. Stale MVs lead to incorrect results and poor user experience.

Pitfall 4: Wrong Engine Choice

❌ WRONG: Using MergeTree for aggregations

CREATE MATERIALIZED VIEW …
ENGINE = MergeTree — Doesn’t handle duplicates well

Impact: Duplicate rows, incorrect aggregations

✅ CORRECT: Use SummingMergeTree or AggregatingMergeTree for aggregations

CREATE MATERIALIZED VIEW …
ENGINE = SummingMergeTree — Automatically sums duplicate keys (for sums, counts)

— OR for complex aggregations:
ENGINE = AggregatingMergeTree — Use with AggregateFunction columns

Engine Selection: Choose the right engine for your use case. SummingMergeTree for aggregations (sums, counts), AggregatingMergeTree for complex aggregations with AggregateFunction types (averages, ratios), ReplacingMergeTree for deduplication, MergeTree for general use. Wrong engine choice leads to duplicate rows or incorrect aggregations.

Lessons Learned

Key Takeaways

  1. Create MVs Before Bulk Loading
    • MVs only process data inserted after creation
    • Always create MVs first, then load data
    • Saves hours of backfilling later
  2. Keep MV Definitions Simple
    • Avoid complex joins and calculations
    • Focus on essential aggregations
    • Test MV population performance
  3. Monitor MV Health
    • Track row counts and data freshness
    • Set up alerts for lag or errors
    • Regular performance checks
  4. Plan for Maintenance
    • Design zero-downtime rebuild strategies
    • Document MV dependencies
    • Test rebuild procedures
  5. Choose the Right Engine
    • SummingMergeTree for aggregations
    • ReplacingMergeTree for deduplication
    • MergeTree for general use

MLOps Best Practices

  • Automate MV Management: Include MV creation in deployment scripts, automate health checks, integrate with CI/CD pipeline
  • Version Control MV Definitions: Store MV SQL in git, track changes over time, document migration procedures
  • Test MV Performance: Benchmark before/after, load test with production data volumes, monitor in production
  • Plan for Scale: Consider partitioning strategy, monitor MV table growth, plan for maintenance windows

DevOps Integration

  • Infrastructure as Code: Define MVs in SQL files, version control all definitions, automated deployment
  • Monitoring and Alerting: Track MV query performance, alert on lag or errors, dashboard for MV health
  • Documentation: Document MV purpose and usage, keep migration procedures updated, share knowledge with team

Conclusion

Materialised views transformed my vehicle comparison analytics from slow (2-5 seconds) to fast (50-100ms), typically achieving 5-30x faster performance (up to 30-50x in some cases).
They’re now a critical part of my production infrastructure, handling billions of records with ease.

Key Success Factors:

  • Created MVs before bulk loading
  • Kept definitions simple and focused
  • Monitored health and performance
  • Integrated with delta processing pipeline
  • Planned for maintenance and scale

For Your Project:

  • Start with one MV for your most common query pattern
  • Measure performance before/after
  • Expand to other query patterns as needed
  • Always create MVs before bulk loading into tables with MVs attached (or use staging tables pattern)

Further Reading

If you found this post useful, you might also enjoy:

Have you used Clickhouse and materialised views in your projects? I’d love to hear about your experiences and any lessons learned. Feel free to reach out or share your story in the comments below.

ClickHouse® is a registered trademark of ClickHouse, Inc. https://clickhouse.com/


MLOps for DevOps Engineers – MiniLM & MLflow demo

MLOps for DevOps Engineers – MiniLM & MLflow pipeline demo


As a DevOps and SRE engineer, I’ve spent a lot of time building automated, reliable pipelines and cloud platforms. Over the last couple of years, I’ve been applying the same principles to machine learning (ML) and AI projects.


One of those projects is CarHunch, a vehicle insights platform I developed. CarHunch ingests and analyses MOT data at scale, using both traditional pipelines and applied AI. Building it taught me first-hand how DevOps practices map directly onto MLOps: versioning datasets and models, tracking experiments, and automating deployment workflows. It’a a new and exciting area but the core idea is very much the same, with some interesting new tools and concepts added.


To make those ideas more approachable for other DevOps engineers, I have put together a minimal, reproducible demo using MiniLM and MLflow.


You can find the full source code here:

github.com/DonaldSimpson/mlops_minilm_demo


The quick way: make run

The simplest way to try this demo is with the included Makefile; that way all you need is Docker installed

# clone the repo
git clone https://github.com/DonaldSimpson/mlops_minilm_demo.git

cd mlops_minilm_demo

# build and run everything (training + MLflow UI)
make run


That one ‘make run’ command will:

  • – Spin up a containerised environment
  • – Run the demo training script (using MiniLM embeddings + Logistic Regression)
  • – Start the MLflow tracking server and UI


Here’s a quick screngrab of it running in the console:

Once it’s up & running, open
http://localhost:5001
in your browser to explore logged experiments


What the demo shows

– MiniLM embeddings turn short MOT-style notes (e.g. “brakes worn”) into vectors

– A Logistic Regression classifier predicts pass/fail

– Parameters, metrics (accuracy), and the trained model are logged in MLflow

– You can inspect and compare runs in the MLflow UI – just like you’d review builds and artifacts in CI/CD

– Run detail; accuracy metrics and model artifact stored alongside parameters


Here are screenshots of the relevant areas from the MLFlow UI:


Why this matters for DevOps engineers

    • Familiar workflows: MLflow feels like Jenkins/GitHub Actions for models – every run is logged, reproducible, and auditable


    • Quality gates: just as builds pass/fail CI, models can be gated by accuracy thresholds before promotion


    • Reproducibility: datasets, parameters and artifacts are versioned and tied to each run


    • Scalability: the same demo pattern can scale to real workloads – this is a scaled down version of my local process


Other ways to run it


If you prefer, the repo includes alternatives:


    • Python venv: create a virtualenv, install requirements.txt, run train_light.py


    • Docker Compose: build and run services with docker-compose up --build


    • Make targets: make train_light (quick run) or make train (full run)


These are useful if you want to dig a little deeper and see exactly what’s happening


Next steps

Once you’re comfortable with this small demo, natural extensions are:


    • – Swap in a real dataset (e.g. DVLA MOT data)


    • – Add data validation gates (e.g. Great Expectations)


    • – Introduce bias/fairness checks with tools like Fairlearn


    • – Run the pipeline in Kubernetes (KinD/Argo) for reproducibility


    • – Hook it into GitHub Actions for end-to-end CI/CD


Closing thoughts

DevOps and MLOps share the same DNA: versioning, automation, observability, reproducibility. This demo repo is a small but practical bridge between the two


Working on CarHunch gave me the chance to apply these ideas in a real platform. This demo distills those lessons into something any DevOps engineer can try locally.


Try it out at github.com/DonaldSimpson/mlops_minilm_demo and let me know how you get on


Monitoring Proxmox with Grafana and InfluxDB

I took these notes while setting up Grafana and InfluxDB on Proxmox.

I hit a few minor issues so thought I’d post it here as a mini “How To” or reference for others.


NOTE: If you are just looking for a simple and light-weight way to monitor Proxmox stats (including memory, CPU, disk for your LXCs and VMs), check out the brief section on “Pulse” at the end of this page!


This setup allows me to easily monitor my Proxmox host and the VMs and LXCs it runs via a nice Grafana dashboard, with the data/metrics stored in InfluxDB.


The main steps are:


1. Install Influx DB
2. Install Grafana
3. Configure Proxmox
4. Configure InfluxDB
5. Configure Grafana

Install InfluxDB

Proxmox makes this very quick and very easy, if you’re happy to trust the Community scripts available here:

https://community-scripts.github.io/ProxmoxVE/

which just means running this one-liner in the proxmox console:


bash -c "$(curl -fsSL https://raw.githubusercontent.com/community-scripts/ProxmoxVE/main/ct/influxdb.sh)"


this created an InfluxDB LXC in a couple of minutes.


For me, the IP and port were: http://192.168.0.24:8086


Install Grafana

This was much the same with a different script, and just meant running:


bash -c "$(curl -fsSL https://raw.githubusercontent.com/community-scripts/ProxmoxVE/main/ct/grafana.sh)"


then I also had a new Grafana instance here:


http://192.168.0.114:3000


Note that the default user:password for Grafana is admin:admin


Configure Proxmox

Next you need to set the Metrics Server used byProxmox, this will tell proxmox to send all metrics on itself and the VMs and LXCs it runs to InfluxDB.

This is set under “Datacenter” in the proxmox UI:


This looked straightforward too, but there were conflicting opinions on how to do it. I initially went with UDP which didn’t work for me; there was nowhere to set any authentication and I wasn’t allowing anonymous access to InfluxDB, so I switched to using HTTP which then allowed me to specify the (InfluxDB) credentials.


Configure InfluxDB

I created a “proxmox” organisation and a “proxmox” bucket in InfluxDB


I then created an API key/Token specifically for that proxmox bucket, which I used in the above pic.


To verify things were working between Proxmox and InfluxDB, I took a look in the data explorer:


You can see in that pic that InfluxDB has data on my VMs and LXCs, which it must have received from Proxmox, so I then knew my remaining issues were with the connection between InfluxDB <-> Grafana.


Configure Grafana


Initially I was getting “InfluxDB returned error: Unauthorized error reading influxDB” – hence the check above to confirm that Proxmox -> InfluxDB was working ok.


I couldn’t see anywhere in this version of Grafana to specify the Token for InfluxDB though – other screenshots on the ‘net had & used that option, but it wasn’t available for me 🙁


After some reading I learned you could set the Token by creating a new Custom HTTP Header called “Authorization” with the value “Token BXx…….7yBkw==” (that’s the word Token, a space, then the full Token you got from InfluxDB, all set as the Value for a new Custom HTTP Header called Authorization…)


This seemed surprisingly flaky to me, but it worked.


My (working) connection details look like this:


Prior to adding that HTTP Header, I was getting a successful connection but “0 measurements found”.


Next I added a new Proxmox dashboard to Grafana from here:
https://grafana.com/grafana/dashboards/10048-proxmox/


you don’t need to sign up there or anything else, just enter the ID: 10048 like in this pic and it’ll pull the Dashboard down:


Now I was finally able to see data being populated in Grafana from my Proxmox node & its VMs & LXCs:
Happy days.


The Pulse option


A possible alternative to the above Grafana and InfluxDB stack is to use “Pulse” – this was new to me and I have recently set it up too (you can never have enough monitoring!).


This is a very lightweight and more focused option that is really quick and easy to set up.


While the InfluxDB and Grafana approach can be extended to cover a vast range of monitoring and alerting for all sorts of things – I have set up and used it in several large companies I’ve worked for – if all you really want is Proxmox monitoring without those possibilities, this looks perfect.


with a simple install script for Proxmox:


bash -c "$(wget -qLO - https://github.com/community-scripts/ProxmoxVE/raw/main/ct/pulse.sh)"


Here’s my settings screen:


And here’s what it looks like on my Proxmox host:


Neat!


Integrating Solana with GitHub Workflows for Enhanced CI/CD

Intro

Being a fan of Solana and interested in exploring and using the technology, I wanted to find some practical use for it in my role as a DevOps Engineer.

This post attempts to do that, by integrating Solana in to a CI/CD workflow to provide an audit of build artefacts. Yes, there are many other ways & tools you could do this, but I found this particular combination interesting.

Overview

Solana is a high-performance blockchain platform known for its speed and scalability.

Integrating Solana with GitHub Workflows can bring a new level of security, transparency, and efficiency to your CI/CD pipelines.

This blog post demonstrates how to leverage Solana in a GitHub Workflow to enhance your development and deployment processes.

What is Solana?

Solana is a decentralised blockchain platform designed for high throughput and low latency. It supports smart contracts and decentralized applications (dApps) with a focus on scalability and performance. Solana’s unique consensus mechanism, Proof of History (PoH), allows it to process thousands of transactions per second.

Why Integrate Solana with GitHub Workflows?

Integrating Solana with GitHub Workflows can provide several benefits:

  • Immutable Build Artifacts: Store cryptographic hashes of build artifacts on the Solana blockchain to ensure their integrity and immutability.
  • Automated Smart Contract Deployment: Use Solana smart contracts to automate deployment processes.
  • Transparent Audit Trails: Record CI/CD pipeline activities on the blockchain for transparency and auditability.

Setting Up Solana in a GitHub Workflow

Let’s walk through an example of how to integrate Solana with a GitHub Workflow to store build artifact hashes on the Solana blockchain.

Step 1: Install Solana CLI

Ensure you have the Solana CLI installed on your local machine or CI environment:

sh -c "$(curl -sSfL https://release.solana.com/v1.8.0/install)"
Step 2: Set Up a Solana Wallet

Then, you need a Solana wallet to interact with the blockchain. You can use the Solana CLI to create a new wallet:

solana-keygen new --outfile ~/my-solana-wallet.json

This command generates a new wallet and saves the keypair to ~/my-solana-wallet.json.

Step 3: Create a GitHub Workflow

Create a new GitHub Workflow file in your repository at .github/workflows/solana.yml:

name: Solana Integration

on:
  push:
    branches:
      - main

jobs:
  build:
    runs-on: ubuntu-latest

    steps:
      - name: Checkout code
        uses: actions/checkout@v2

      - name: Set up Solana CLI
        run: |
          sh -c "$(curl -sSfL https://release.solana.com/v1.8.0/install)"
          export PATH="/home/runner/.local/share/solana/install/active_release/bin:$PATH"
          solana --version

      - name: Build project
        run: |
          # Replace with your build commands
          echo "Building project..."
          echo "Build complete" > build-artifact.txt

      - name: Generate SHA-256 hash
        run: |
          sha256sum build-artifact.txt > build-artifact.txt.sha256
          cat build-artifact.txt.sha256

      - name: Store hash on Solana blockchain
        env:
          SOLANA_WALLET: ${{ secrets.SOLANA_WALLET }}
        run: |
          echo $SOLANA_WALLET > ~/my-solana-wallet.json
          solana config set --keypair ~/my-solana-wallet.json
          solana airdrop 1
          HASH=$(cat build-artifact.txt.sha256 | awk '{print $1}')
          solana transfer <RECIPIENT_ADDRESS> 0.001 --allow-unfunded-recipient --memo "$HASH"
Step 4: Configure GitHub Secrets

To securely store your Solana wallet keypair, add it as a secret in your GitHub repository:

  1. Go to your repository on GitHub.
  2. Click on Settings.
  3. Click on Secrets in the left sidebar.
  4. Click on New repository secret.
  5. Add a secret with the name SOLANA_WALLET and the content of your ~/my-solana-wallet.json file.
Step 5: Run the Workflow

Push your changes to the main branch to trigger the workflow. The workflow will:

  1. Check out the code.
  2. Set up the Solana CLI.
  3. Build the project.
  4. Generate a SHA-256 hash of the build artifact.
  5. Store the hash on the Solana blockchain.

Example Output and Actions

After the workflow runs, you can verify the transaction on the Solana blockchain using a block explorer like Solscan. The memo field of the transaction will contain the SHA-256 hash of the build artifact, ensuring its integrity and immutability.

Example Output:
Run sha256sum build-artifact.txt > build-artifact.txt.sha256
b1946ac92492d2347c6235b4d2611184a1e3d9e6 build-artifact.txt
Run solana transfer <RECIPIENT_ADDRESS> 0.001 --allow-unfunded-recipient --memo "b1946ac92492d2347c6235b4d2611184a1e3d9e6"
Signature: 5G9f8k9... (shortened for brevity)
Possible Actions:
  • Verify Artifact Integrity: Use the stored hash to verify the integrity of the build artifact before deployment.
  • Audit Trail: Maintain a transparent and immutable audit trail of all build artifacts.
  • Automate Deployments: Extend the workflow to trigger automated deployments based on the stored hashes.

Conclusion

Integrating Solana with GitHub Workflows provides a powerful way to enhance the security, transparency, and efficiency of your CI/CD pipelines.

By leveraging Solana’s blockchain technology, you can ensure the integrity and immutability of your build artifacts, automate deployment processes, and maintain transparent audit trails.

I have used solutions similar to this previously; by automatically adding a containers hash to an immutable database when it passes testing, while at the same time ensuring that the only images permissable for deployment in the next environment up (e.g. Production) exist on that list, you can (at least help to) ensure that only approved code is deployed.

If you’d like to learn more about Solana they have some great documentation and examples: https://solana.com/docs/intro/quick-start

Enhancing CI/CD Pipelines with Immutable Build Artifacts Using Crypto Technologies

Intro:

In the ever-evolving landscape of software development, ensuring the integrity and security of build artifacts is paramount. As CI/CD pipelines become more sophisticated, integrating cryptocurrency technologies can provide a robust solution for managing and securing build artifacts. This blog post delves into the concept of immutable build artifacts and how crypto technologies can enhance CI/CD pipelines.

Understanding CI/CD Pipelines

CI/CD pipelines are automated workflows that streamline the process of integrating, testing, and deploying code changes. They aim to:

  • Continuous Integration (CI): Automatically integrate code changes from multiple contributors into a shared repository, ensuring a stable and functional codebase.
  • Continuous Deployment (CD): Automatically deploy integrated code to production environments, delivering new features and fixes to users quickly and reliably.

The Importance of Immutable Build Artifacts

Build artifacts are the compiled binaries, libraries, and other files generated during the build process. Ensuring these artifacts are immutable—unchangeable once created—is crucial for several reasons:

  • Security: Prevents tampering and unauthorized modifications.
  • Reproducibility: Ensures that the same artifact can be deployed consistently across different environments.
  • Auditability: Provides a clear and verifiable history of artifacts.

Leveraging Crypto Technologies for Immutable Build Artifacts

Cryptocurrency technologies, particularly blockchain, offer unique advantages for managing build artifacts:

  • Decentralization: Distributes data across multiple nodes, reducing the risk of a single point of failure.
  • Immutability: Ensures that once data is written, it cannot be altered or deleted.
  • Transparency: Provides a transparent and auditable history of all transactions.

Implementing Immutable Build Artifacts in CI/CD Pipelines

  1. Generate Build Artifacts: During the CI process, generate the build artifacts as usual.
   # Example: Building a Docker image
   docker build -t my-app:latest .
  1. Create a Cryptographic Hash: Generate a cryptographic hash (e.g., SHA-256) of the build artifact to ensure its integrity.
   # Example: Generating a SHA-256 hash of a Docker image
   docker save my-app:latest | sha256sum
  1. Store the Hash on a Blockchain: Store the cryptographic hash on a blockchain to ensure immutability and transparency.
   # Example: Using a blockchain-based storage service
   blockchain-store --hash <generated-hash> --metadata "Build #123"
  1. Retrieve and Verify the Hash: When deploying the artifact, retrieve the hash from the blockchain and verify it against the artifact to ensure integrity.
   # Example: Verifying the hash
   retrieved_hash=$(blockchain-retrieve --metadata "Build #123")
   echo "<artifact-hash>  my-app.tar.gz" | sha256sum -c -

Example Workflow

  1. CI Pipeline:
  • Build the artifact (e.g., Docker image).
  • Generate a cryptographic hash of the artifact.
  • Store the hash on a blockchain.
  1. CD Pipeline:
  • Retrieve the hash from the blockchain.
  • Verify the artifact’s integrity using the retrieved hash.
  • Deploy the verified artifact to the production environment.

Benefits of Using Immutable Build Artifacts

  • Enhanced Security: Blockchain’s immutable nature ensures that build artifacts are secure and tamper-proof.
  • Improved Reproducibility: Immutable artifacts guarantee consistent deployments across different environments.
  • Increased Transparency: Blockchain provides a transparent and auditable history of all build artifacts.

Conclusion

Integrating cryptocurrency technologies with CI/CD pipelines to manage immutable build artifacts offers a range of benefits that enhance security, reproducibility, and transparency. By leveraging blockchain’s decentralized and immutable nature, organizations can ensure the integrity and authenticity of their build artifacts, providing a robust foundation for their CI/CD processes.

As the software development landscape continues to evolve, embracing these cutting-edge technologies will be crucial for maintaining a competitive edge and ensuring the reliability and security of software deployments. By implementing immutable build artifacts, organizations can build a more secure and efficient CI/CD pipeline, paving the way for future innovations.

ArgoCD and K8sGPT with KinD

This post covers a lot (very quickly and reasonably easily);

It starts with using Kuberenets in Docker (KinD) to create a minimal but functional local Kubernetes Cluster.
Then, ArgoCD is setup and a sample app is deployed to the cluster.
Finally, k8sgpt is configured and a basic analysis of the cluster is run.

The main point of all of this was to try out k8sgpt in a safe and disposable environment.

Step 1: Install kind

First, ensure you have kind installed.

KinD can be installed quickly and easily with just the following commands:

curl -Lo ./kind https://kind.sigs.k8s.io/dl/v0.17.0/kind-linux-amd64
chmod +x ./kind
sudo mv ./kind /usr/local/bin/kind

Check out this older post for more detail on KinD:
https://www.donaldsimpson.co.uk/2023/08/09/kind-local-kubernetes-with-docker-nodes-made-quick-and-easy/

Step 2: Create a kind Cluster

Create a new kind cluster:

kind create cluster --name argocd-cluster

Step 3: Install kubectl

Ensure you have kubectl installed. You can install it using the following command:

curl -LO "https://dl.k8s.io/release/$(curl -L -s https://dl.k8s.io/release/stable.txt)/bin/linux/amd64/kubectl"
chmod +x kubectl
sudo mv kubectl /usr/local/bin/

Step 4: Install ArgoCD

  1. Create the argocd namespace:
kubectl create namespace argocd
  1. Install ArgoCD using the official manifests:
kubectl apply -n argocd -f https://raw.githubusercontent.com/argoproj/argo-cd/stable/manifests/install.yaml

Step 5: Access the ArgoCD API Server

  1. Forward the ArgoCD server port to localhost:
kubectl port-forward svc/argocd-server -n argocd 8080:443
  1. Retrieve the initial admin password:
kubectl get secret argocd-initial-admin-secret -n argocd -o jsonpath="{.data.password}" | base64 -d; echo

Step 6: Login to ArgoCD

  1. Open your browser and navigate to https://localhost:8080.
  2. Login with the username admin and the password retrieved in the previous step.

Step 7: Install argocd CLI

  1. Download the argocd CLI:
curl -sSL -o argocd https://github.com/argoproj/argo-cd/releases/latest/download/argocd-linux-amd64
chmod +x argocd
sudo mv argocd /usr/local/bin/
  1. Login using the argocd CLI:
argocd login localhost:8080
  1. Set the admin password (optional):
argocd account update-password

Step 8: Deploy an Application with ArgoCD

  1. Create a new application:
argocd app create guestbook \
    --repo https://github.com/argoproj/argocd-example-apps.git \
    --path guestbook \
    --dest-server https://kubernetes.default.svc \
    --dest-namespace default
  1. Sync the application:
argocd app sync guestbook
  1. Check the application status:
argocd app get guestbook

Step 9: Install K8sGPT

  1. Install K8sGPT CLI:
curl -Lo k8sgpt https://github.com/k8sgpt-ai/k8sgpt/releases/latest/download/k8sgpt-linux-amd64
chmod +x k8sgpt
sudo mv k8sgpt /usr/local/bin/
  1. Configure K8sGPT:
k8sgpt auth --kubeconfig ~/.kube/config

Step 10: Inspect the Cluster with K8sGPT

  1. Run K8sGPT to inspect the cluster:
k8sgpt analyze

Example Output and Possible Associated Actions

Example Output:

[INFO] Analyzing cluster…

[INFO] Found 3 issues in namespace default:

[WARNING] Pod guestbook-frontend-5d8d4f5d6f-abcde is in CrashLoopBackOff state

[WARNING] Service guestbook-frontend is not reachable

[INFO] Deployment guestbook-frontend has 1 unavailable replica

Associated Actions:

  1. Pod in CrashLoopBackOff State:
    • Action: Check the logs of the pod to identify the cause of the crash.
    • Command: kubectl logs guestbook-frontend-5d8d4f5d6f-abcde -n default
    • Possible Fix: Resolve any issues found in the logs, such as missing environment variables, incorrect configurations, or application errors.
  2. Service Not Reachable:
    • Action: Verify the service configuration and ensure it is correctly pointing to the appropriate pods.
    • Command: kubectl describe svc guestbook-frontend -n default
    • Possible Fix: Ensure the service selector matches the labels of the pods and that the pods are running and ready.
  3. Deployment with Unavailable Replica:
    • Action: Check the deployment status and events to understand why the replica is unavailable.
    • Command: kubectl describe deployment guestbook-frontend -n default
    • Possible Fix: Address any issues preventing the deployment from scaling, such as resource constraints or scheduling issues.

Conclusion

Ok, addmitedly that was a bit of a whirlwind, but if you followed it you have successfully deployed ArgoCD to a kind cluster, deployed an application using ArgoCD to that new cluster, then inspected the cluster & app using K8sGPT.


The example output and associated actions provide guidance on how to address common issues identified by K8sGPT.


This setup allows you to manage your applications and monitor the health of your Kubernetes cluster effectively, and being able to spin up a disposable cluster like this is handy for many reasons.