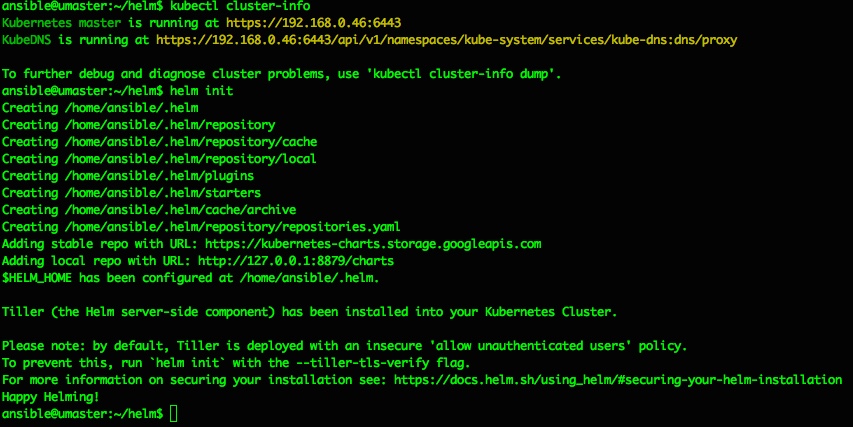
Kubernetes – setting up the hosts

Introduction

This is Step 1 in my recent Kubernetes setup where I very quickly describe the process followed to build and configure the basic requirements for a simple Kubernetes cluster.

Step 2 is here https://www.donaldsimpson.co.uk/2018/12/29/kubernetes-from-cluster-reset-to-up-and-running/

and Step 3 where I set up Helm and Tiller and deploy an initial chart to the cluster: https://www.donaldsimpson.co.uk/2019/01/03/kubernetes-adding-helm-and-tiller-and-deploying-a-chart/

The TL/DR

A quick summary should cover 99% of this, but I wanted to make sure I’d recorded my process/journey to get there – to cut a long story short, I ended up using this Ansible project:

https://github.com/DonaldSimpson/ansible-kubeadm


which I forked from the original here:

https://github.com/ben-st/ansible-kubeadm

on the 5 Ubuntu linux hosts I created by hand (the horror) on my VMWare ESX home lab server. I started off writing my own ansible playbook which did the job, then went looking for improvements and found the above fitted my needs perfectly.

The inventory file here: https://github.com/DonaldSimpson/ansible-kubeadm/blob/master/inventory details the addresses and functions of the 5 hosts – 4 x workers and a single master, which I’m planning on keeping solely for master role.

My notes:

Host prerequisites are in my rough notes below – simple things like ssh keys, passwwordless sudo from the ansible user, installing required tools like python, setting suitable ip addresses and adding the users you want to use. Also allocating suitable amounts of mem, cpu and disk – all of which are down to your preference, availability and expectations.

https://kubernetes.io/docs/setup/independent/create-cluster-kubeadm/

ubuntumaster is 192.168.0.46
su – ansible
check history

ansible setup

https://www.howtoforge.com/tutorial/setup-new-user-and-ssh-key-authentication-using-ansible/
1 x master  - sudo apt-get install open-vm-tools-desktop - sudo apt install openssh-server vim whois python ansible - export TERM=linux re https://stackoverflow.com/questions/49643357/why-p-appears-at-the-first-line-of-vim-in-iterm
 - /etc/hosts:
127.0.1.1       umaster
192.168.0.43    ubuntu01
192.168.0.44    ubuntu02
192.168.0.45    ubuntu03
// slave nodes need:ssh-rsa AAAAB3NzaC1y<snip>fF2S6X/RehyyJ24VhDd2N+Dh0n892rsZmTTSYgGK8+pfwCH/Vv2m9OHESC1SoM+47A0iuXUlzdmD3LJOMSgBLoQt ansible@umaster
added to root user auth keys in .ssh and apt install python ansible -y
//apt install python ansible -y
useradd -m -s /bin/bash ansible
passwd ansible <type the password you want>

echo  -e ‘ansible\tALL=(ALL)\tNOPASSWD:\tALL’ > /etc/sudoers.d/ansibleecho  -e 'don\tALL=(ALL)\tNOPASSWD:\tALL' > /etc/sudoers.d/don
mkpasswd --method=SHA-512 <type password "secret">
Password:
$6$dqxHiCXHN<snip>rGA2mvE.d9gEf2zrtGizJVxrr3UIIL9Qt6JJJt5IEkCBHCnU3nPYH/
su - ansible
ssh-keygen -t rsa

cd ansible01/
vim inventory.ini
ansible@umaster:~/ansible01$ cat inventory.ini
[webserver]
ubuntu01 ansible_host=192.168.0.43
ubuntu02 ansible_host=192.168.0.44
ubuntu03 ansible_host=192.168.0.45

ansible@umaster:~/ansible01$ cat ansible.cfg
[defaults]
 inventory = /home/ansible/ansible01/inventory.ini
ansible@umaster:~/ansible01$ ssh-keyscan 192.168.0.43 >> ~/.ssh/known_hosts
# 192.168.0.43:22 SSH-2.0-OpenSSH_7.6p1 Ubuntu-4
ansible@umaster:~/ansible01$ ssh-keyscan 192.168.0.44 >> ~/.ssh/known_hosts
# 192.168.0.44:22 SSH-2.0-OpenSSH_7.6p1 Ubuntu-4
ansible@umaster:~/ansible01$ ssh-keyscan 192.168.0.45 >> ~/.ssh/known_hosts
# 192.168.0.45:22 SSH-2.0-OpenSSH_7.6p1 Ubuntu-4
ansible@umaster:~/ansible01$ cat ~/.ssh/known_hosts
or could have donefor i in $(cat list-hosts.txt)
do
ssh-keyscan $i >> ~/.ssh/known_hosts
done
cat deploy-ssh.yml

 – hosts: all
   vars:
     – ansible_password: ‘$6$dqxHiCXH<kersnip>l.urCyfQPrGA2mvE.d9gEf2zrtGizJVxrr3UIIL9Qt6JJJt5IEkCBHCnU3nPYH/’
  gather_facts: no
   remote_user: root

   tasks:

   – name: Add a new user named provision
     user:
          name=ansible
          password={{ ansible_password }}

   – name: Add provision user to the sudoers
     copy:
          dest: “/etc/sudoers.d/ansible”
          content: “ansible ALL=(ALL)  NOPASSWD: ALL”

   – name: Deploy SSH Key
     authorized_key: user=ansible
                     key=”{{ lookup(‘file’, ‘/home/ansible/.ssh/id_rsa.pub’) }}”
                     state=present

   – name: Disable Password Authentication
     lineinfile:
           dest=/etc/ssh/sshd_config
           regexp=’^PasswordAuthentication’
           line=”PasswordAuthentication no”
           state=present
           backup=yes
     notify:
       – restart ssh

   – name: Disable Root Login
     lineinfile:
           dest=/etc/ssh/sshd_config
           regexp=’^PermitRootLogin’
           line=”PermitRootLogin no”
           state=present
           backup=yes
     notify:
       – restart ssh

   handlers:
   – name: restart ssh
     service:
       name=sshd
       state=restarted

// end of the above file

ansible-playbook deploy-ssh.yml –ask-pass
results inLAY [all] *********************************************************************************************************************************************************************************************************************************************************************

TASK [Add a new user named provision] ******************************************************************************************************************************************************************************************************************************************
fatal:

[ubuntu02]

: FAILED! => {"msg": "to use the 'ssh' connection type 
with passwords, you must install the sshpass program"}
for each node/slave/hostsudo apt-get install -y sshpass
ubuntu01 ansible_host=192.168.0.43
ubuntu02 ansible_host=192.168.0.44
ubuntu03 ansible_host=192.168.0.45

kubernetes setup
https://www.techrepublic.com/article/how-to-quickly-install-kubernetes-on-ubuntu/run install_apy.yml against all hosts and localhost too
on master:

kubeadm init

results in:root@umaster:~# kubeadm init
[init] using Kubernetes version: v1.11.1
[preflight] running pre-flight checks
I0730 15:17:50.330589   23504 kernel_validator.go:81] Validating kernel version
I0730 15:17:50.330701   23504 kernel_validator.go:96] Validating kernel config
    [WARNING SystemVerification]: docker version is greater than the most recently validated version. Docker version: 17.12.1-ce. Max validated version: 17.03
[preflight] Some fatal errors occurred:
    [ERROR Swap]: running with swap on is not supported. Please disable swap
[preflight] If you know what you are doing, you can make a check non-fatal with `–ignore-preflight-errors=…`
root@umaster:~#
doswapoff -a then try again
kubeadm init… wait for images to be pulled etc – takes a while

Your Kubernetes master has initialized successfully!

To start using your cluster, you need to run the following as a regular user:

  mkdir -p $HOME/.kube
  sudo cp -i /etc/kubernetes/admin.conf $HOME/.kube/config
  sudo chown $(id -u):$(id -g) $HOME/.kube/config

You should now deploy a pod network to the cluster.
Run “kubectl apply -f [podnetwork].yaml” with one of the options listed at:
https://kubernetes.io/docs/concepts/cluster-administration/addons/

You can now join any number of machines by running the following on each node
as root:

  kubeadm join 192.168.0.46:6443 --token 9e85jo.77nzvq1eonfk0ar6 --discovery-token-ca-cert-hash sha256:61d4b5cd0d7c21efbdf2fd64c7bca8f7cb7066d113daff07a0ab6023236fa4bc
root@umaster:~#

Next up…

The next post in the series is here: https://www.donaldsimpson.co.uk/2018/12/29/kubernetes-from-cluster-reset-to-up-and-running/ and details an automated process to scrub my cluster and reprovision it (form a Kubernetes point of view – the hosts are left intact).

Kubernetes – from cluster reset to up and running

This is Step 2 in a series of Kubernetes blog posts

Step 1 covers the initial host creation and basic provisioning with Ansible: https://www.donaldsimpson.co.uk/2019/01/03/kubernetes-setting-up-the-hosts/

and Step 3 is where I set up Helm and Tiller and deploy an initial chart to the cluster: https://www.donaldsimpson.co.uk/2019/01/03/kubernetes-adding-helm-and-tiller-and-deploying-a-chart/

These are notes on going from a freshly reset kubernetes cluster to a running & healthy cluster with a pod network applied and worker nodes connected.

To get to this starting point I provisioned 4 Ubuntu hosts (1 master & 3 workers) on my VMWare server – a Dell Poweredge R710 with 128GB RAM.

I then used this Ansible project:

https://github.com/DonaldSimpson/ansible-kubeadm

to configure the hosts and prep for Kubernetes with kubeadm:

https://kubernetes.io/docs/setup/production-environment/tools/kubeadm/create-cluster-kubeadm/

I’ll write about this in more detail in another post…

Please note that none of this is production grade or recommended, it’s simply what I have done to suit my needs in my home lab. My focus is on automating Kubernetes processes and deployments, not creating highly available bullet-proof production systems.

To reset and restore a ‘new’ cluster, first on the master instance – reboot and as a normal user (I’m using an “ansible” user with sudo throughout):


sudo kubeadm reset
(y)
sudo swapoff -a
sudo kubeadm init --pod-network-cidr=10.244.0.0/16

I’m passing that CIDR address as I’m using Flannel for pod networking (details follow) – if you use something else you may not need that, but may well need something else.

That should be the MASTER started, with a message to add nodes with:


  kubeadm join 192.168.0.46:6443 --token 9w09pn.9i9uu1ht8gzv36od --discovery-token-ca-cert-hash sha256:4bb0bbb1033a96347c6dd888c769ec9c5f6caa1b699066a58720ffdb97a0f3d7

which all sounds good, but the first most basic check produces the following error:


ansible@umaster:~$ kubectl cluster-info
To further debug and diagnose cluster problems, use 'kubectl cluster-info dump'.
Unable to connect to the server: x509: certificate signed by unknown authority (possibly because of "crypto/rsa: verification error" while trying to verify candidate authority certificate "kubernetes")

which I think is due to the kubeadm reset cleaning up the previous config, but can be easily fixed with this:


mkdir -p $HOME/.kube
sudo cp -i /etc/kubernetes/admin.conf $HOME/.kube/config
sudo chown $(id -u):$(id -g) $HOME/.kube/config

then it works and MASTER is up and running ok:


ansible@umaster:~$ sudo kubectl cluster-info
Kubernetes master is running at https://192.168.0.46:6443
KubeDNS is running at https://192.168.0.46:6443/api/v1/namespaces/kube-system/services/kube-dns:dns/proxy
To further debug and diagnose cluster problems, use 'kubectl cluster-info dump'.

————- ADD NODES ——————

Use the command and token provided by the master on the worker node(s) (in my case that’s “ubuntu01” to “ubuntu04”). Again I’m running as the ansible user everywhere, and I’m disabling swap and doing a kubeadm reset first as I want this repeatable:

sudo swapoff -a
sudo kubeadm reset
sudo  kubeadm join 192.168.0.46:6443 --token 9w09pn.9i9uu1ht8gzv36od --discovery-token-ca-cert-hash sha256:4bb0bbb1033a96347c6dd888c769ec9c5f6caa1b699066a58720ffdb97a0f3d7

I think the token expires after a few hours. If you want to get a new one you can query the Master using:

https://kubernetes.io/docs/reference/setup-tools/kubeadm/kubeadm-token/

Or, as I’ve just found out, the more recent versions ok k8s provide “kubeadm token create –print-join-command”, which provide output like the following example that you can save to a file/variable/whatever:

kubeadm join 192.168.0.46:6443 --token 8z5obf.2pwftdav48rri16o --discovery-token-ca-cert-hash sha256:2fabde5ad31a6f911785500730084a0e08472bdcb8cf935727c409b1e94daf44

I believe options to specify json or alternative output formatting is in the works too.

That’s all that is needed, if you’ve not used this node already it may take a while to pull things in but if you have it should be pretty much instant.

When ready, running a quick check on the MASTER shows the connected node (ubuntu01) and the Master (umaster) and their status:


ansible@umaster:~$ sudo kubectl get nodes --all-namespaces
NAME       STATUS     ROLES    AGE     VERSION
ubuntu01   NotReady   <none>   27s     v1.13.1
umaster    NotReady   master   8m26s   v1.13

The NotReady status is because there’s no pod network available – see here for details and options:

https://kubernetes.io/docs/setup/independent/create-cluster-kubeadm/#pod-network

so apply a pod network (I’m using flannel) like this on the Master only:


ansible@umaster:~$ sudo kubectl apply -f https://raw.githubusercontent.com/coreos/flannel/bc79dd1505b0c8681ece4de4c0d86c5cd2643275/Documentation/kube-flannel.yml
clusterrole.rbac.authorization.k8s.io/flannel created
clusterrolebinding.rbac.authorization.k8s.io/flannel created
serviceaccount/flannel created
configmap/kube-flannel-cfg created
daemonset.extensions/kube-flannel-ds-amd64 created
daemonset.extensions/kube-flannel-ds-arm64 created
daemonset.extensions/kube-flannel-ds-arm created
daemonset.extensions/kube-flannel-ds-ppc64le created
daemonset.extensions/kube-flannel-ds-s390x created

Then check again and things should look better now they can communicate…


ansible@umaster:~$ sudo kubectl get nodes --all-namespaces
NAME       STATUS   ROLES    AGE     VERSION
ubuntu01   Ready    <none>   2m23s   v1.13.1
umaster    Ready    master   10m     v1.13.1
ansible@umaster:~$

Adding any number of subsequent nodes is very easy and exactly the same (the pod networking setup is a one-off step on the master only). I added all 4 of my worker vms and checked they were all Ready and “schedulable”. My server coped with this no problem at all. Note that by default you can’t schedule tasks on the Master, but this can be changed if you want to.

That’s the very basic “reset and restore” steps done. I plan to add this process to a Jenkins Pipeline, so that I can chain a complete cluster destroy/reprovision and application build, deploy and test process together.

The next steps I did were to:

  • install the Kubernetes Dashboard to the cluster
  • configure the Kubernetes Dashboard and fix permissions
  • deploy a sample application, replicaset & service and expose it to the network
  • configure Heapster

which I’ll post more on soonish… and I’ll add the precursor to this post on the host provisioning and kubeadm setup too.

Meetup – Deploying Openshift to AWS with HashiCorp Terraform and Ansible


Automated IT Solutions presented a talk on “Deploying Openshift to AWS with HashiCorp Terraform and Ansible”, by Liam Lavelle on 16th October 2018.


We would like to thank


  • Liam Lavelle for an interesting, informative and fun session
  • Everyone that came along to make it such a good event, with some great questions, helpful answers and interesting discussions
  • Hays for the beer, pizza, venue and help with everything

Hope to see you all at the next one soon!

The slides and all materials used in this session are available on our GitHub repo here:


Deploying Openshift to AWS with HashiCorp Terraform and Ansible

Tuesday, Oct 16, 2018, 6:15 PM

HAYS
7 Castle St, Edinburgh EH2 3AH Edinburgh, GB

30 Members Went

In this session we look at Infrastructure as Code and Configuration as Code, as we demonstrate how to use these approaches to deploy RedHat OpenShift to AWS with HashiCorp Terraform and Ansible. We start off with configuring AWS credentials, then use HashiCorp Terraform to create the AWS infrastructure needed to deploy and run our own RedHat OpenSh…

Check out this Meetup →


Here are the details:
When:
Tuesday, October 16th, 2018
6:15 PM to 9:00 PM


Where:
Hays office on the 2nd floor
7 Castle St, Edinburgh EH2 3AH · Edinburgh


What:
Deploying Openshift to AWS with HashiCorp Terraform and Ansible


Agenda:

In this session we look at Infrastructure as Code and Configuration as Code, as we demonstrate how to use these approaches to deploy RedHat OpenShift to AWS with HashiCorp Terraform and Ansible.

We start off with configuring AWS credentials, then use HashiCorp Terraform to create the AWS infrastructure needed to deploy and run our own RedHat OpenShift cluster.

We then go through using Ansible to deploy OpenShift to AWS, followed by a review of the Cluster, then take a quick look at troubleshooting any issues you may encounter.

There will be a break in the middle for beer & pizza courtesy of Hays, and we will wrap things up with a quick Q&A and feedback session.

If you would like to bring your own laptop and follow along, please do!

Who:
Intermediate Linux and some AWS knowledge is useful but not essential.

Wooden boards

A few pics of some roughly milled Ash planks a friend gave us, which I planed/thicknessed and cut to length & height to create kitchen kick-boards.

Followed by a few pics of a chopping board I finished off at the same time.

The planks had been sitting around the yard for quite a while… here they are after a quick initial run through the planer:

Close up after sanding and applying a load of Danish oil:

Drying in the sun:

The boards are in place now and I’ll add some pics if the kitchen is ever clean enough 🙂


Some close up pics of a couple of chopping board made from a sleeper another friend gave me about 5 years ago – he’d had it for yonks so it must be pretty old wood. I left them extra chunky so when they get too scored and cut I can resurface them several times:

New Meetup – Vagrant from scratch to LAMP stack

Automated IT Solutions are running a new Meetup in Edinburgh on Friday 18th May, check out the details and register for this free session here – beer, pizza and free HashiCorp stickers included!:

Vagrant from scratch to LAMP stack

Friday, May 18, 2018, 6:15 PM

HAYS
7 Castle St, Edinburgh EH2 3AH Edinburgh, GB

18 Members Attending

Automated IT Solutions are presenting a session on HashiCorp Vagrant: “from scratch to LAMP stack” by Adam Cheney. In this session you will learn: – Vagrant basics, introduction and usage – How to install and configure Vagrant – Provisioning VMs with Vagrant and Ansible followed by a live demonstration/workshop of building a LAMP stack within Vagra…

Check out this Meetup →

Spalted Beech bowl – green woodturning

The weather’s finally warm enough for me to do some woodturning again.

I’ve been wanting to make some more “green” Beech bowls from the trees I chopped up early last year. Here are pics of the process.

chainsawed a “50p” shaped bowl blank from a slab of wood that’s been sitting in the shed:

quickly and easily made round – green wood cuts very easily, and smells good too!

spinning at about 2,000 rpm:really nice spalting all the way through: some homemade beeswax and oil applied, with help from a bit of heat: inside done too… and the underneath finished in the reversing jaws: all done – will try and let it finish drying out slowly to avoid serious cracking, but it’s bound to warp a fair bit…

Adding an insecure-registry to Docker on Ubuntu

Quick note on adding an entry like –insecure-registry 172.30.0.0/16 to docker running on Ubuntu.

While trying to get oc cluster up working on an Ubuntu VM I was getting the following error message and (helpfully) a suggested solution:

don@ubuntu:~# oc cluster up doncluster
Starting OpenShift using registry.access.redhat.com/openshift3/ose:v3.7.23 ...
-- Checking OpenShift client ... OK
-- Checking Docker client ... OK
-- Checking Docker version ... OK
-- Checking for existing OpenShift container ... OK
-- Checking for registry.access.redhat.com/openshift3/ose:v3.7.23 image ... OK
-- Checking Docker daemon configuration ... FAIL
   Error: did not detect an --insecure-registry argument on the Docker daemon
   Solution:
     Ensure that the Docker daemon is running with the following argument:
         --insecure-registry 172.30.0.0/16

I normally work on RedHat boxes, and this is usually easily solved by going to /etc/sysconfig/docker and adding the desired registry to the line:

INSECURE_REGISTRY=

On more recent RedHat docker installs this is now done in the externalised config file /etc/containers/registries.conf.

On my Ubuntu VM neither of these exist, and running locate with grep plus a quick google brings back loads of other file locations and suggestions, none of which worked for me (/etc/default/docker, exporting DOCKER_OPTS etc etc).

So, I checked systemctl status docker and got the following:

don@ubuntu:~# systemctl status docker
● docker.service - Docker Application Container Engine
 Loaded: loaded (/lib/systemd/system/docker.service; enabled; vendor preset: enabled)
 Active: active (running) since Wed 2018-01-24 11:29:25 GMT; 25min ago
 Docs: https://docs.docker.com
 Main PID: 4648 (dockerd)
 Tasks: 19 (limit: 19660)
 Memory: 26.8M
 CPU: 1.324s
 CGroup: /system.slice/docker.service
 ├─4648 /usr/bin/dockerd -H fd:// --insecure-registry 172.30.0.0/16
 └─4667 docker-containerd -l unix:///var/run/docker/libcontainerd/docker-containerd.sock --shim docker-containerd-shim --metrics-interval=0 --start-timeout 2m --state-di (...snip)

which prompted me to look at the file

/lib/systemd/system/docker.service

Adding the settings I wanted to the end of the ExecStart line like so:

ExecStart=/usr/bin/dockerd -H fd:// --insecure-registry 172.30.0.0/16

followed by a

systemctl daemon-reload
systemctl restart docker

did the trick, finally.

I am now hitting this issue, which looks like a systemd + docker mismatch… and am thinking CentOS may be a better place to test this!

don@ubuntu:~# oc cluster up doncluster
Starting OpenShift using registry.access.redhat.com/openshift3/ose:v3.7.23 ...
-- Checking OpenShift client ... OK
-- Checking Docker client ... OK
-- Checking Docker version ... OK
-- Checking for existing OpenShift container ... OK
-- Checking for registry.access.redhat.com/openshift3/ose:v3.7.23 image ... OK
-- Checking Docker daemon configuration ... OK
-- Checking for available ports ... FAIL
   Error: Cannot get TCP port information from Kubernetes host
   Caused By:
     Error: cannot start container cec56a101a46aa25adb6806f7c84df218e5d79c392fa0c38207f92510eb46538
     Caused By:
       Error: Error response from daemon: {"message":"oci runtime error: rootfs_linux.go:53: mounting \"/sys/fs/cgroup\" to rootfs \"/var/lib/docker/aufs/mnt/aeedaa83596edc9cb2b2cd835000277f9a5355f709694f8ec70d88787395cbd0\" caused \"no subsystem for mount\""}

argh.

Getting started with Terraform and AWS

These are my notes from running through the Terraform getting started guide here:

https://www.terraform.io/intro/getting-started/install.html

to set up terraform (on a Mac) and provision a basic test instance in AWS.

Install process

This is very easy, simply download terraform for your platform (a single binary), extract it somewhere sensible and add that location to your PATH variable.

I set this up in my .profile, along the lines of:

export TFORM=/Users/donaldsimpson/TFORM
export PATH=$M2:$TFORM:$PATH

quick check that all looks ok:

Setup

As per the guide, the next steps are to get a note of your AWS access_key and secret_key from this AWS page, then create and edit a local “example.tf” file for your project, like this:

provider "aws" {
  access_key = "ACCESS_KEY_HERE"
  secret_key = "SECRET_KEY_HERE"
  region     = "us-east-1"
}

resource "aws_instance" "example" {
  ami           = "ami-2757f631"
  instance_type = "t2.micro"
}

I hit this issue: https://github.com/hashicorp/terraform/issues/4367 as my AWS account is pretty old, and had to change the values for

ami = "ami-2757f631"
instance_type = "t2.micro"

to be:

ami = "ami-408c7f28"
instance_type = "t1.micro"

Terraform init

You should now be able to run terraform init and see something positive…

Check the plan

Running “terraform plan” provides a dry run/sanity check of what would be done

Make it so

terraform apply: run the plan, and actually create the resources listed above:

Show it is so

Once that has completed, you can check your AWS console and see the newly created instance:

“terraform show” can confirm the same details in a less pointy-clickety way:

Next steps

This was all pretty simple, quick and straightforward.

The next steps are to manage the hosts in an Infrastructure as Code manner, adding in changes and deletions/reprovisioning, and to do something useful with them.

I’d also like to try using Terraform with Digital Ocean and VMWare providers.


Pin It on Pinterest

%d bloggers like this: